

About SpeakerTimerPro
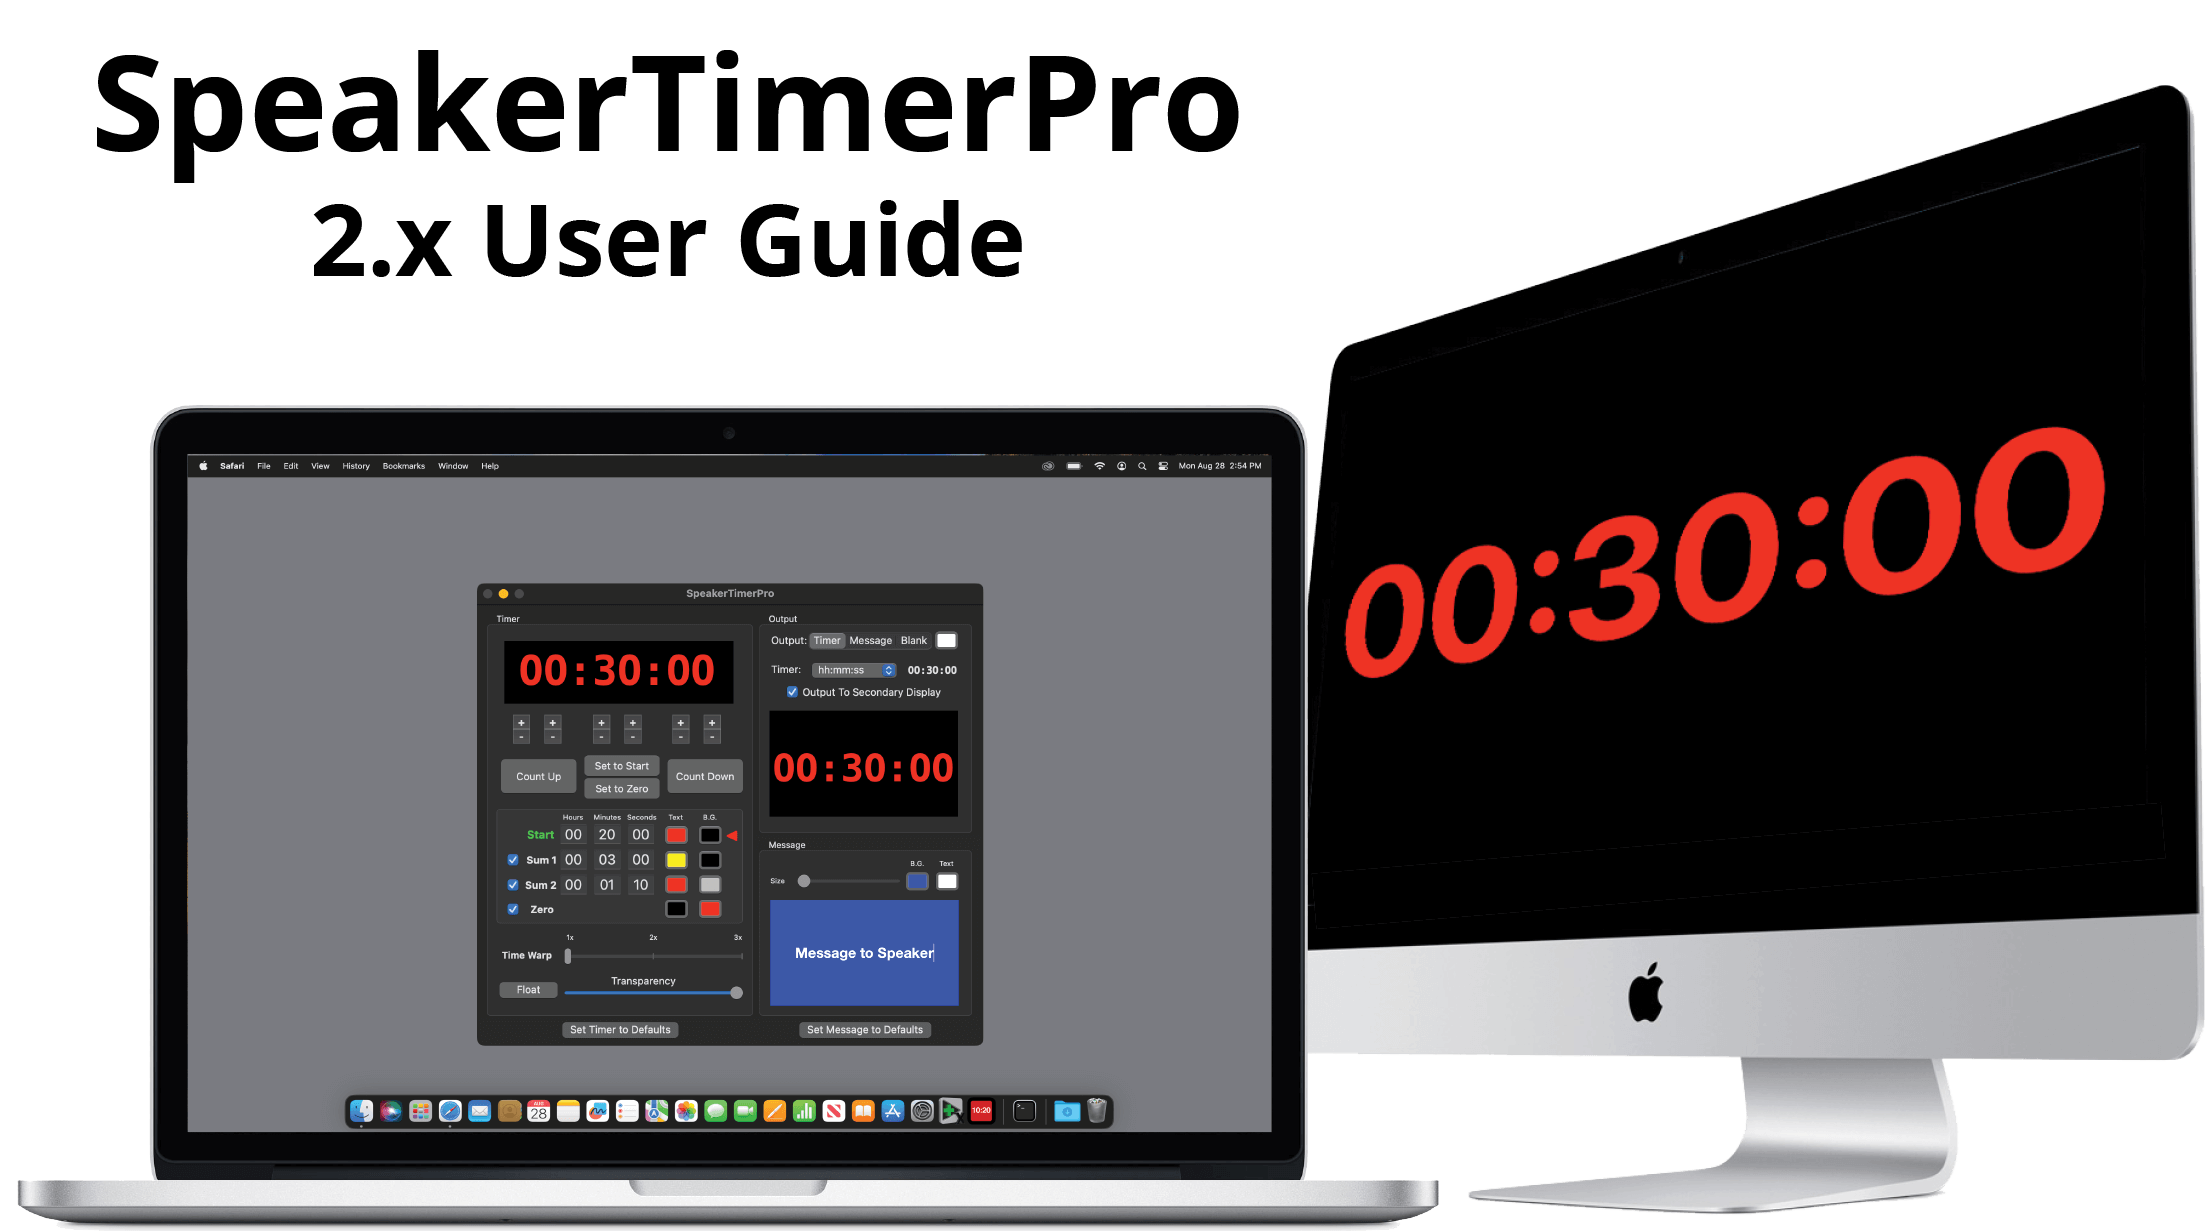
SpeakerTimerPro is a fullscreen customizable speaker timer application with customizable background color options that can be changed at user-defined times during a countdown. The timer can count up or down and our unique Time Warp feature allows a subtle increase in the speed of the counter to help get a show back on time.
Table of Contents
Before You Begin

PreFlight

Each version of macOS has specific settings which have a great impact on playback performance. Before you begin, please visit www.dtvideolabs.com/preflight.This page also includes a link to a printable PDF if needed.
Setup

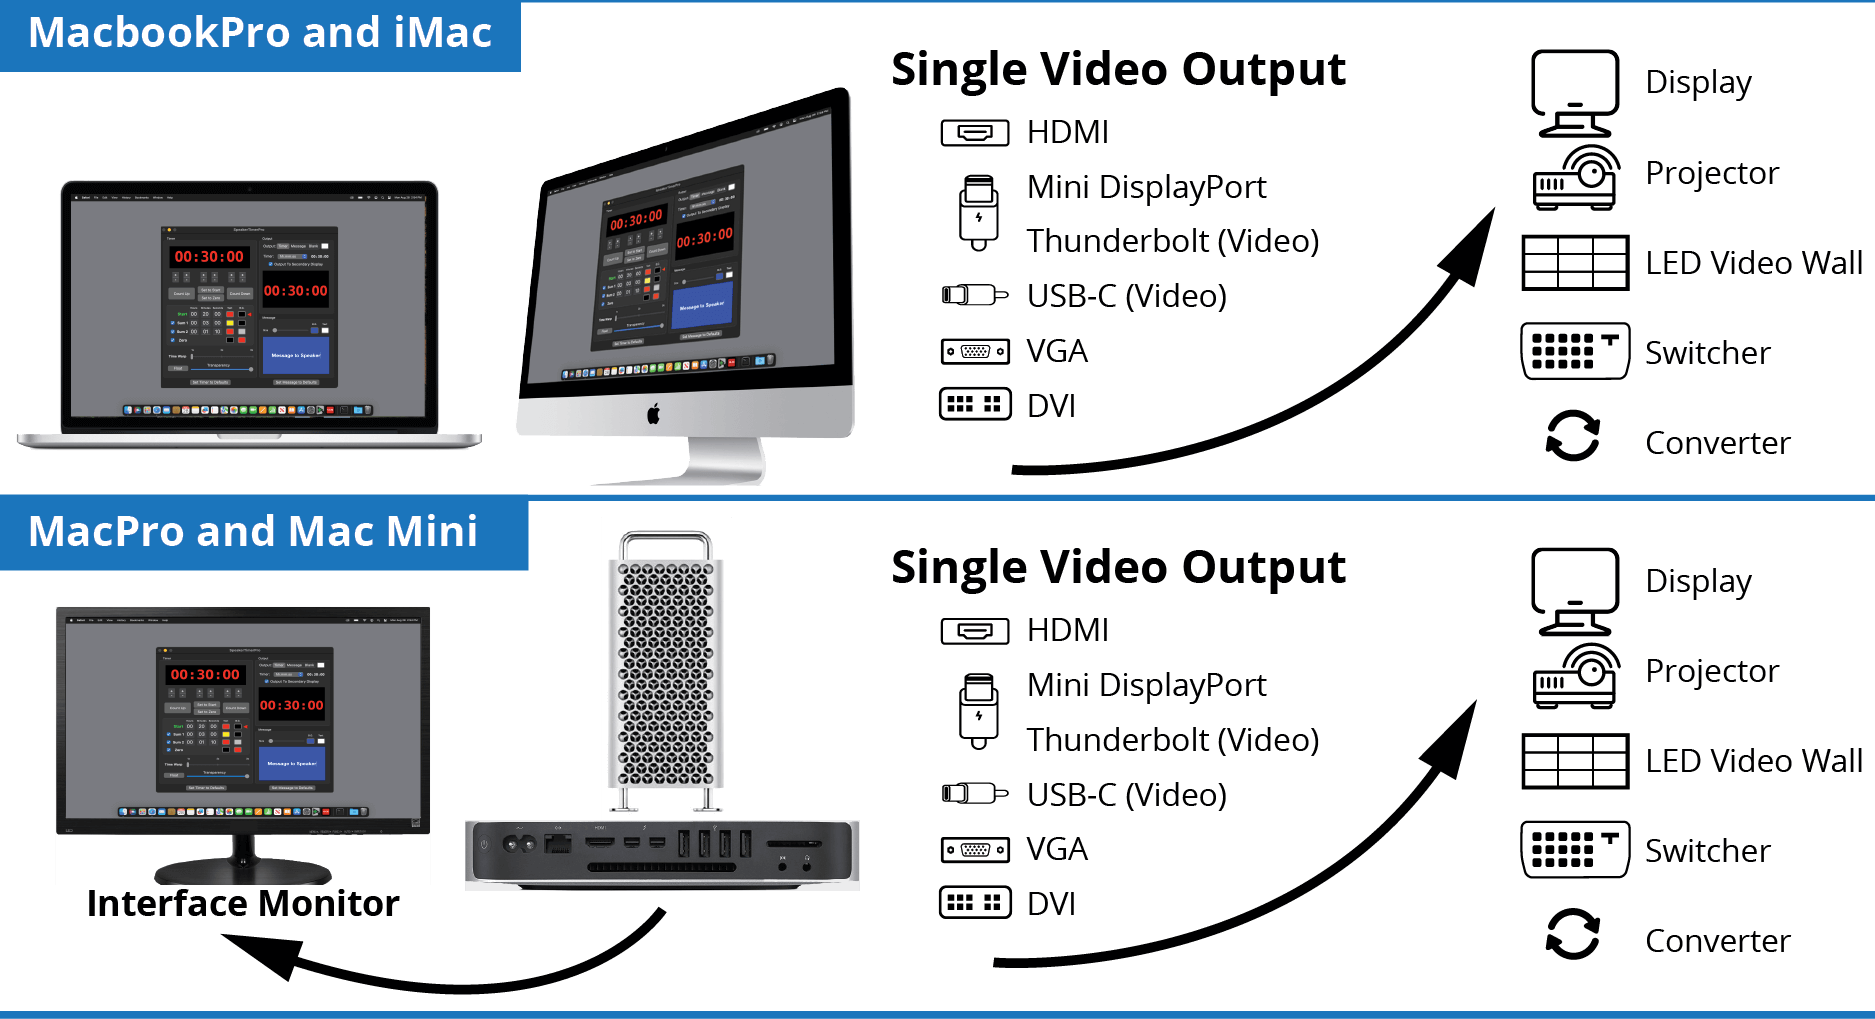
General Hardware Setup
Connecting a SpeakerTimerPro system is simple. By using modern Apple video adapters or third party converters, SpeakerTimerPro easily connects with high-resolution monitors, video projectors, LED video walls, professional switchers and converters.
SpeakerTimerPro is not compatible with video output devices such as the AJA T-TAP or Blackmagic UltraStudio devices. Please visit our FAQ for current information.

License Activation
Activating an Internet Activated (IA) Serial Number
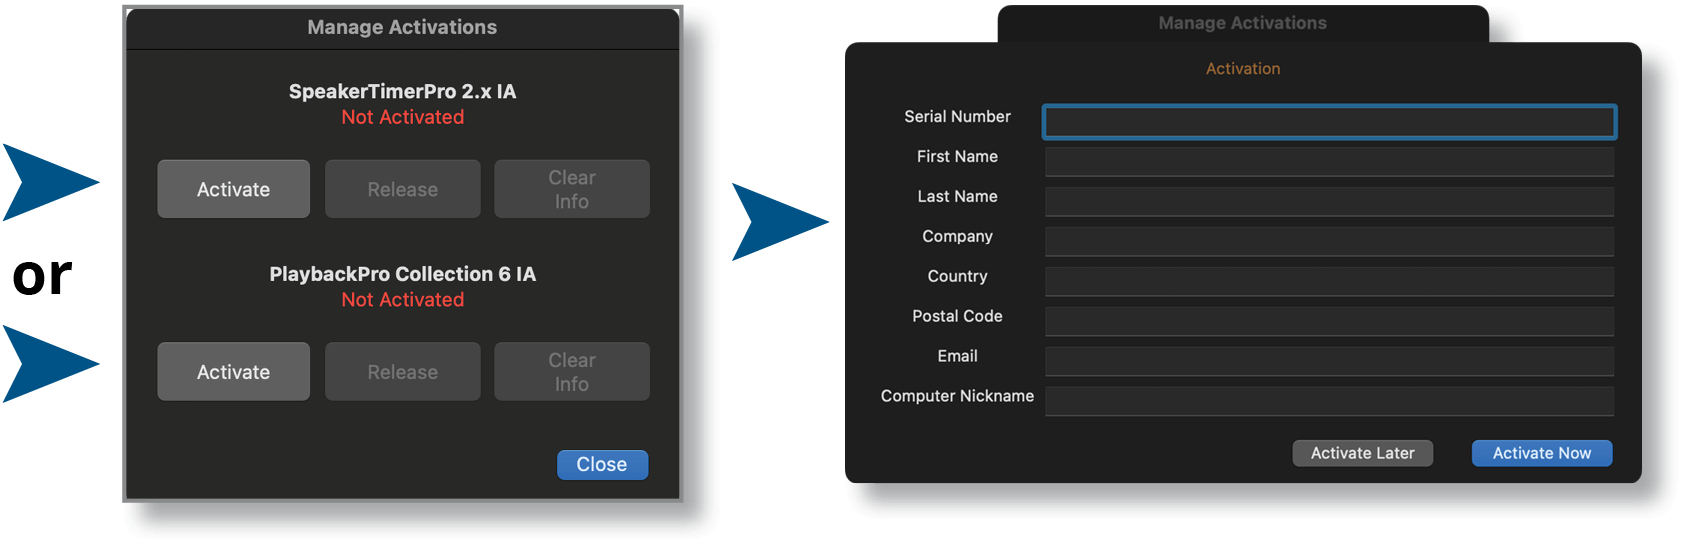
SpeakerTimerPro can be activated using a serial code from either SpeakerTimerPro or the PlaybackPro Collection.
- Download the SpeakerTimerPro IA application from the link provided in your purchase email or from the Internet Activated (IA) table on www.dtvideolabs.com/downloads
-
Place the unzipped program file into the Applications folder then
double click to launch.
A delay of up to 10 seconds can occur when launching the application. This is normal behavior as the application checks the license. - In the dialog box click the “Activate” button under the name of the application to be activated
- Enter the serial number provided at the time of purchase, including the dashes. A DT Videolabs serial number will always be 4 sets of 8 digits, separated by dashes. For example, xxxxxxxx-xxxxxxxx-xxxxxxxx-xxxxxxxx. Enter your personal registration information in the remaining fields and click “Activate Now”. It is important that you enter something in each of the fields.
Notes
- Internet access is required to activate or release a license, however it is not necessary for program use once a license is activated
- Registration information can be unique each time an application is activated
- Licenses are single seat and allow for the use of one application at a time, on one computer at a time
- License may be released from one computer and moved to another using the release process outlined below and at www.dtvideolabs.com/activation
Once activated, the Application Control Window will appear. If you encounter any problems during activation, please visit www.dtvideolabs.com/contact or email technical@dtvideolabs.com.
Releasing an Internet Activated Serial Number
Connect the computer to the internet
- Launch SpeakerTimerPro
- Go to the SpeakerTimerPro menu (to the left of the File Menu), select “Manage Licenses”
- Store the serial number. A DT Videolabs serial number will always be 4 sets of 8 digits with dashes in-between.
- Click on “Release License”. The system will report when the license has been successfully released and available to activate on another system.
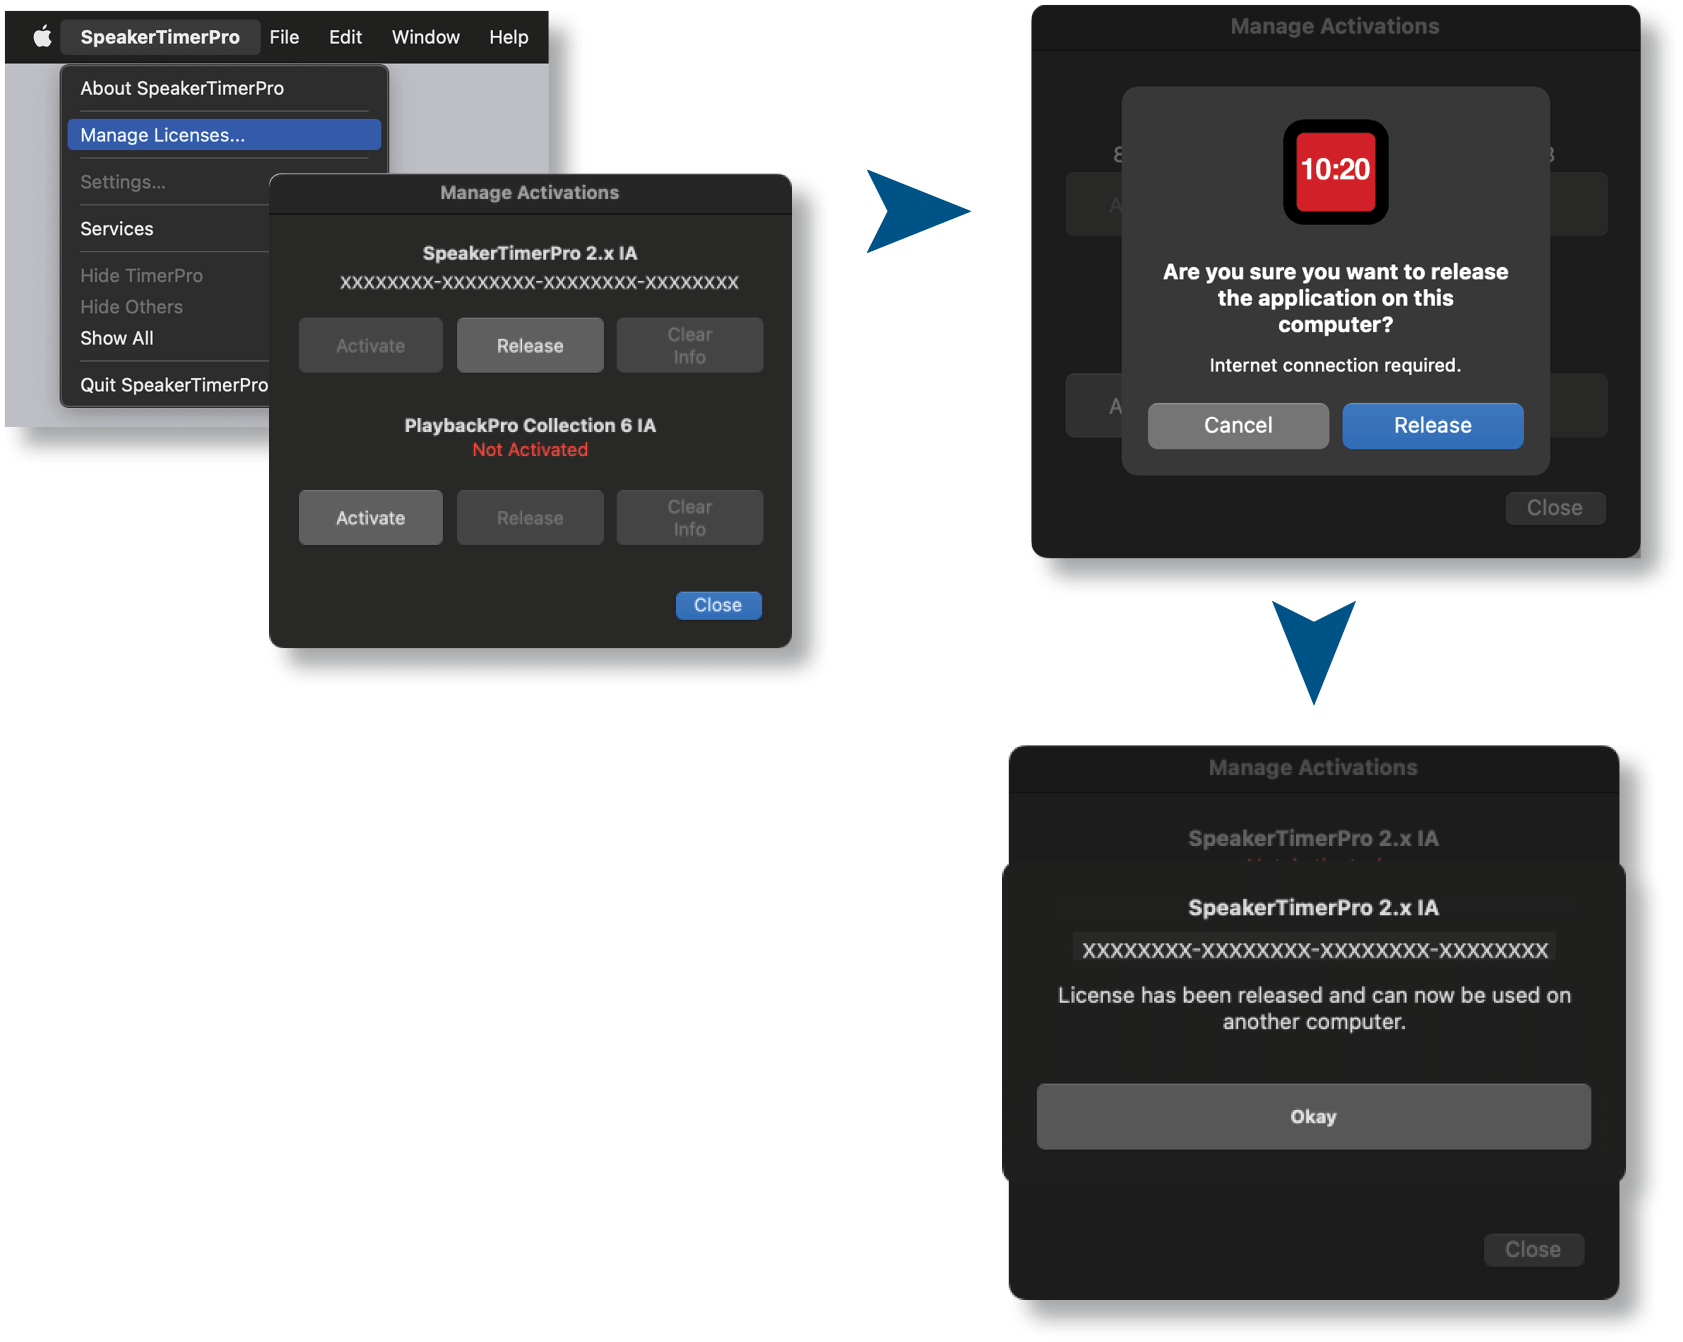
***IMPORTANT*** License information will be retained on your system after you release a license. Users of previous versions will notice the addition of the “Clear Info” button which removes previous license info from your system and can aid in troubleshooting. If you have trouble activating a license, clear the info and try activating again. If you use the “Clear Info” button, it is important for you to retain a copy of your license number so you can reactivate.
New USB Installation Collection Instructions
Connect the computer to the internet
- Insert the USB Enabler key into the system
- If you haven’t already, go to www.dtvideolabs.com/downloads to download the Collection
- Place the unzipped program files into the Applications folder then double click an application to launch
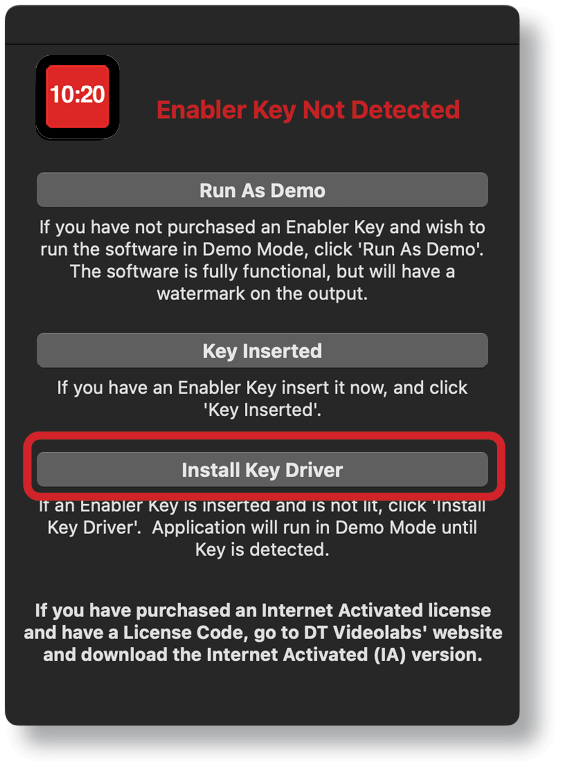
- If running an application on a system for the first time, a window will open after you attempt to create or open a show. Select “Install Key Driver”and follow the on-screen instructions

Demo Mode
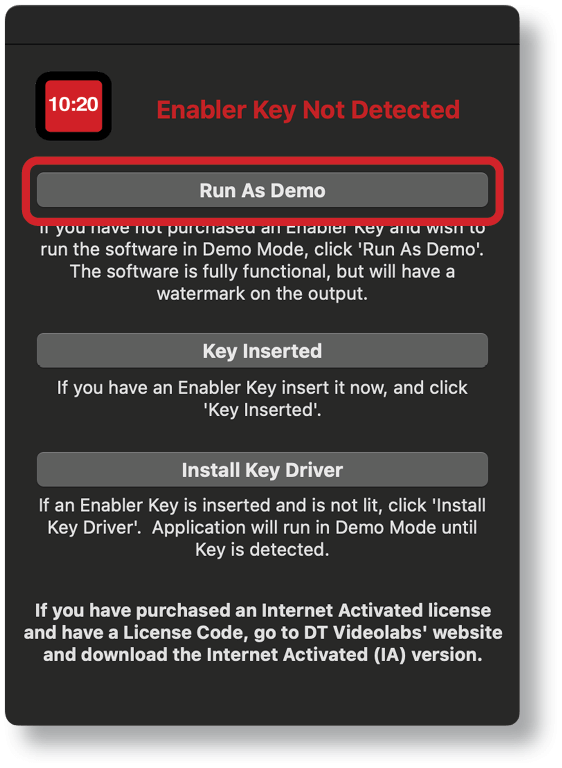
If you need to evaluate SpeakerTimerPro, the USB version can be used in Demo mode. It is fully functional but the timer will stop after 3 minutes. When SpeakerTimerPro is launched and the system does not detect a USB dongle, a dialog box will appear with options, select “Run as Demo”.
Interface
SpeakerTimerPro is designed to use a primary screen for the interface and a secondary output for fullscreen timer display. Displays can be reordered under the Displays section of System Preferences.
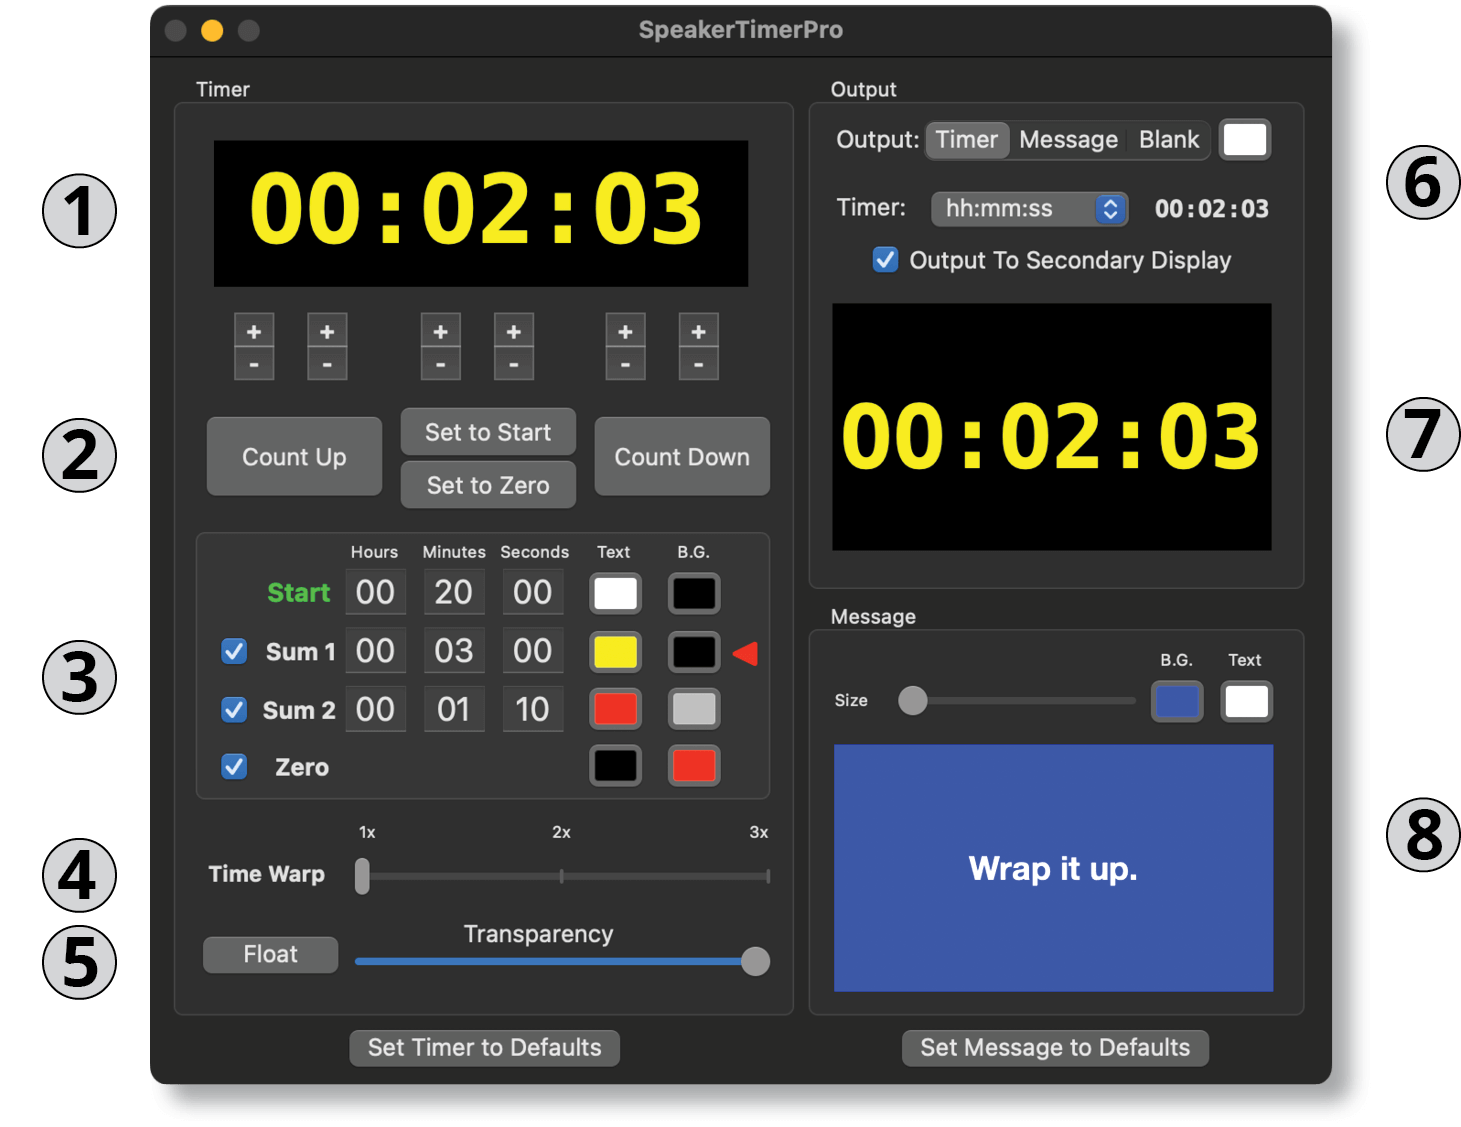
The Timer Panel

Timer Duration Window
The Timer Duration is shown in the top window of the interface. The values can be set and adjusted manually by using the + and - buttons under each digit. The Timer Duration can also be populated instantly by pressing either of the Set buttons. Preset values for the Set buttons are entered in the fields to the right of the mid-screen Set button. This functionality allows a Timer Duration to be set instantly and quick adjustments made using the + and - buttons.

Timer Controls
Set to Start - Changes the Timer Duration to the preset values in the Start row.
Set to Zero - Changes the Timer Duration to zero.
Count Down - Starts the current Timer Duration value counting down. The timer can be paused and restarted by toggling the Count Down button. When counting down, the timer will stop when it reaches zero.
Count Up - Starts the current Timer Duration value counting up. The timer can be paused and restarted by toggling the Count Up button. When counting up, the timer will continue even after it passes the “Start” value.

Timer Values
Start - Sets the starting time for the timer
Sum Values - Changes the display colors at specific times when you are counting down. Sum 1 will change the text and background colors when the time reaches the values in the Sum 1 boxes. The colors will change again to the values in the Sum 2 boxes when their time has been reached. Either or both can be turned off by clicking the checkbox and can be toggled while the timer is active. Colors can also be changed while the timer is active.
Zero - Changes the text and background color of the timer when it reaches zero. This setting can be turned off by clicking the checkbox.

Time Warp - Adjusts the speed of the timer. This allows you to adjust the speed of the timer to get a presenter back to within the desired timeframe. The presenter does not see these adjustments.

Float - Creates a floating, movable Time Duration window on the same screen that’s used for the application interface.
Transparency - Adjusts the opacity of the floating Time Duration window.
The Output Panel

Output Options
“Timer”, “Message” and “Blank” - selectors allow you to change what the speaker sees. The color selector to the right of “Blank” allows you to change the background color for a blank screen.
Counter display options - Changes the number of timer digits. “Auto” will automatically adjust the timer digit display size to match the minimum number of digits required to show the time. For example, if the count down goes from 01:0:00 to 00:59:59, the display will drop the leading zeros and the text size will increase to fill the entire screen.
Output to secondary monitor - Allows you to toggle output to a secondary display.

Speaker Preview - The Speaker Preview allows you to see what the speaker sees.
The Message Panel

The message panel allows you to change the values for the message to the speaker, including font size, font color and background color.
Using SpeakerTimerPro
- Connect your Mac to a secondary display
- Open SpeakerTimerPro
- Decide if you need the timer to count up or count down
- Timer Duration and colors can be set using the values to the right of the Set button. These values will be used when you press either of the Set buttons.
- Use the Sum 1, Sum 2 and Zero check boxes to trigger text and background color changes at specific times when the timer is counting down. These values do not have any affect when counting up.
- Counter display options - Select an option for the number of timer digits. “Auto” will automatically adjust the display to match the minimum number of digits required to display the remaining time. For example, if the count goes from 01:00:00 to 00:59:59, the display will drop the leading zeros, displaying only 59:59 and the text size will increase to fill the entire screen.
- A unique feature of SpeakerTimerPro is the Time Warp slider. This option will subtly increase the speed of the timer. This can be helpful in a live event where the amount of time a speaker has been given changes due to an unforeseen circumstance and the timer has already started. Increasing the speed of the timer count will generally not be noticeable to the speaker but their timer will end on zero sooner than if in real time.

