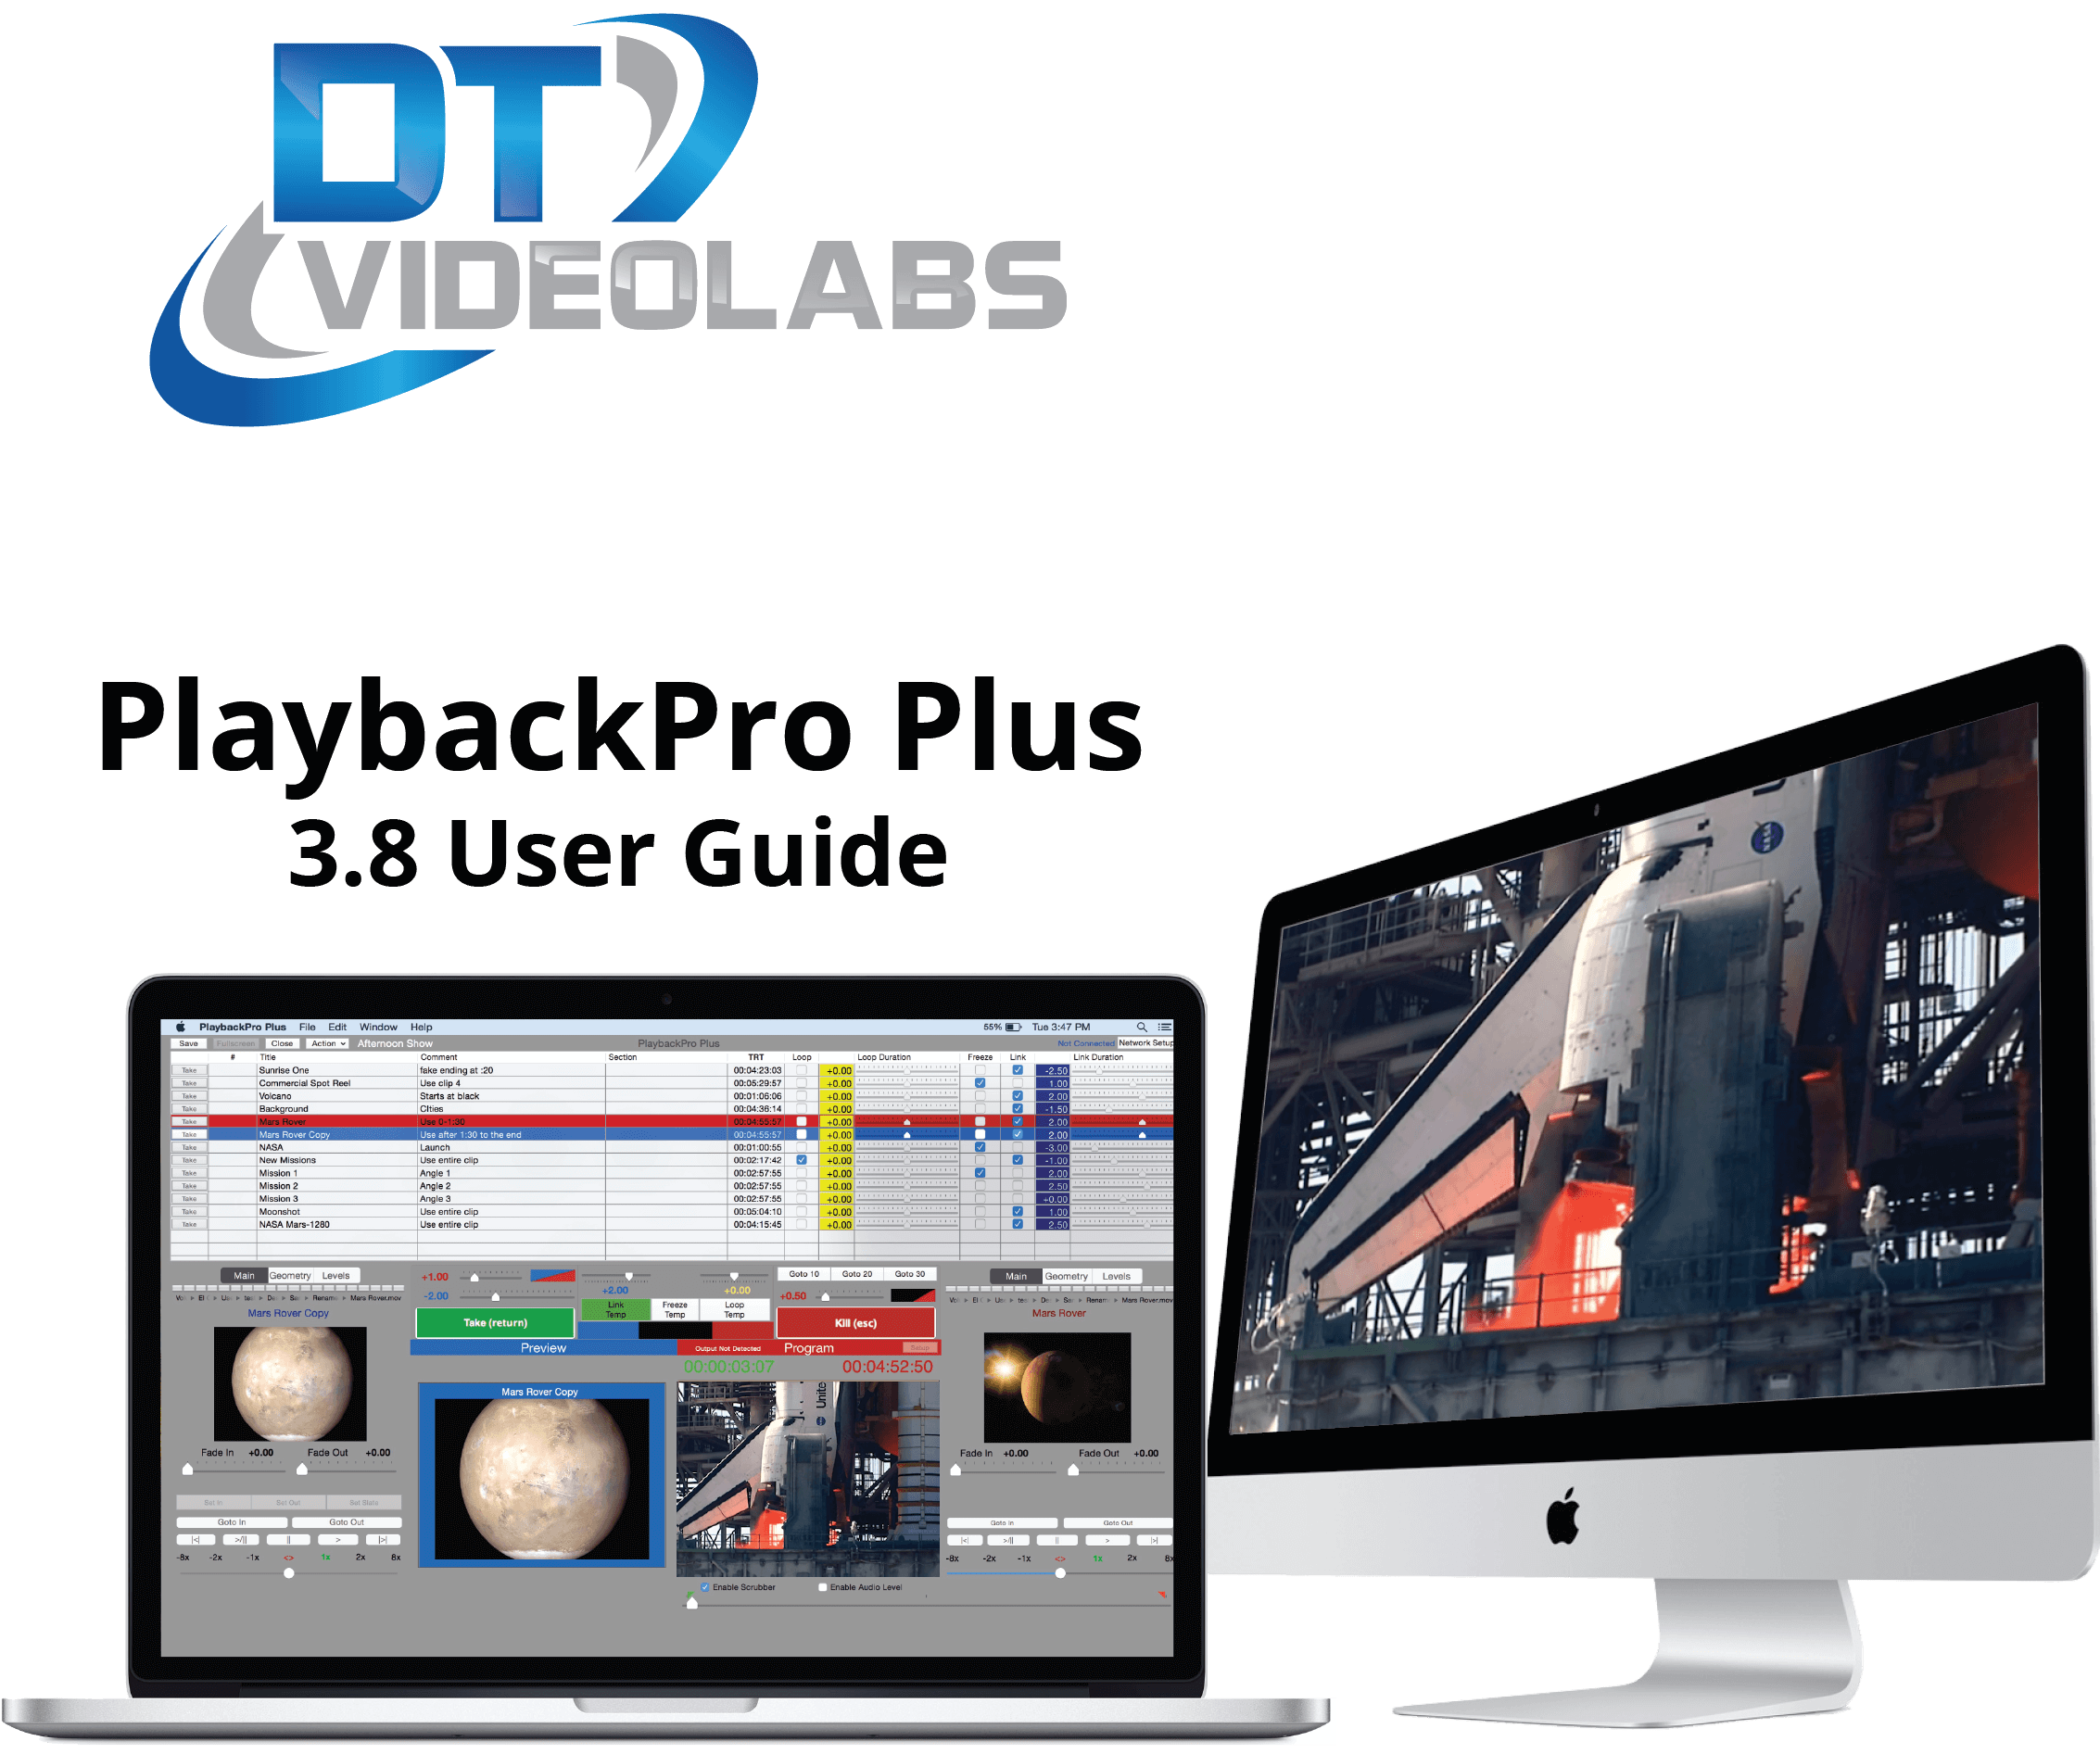
About PlaybackPro Plus
PlaybackPro Plus makes professional media playback on a Mac quick and simple. By utilizing the best in Apple video technology, PlaybackPro Plus is optimized to play virtually any modern Mac file type. The intuitive interface allows you to rapidly add media, organize and play clips, apply custom settings and save playlists, all without altering the original files.
PlaybackPro Plus includes a mixer for crossfades and direct cuts between clips, support for still images and remote control over ethernet using TCP/IP and UDP commands.
Automatic output resolution and aspect ratio functions are built in, with real-time manual adjustments available for sizing, stretching, cropping, as well as gain, saturation, black levels, hue and volume.
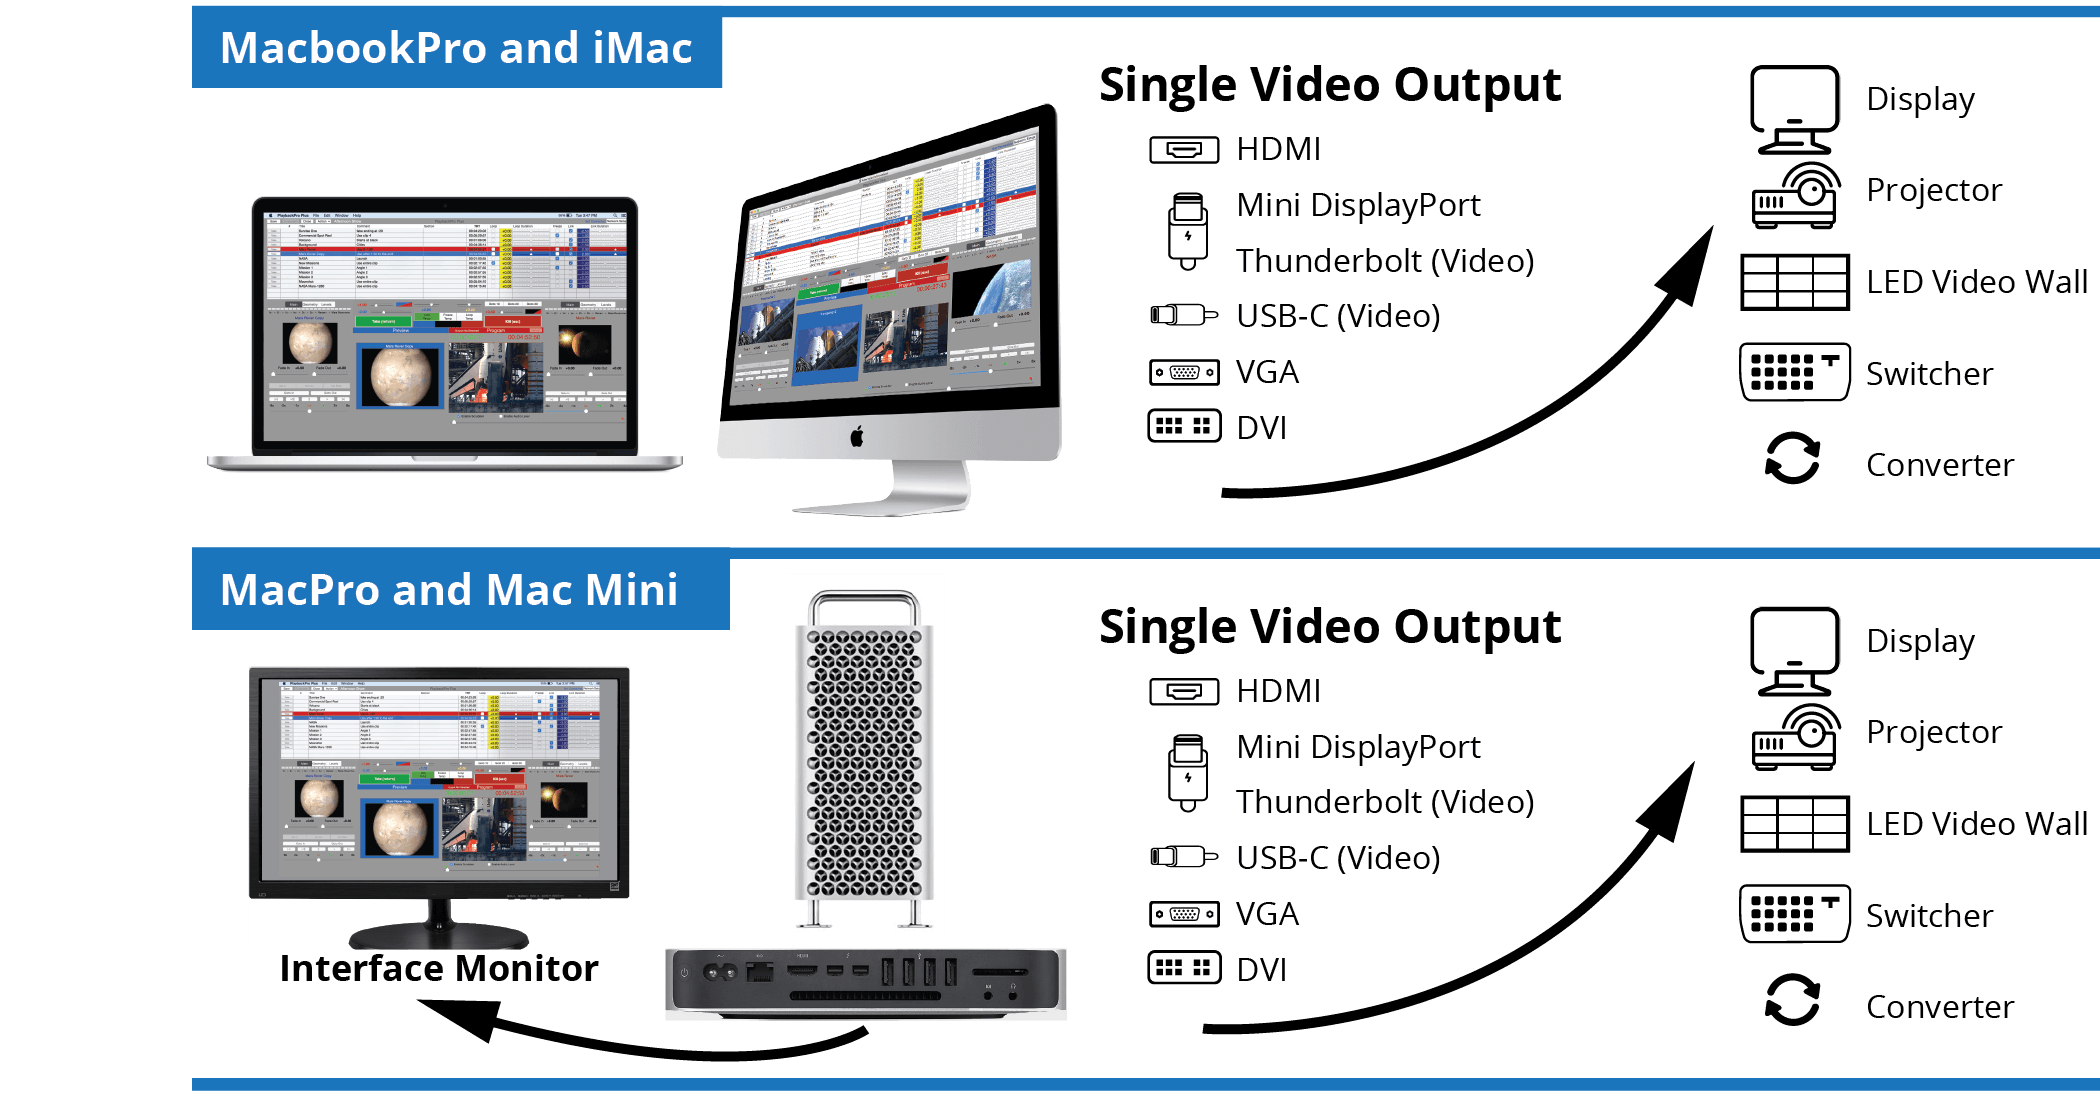
Connecting a PlaybackPro Plus system is easy too. By using modern Apple video adapters or third party broadcast converters, PlaybackPro Plus easily connects to professional switchers, video projectors, LED video walls and high-resolution monitors. PlaybackPro is not currently compatible with video output devices such as an Aja T-TAP or Blackmagic UltraStudio device. Please visit our www.dtvideolabs.com/faq for current information.
Also From DT Videolabs
Table of Contents
Before You Begin

PreFlight

Each version of macOS has specific settings which have a great impact on playback performance. Before you begin, please visit www.dtvideolabs.com/preflight.This page also includes a link to a printable PDF if needed.

System Specifications
Using the right Mac system, configured with recommended codecs and container files is key to successful high resolution playback with PlaybackPro Plus. Please visit www.dtvideolabs.com/system-recommendations for the most current specifications and Mac system recommendations.
Setup

General Hardware Setup

License Activation
Activating an Internet Activated (IA) Serial Number
PlaybackPro Plus can be activated using a serial code from either PlaybackPro Plus or the PlaybackPro Collection.
- Download the PlaybackProPlus IA application from the link provided in your purchase email or from the Internet Activated (IA) table on www.dtvideolabs.com/downloads
- Place the unzipped program file into the Applications folder then double click to launch.
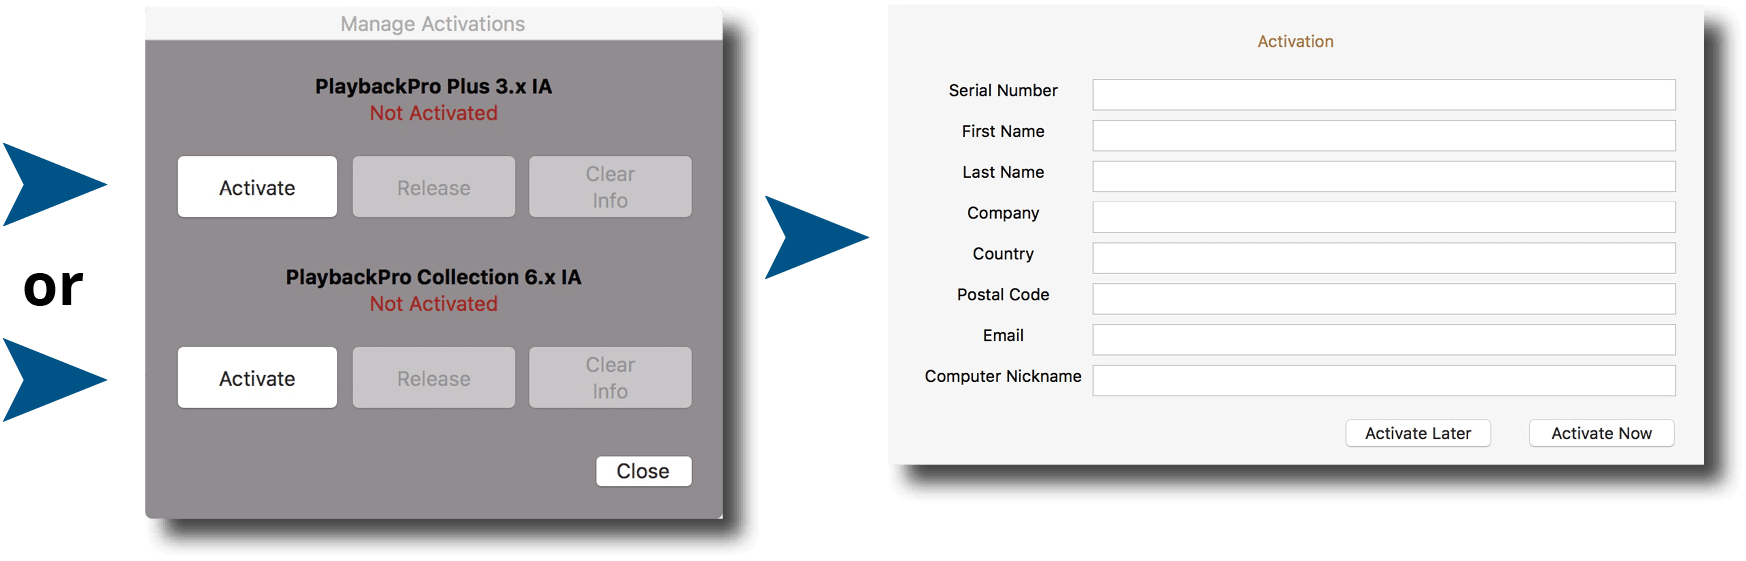
A delay of up to 10 seconds can occur when launching the application. This is normal behavior as the application checks the license. - In the dialog box click the “Activate” button under the name of the application to be activated
- Enter the serial number provided at the time of purchase, including the dashes. A DT Videolabs serial number will always be 4 sets of 8 digits, separated by dashes. For example, xxxxxxxx-xxxxxxxx-xxxxxxxx-xxxxxxxx. Enter your personal registration information in the remaining fields and click “Activate Now”. It is important that you enter something in each of the fields.
Notes
Internet access is required to activate or release a license, however it is not necessary for program use once a license is activated
- Registration information can be unique each time an application is activated
- Licenses are single seat and allow for the use of one application at a time, on one computer at a time
- License may be released from one computer and moved to another using the release process outlined below and at www.dtvideolabs.com/activation
Once activated, the Application Control Window will appear. If you encounter any problems during activation, please visit www.dtvideolabs.com/contact or email technical@dtvideolabs.com.
Releasing an Internet Activated Serial Number
Connect the computer to the internet
- Launch PlaybackPro Plus
- Go to the PlaybackPro Plus menu (to the left of the File Menu), select “Manage Licenses”
- Store the serial number. A DT Videolabs serial number will always be 4 sets of 8 digits with dashes in-between.
- Click on “Release License”. The system will report when the license has been successfully released and available to activate on another system.
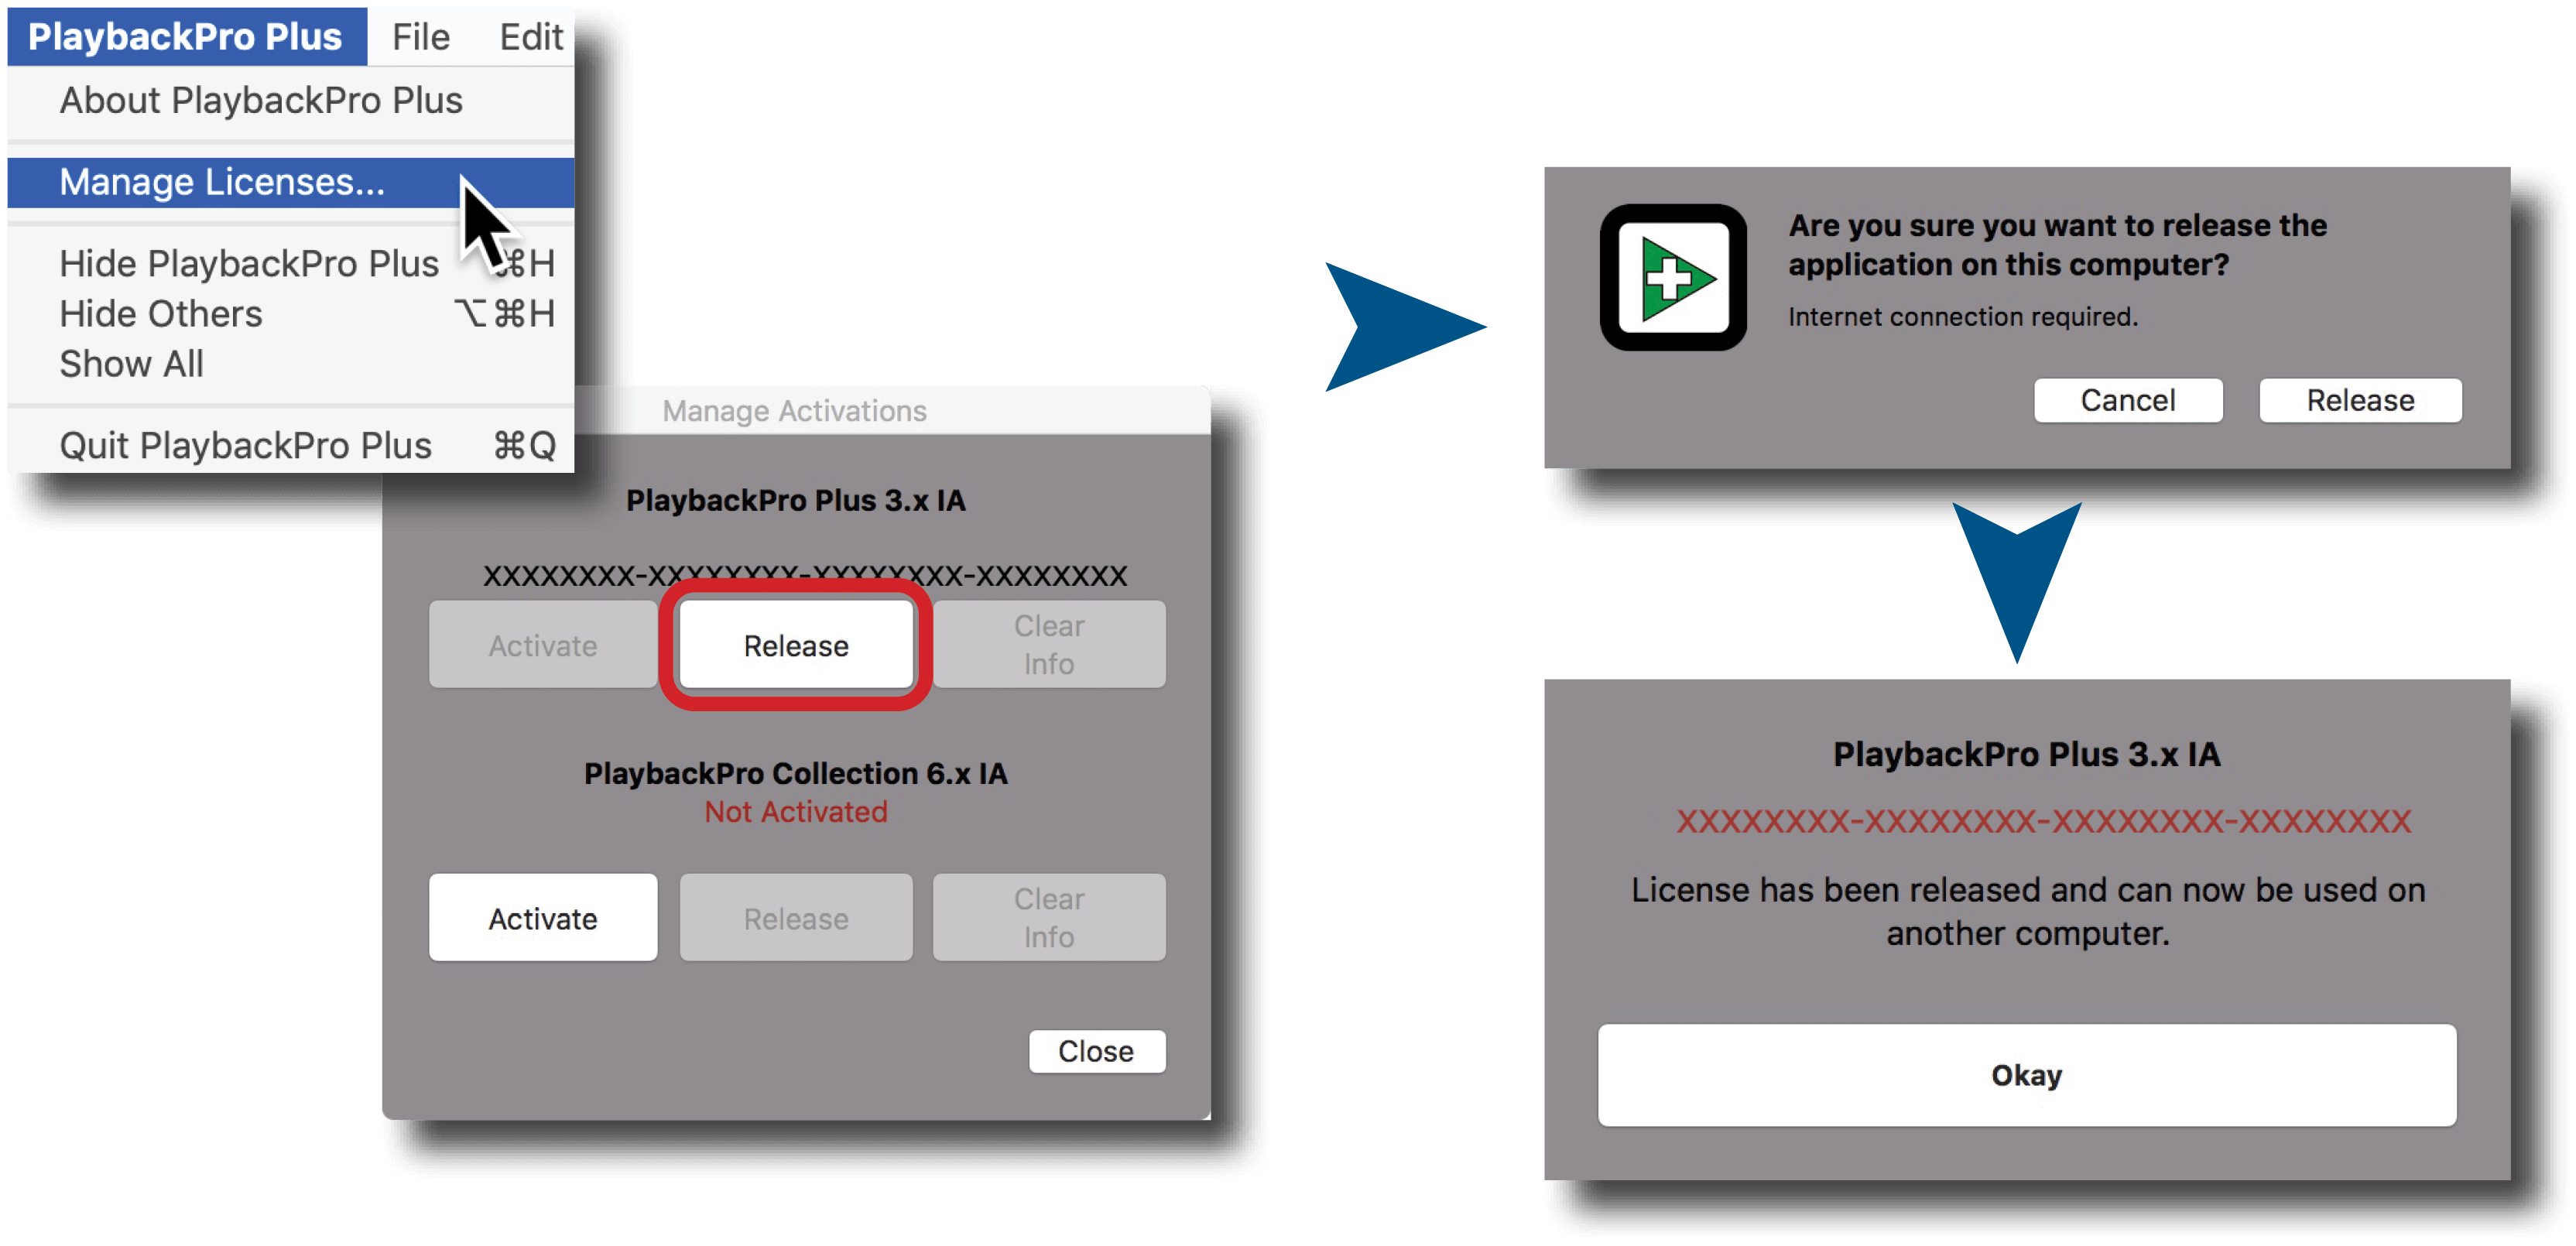
***IMPORTANT*** License information will be retained on your system after you release a license. Users of previous versions will notice the addition of the “Clear Info” button which removes previous license info from your system and can aid in troubleshooting. If you have trouble activating a license, clear the info and try activating again. If you use the “Clear Info” button, it is important for you to retain a copy of your license number so you can reactivate.
New USB Installation Collection Instructions
Connect the computer to the internet
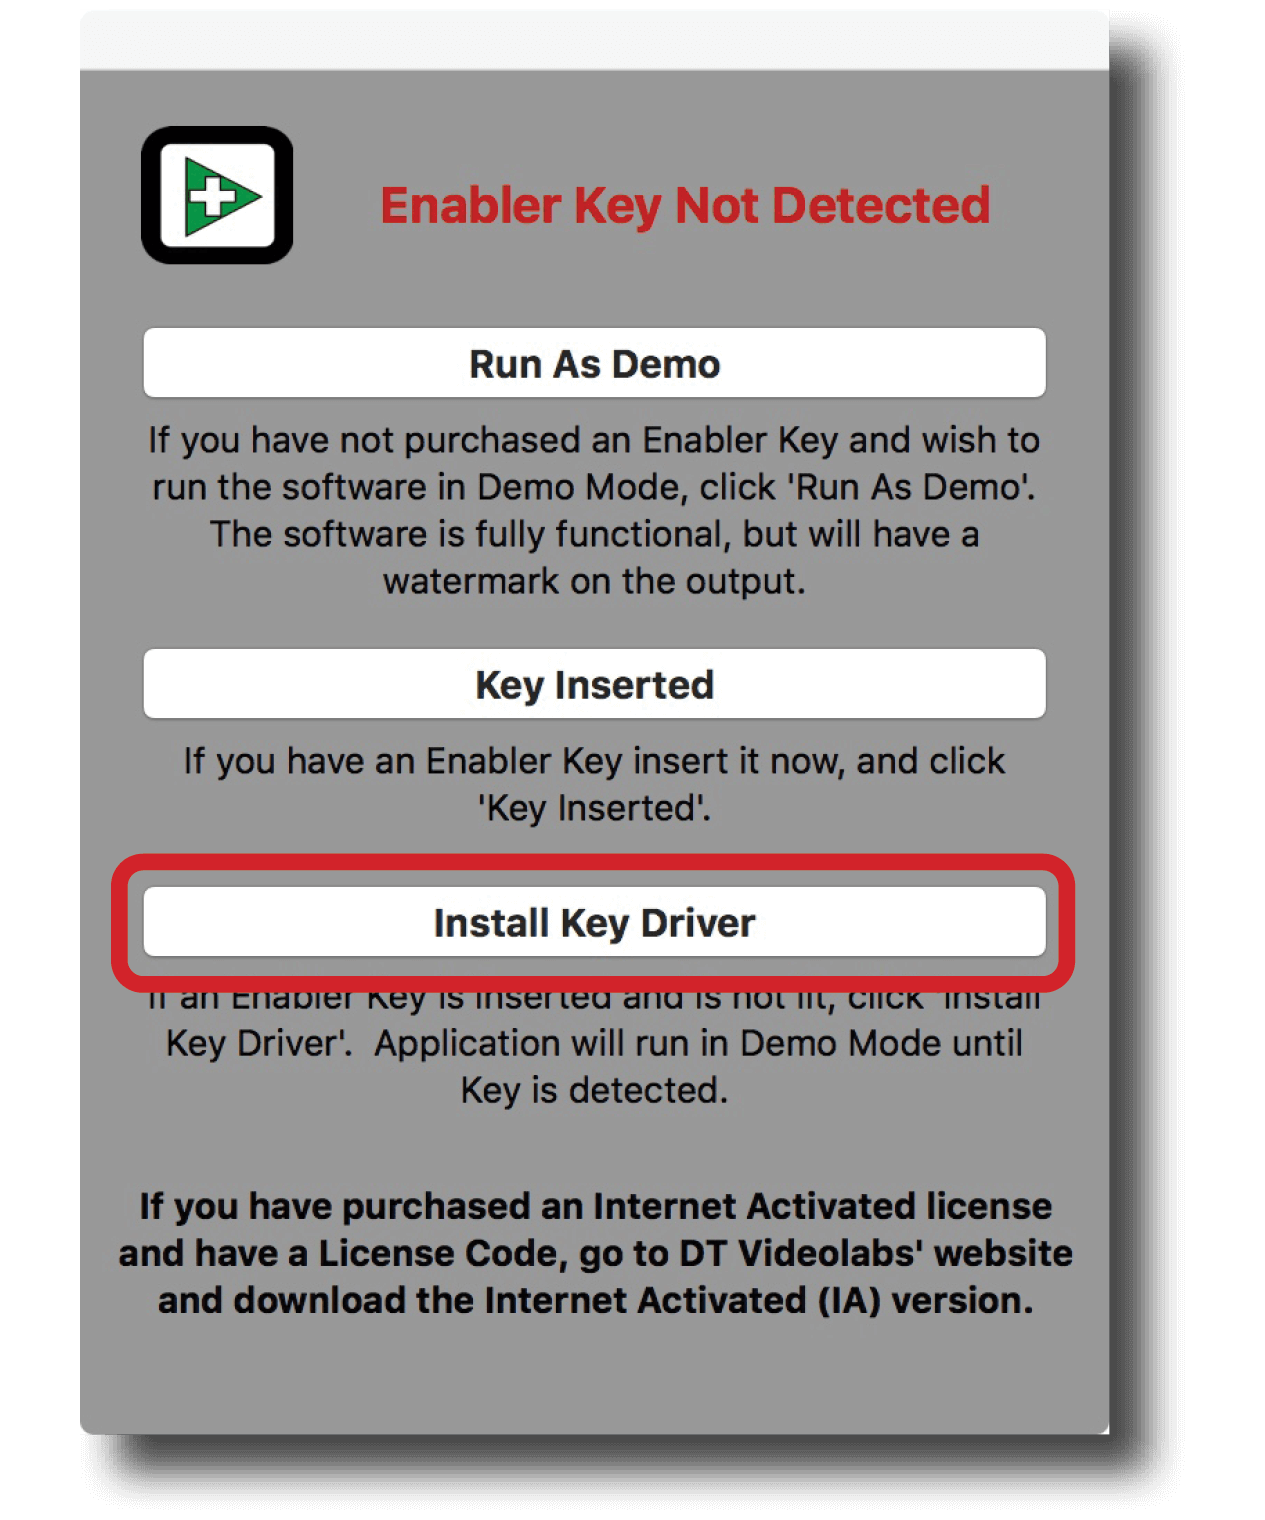
- Insert the USB Enabler key into the system
- If you haven’t already, go to www.dtvideolabs.com/downloads to download the Collection
- Place the unzipped program files into the Applications folder then double click an application to launch
- If running an application on a system for the first time, a window will open after you attempt to create or open a show. Select “Install Key Driver”and follow the on-screen instructions
***IMPORTANT*** License information will be retained on your system after you release a license. Users of previous versions will notice the addition of the “Clear Info” button which removes previous license info from your system and can aid in troubleshooting. If you have trouble activating a license, clear the info and try activating again. If you use the “Clear Info” button, it is important for you to retain a copy of your license number so you can reactivate.

Demo Mode

If you need to evaluate PlaybackPro Plus or set up a show off-line, you can use Demo mode. It is fully functional but has a watermark on the fullscreen output. Download the USB version of PlaybackPro Plus (Internet Activated versions do not offer a demo mode) from www.dtvideolabs.com/downloads, launch it, click on “New Show.” After a few moments, you will get a dialog box with options for the USB key. Select “Run as Demo.”

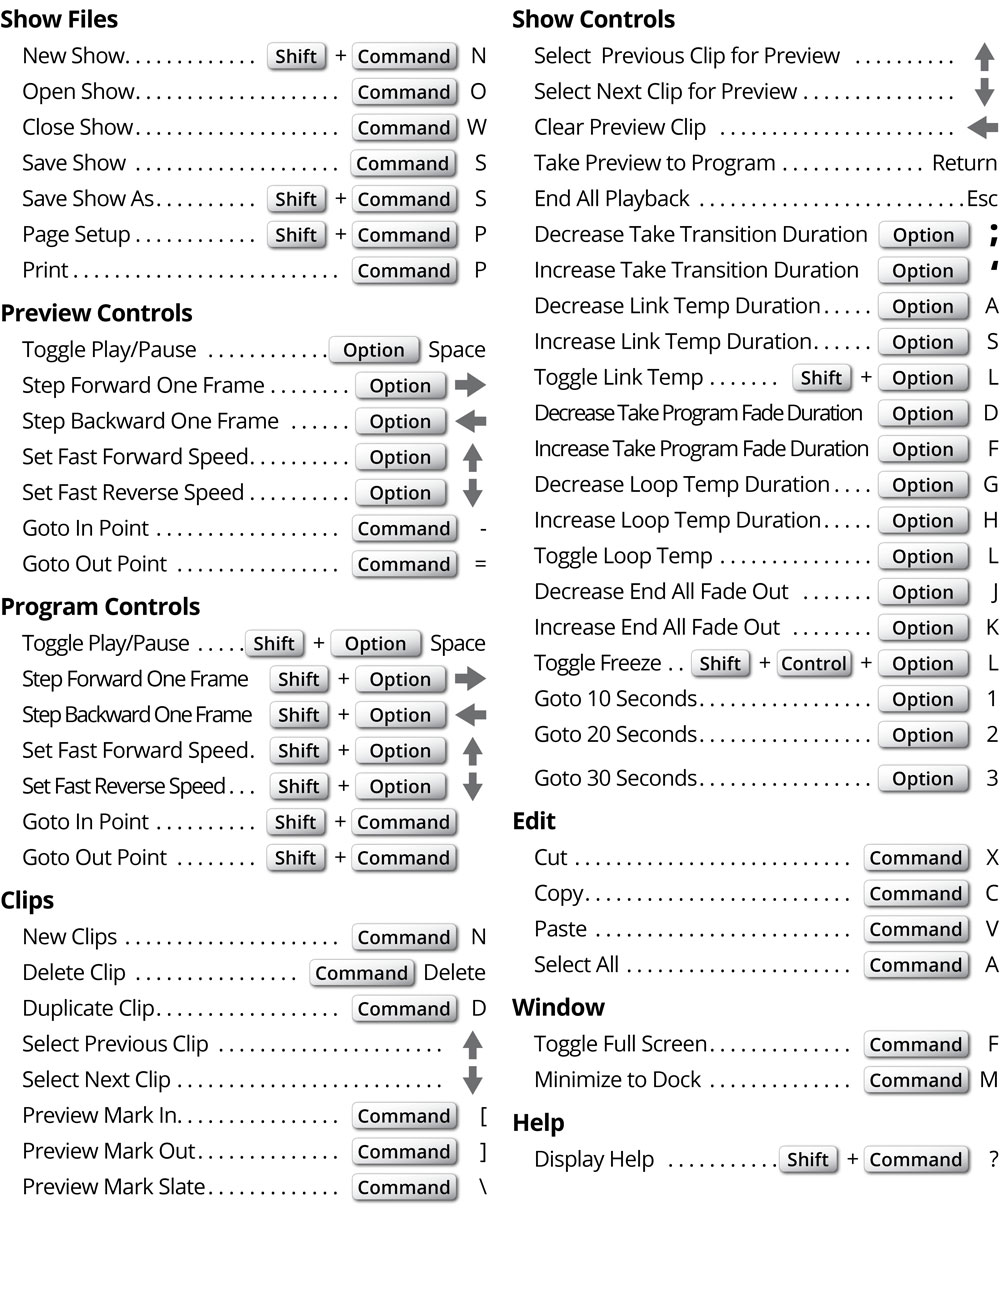
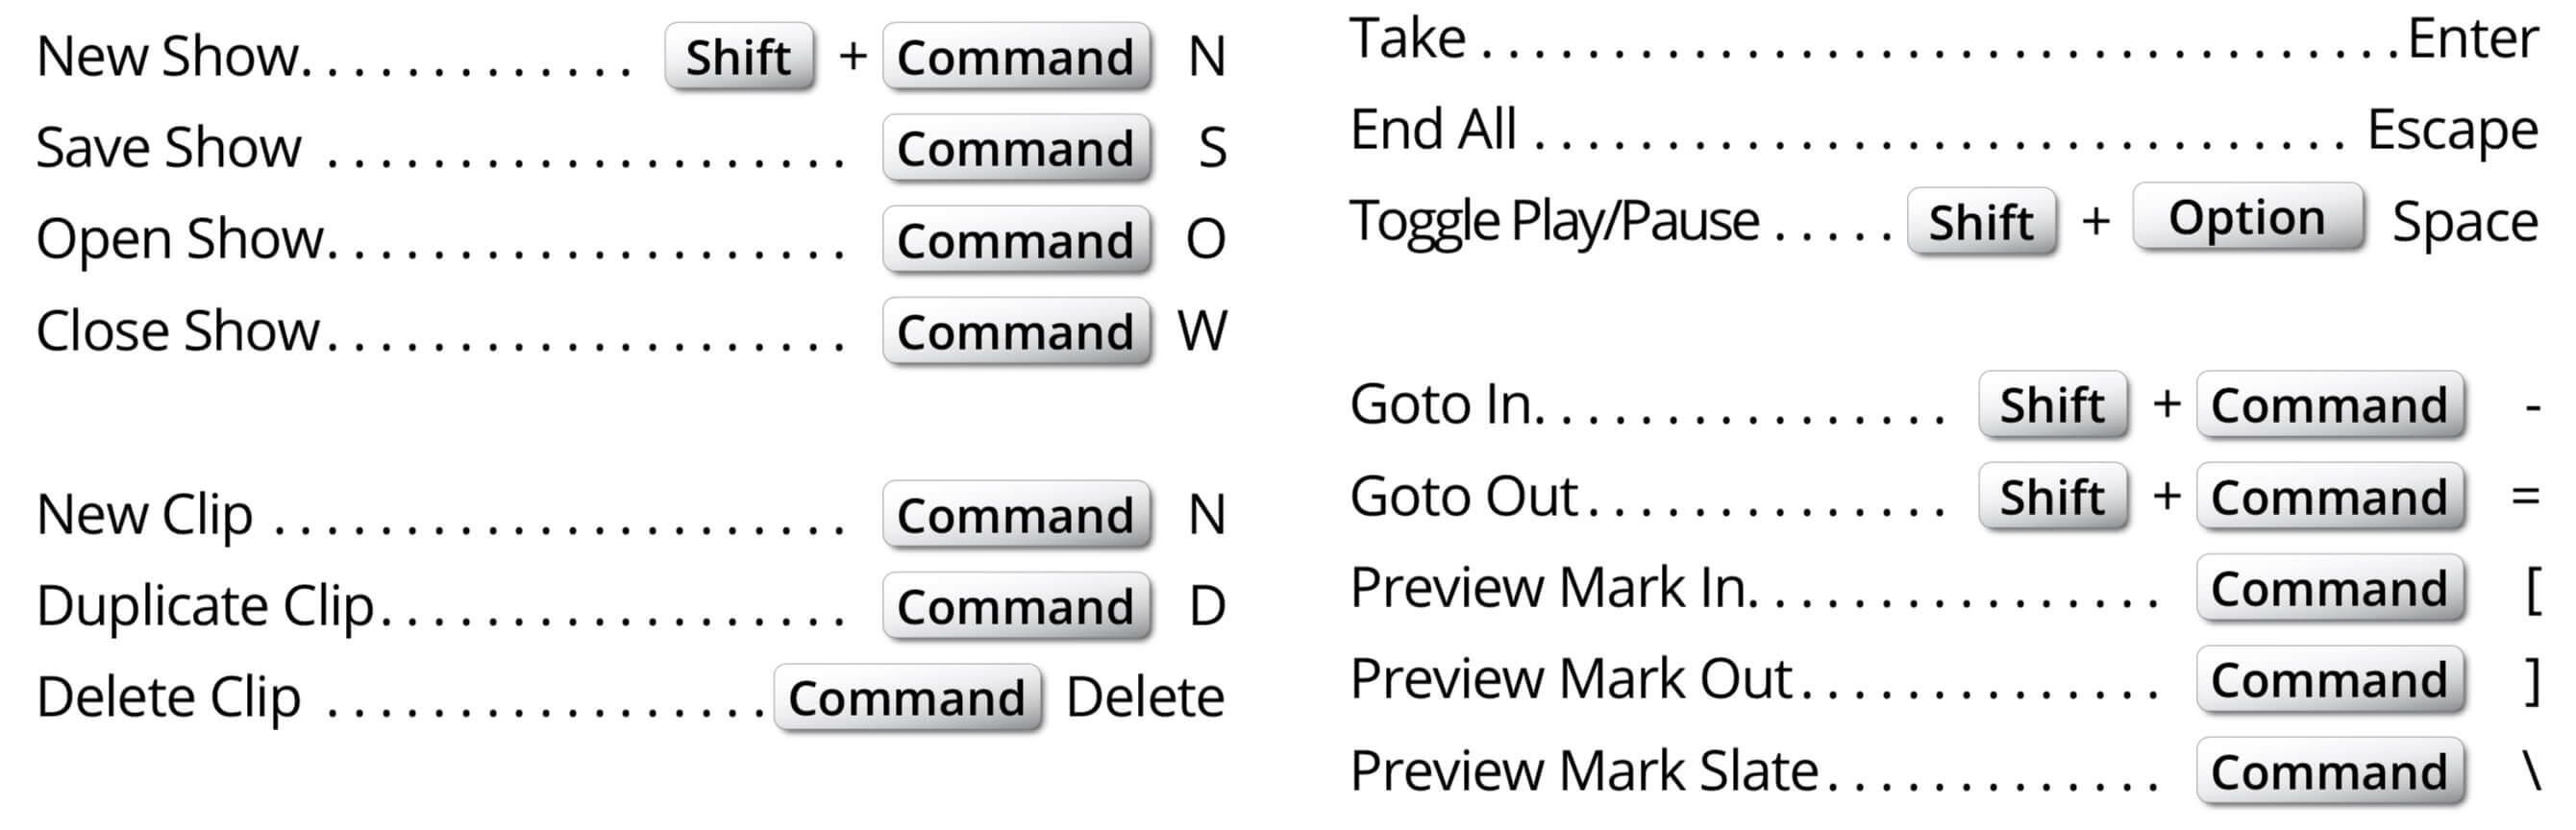
Top Keyboard Commands

Audio
Currently audio is handled by macOS. To change the audio output go to System Preferences, Sound, Output. Multi-channel audio is possible with PlaybackPro Plus. Please contact us for current instructions.
Common compatible codecs are AAC, AIFF/AIFC, MP3 and .WAV.
Interface

Layout
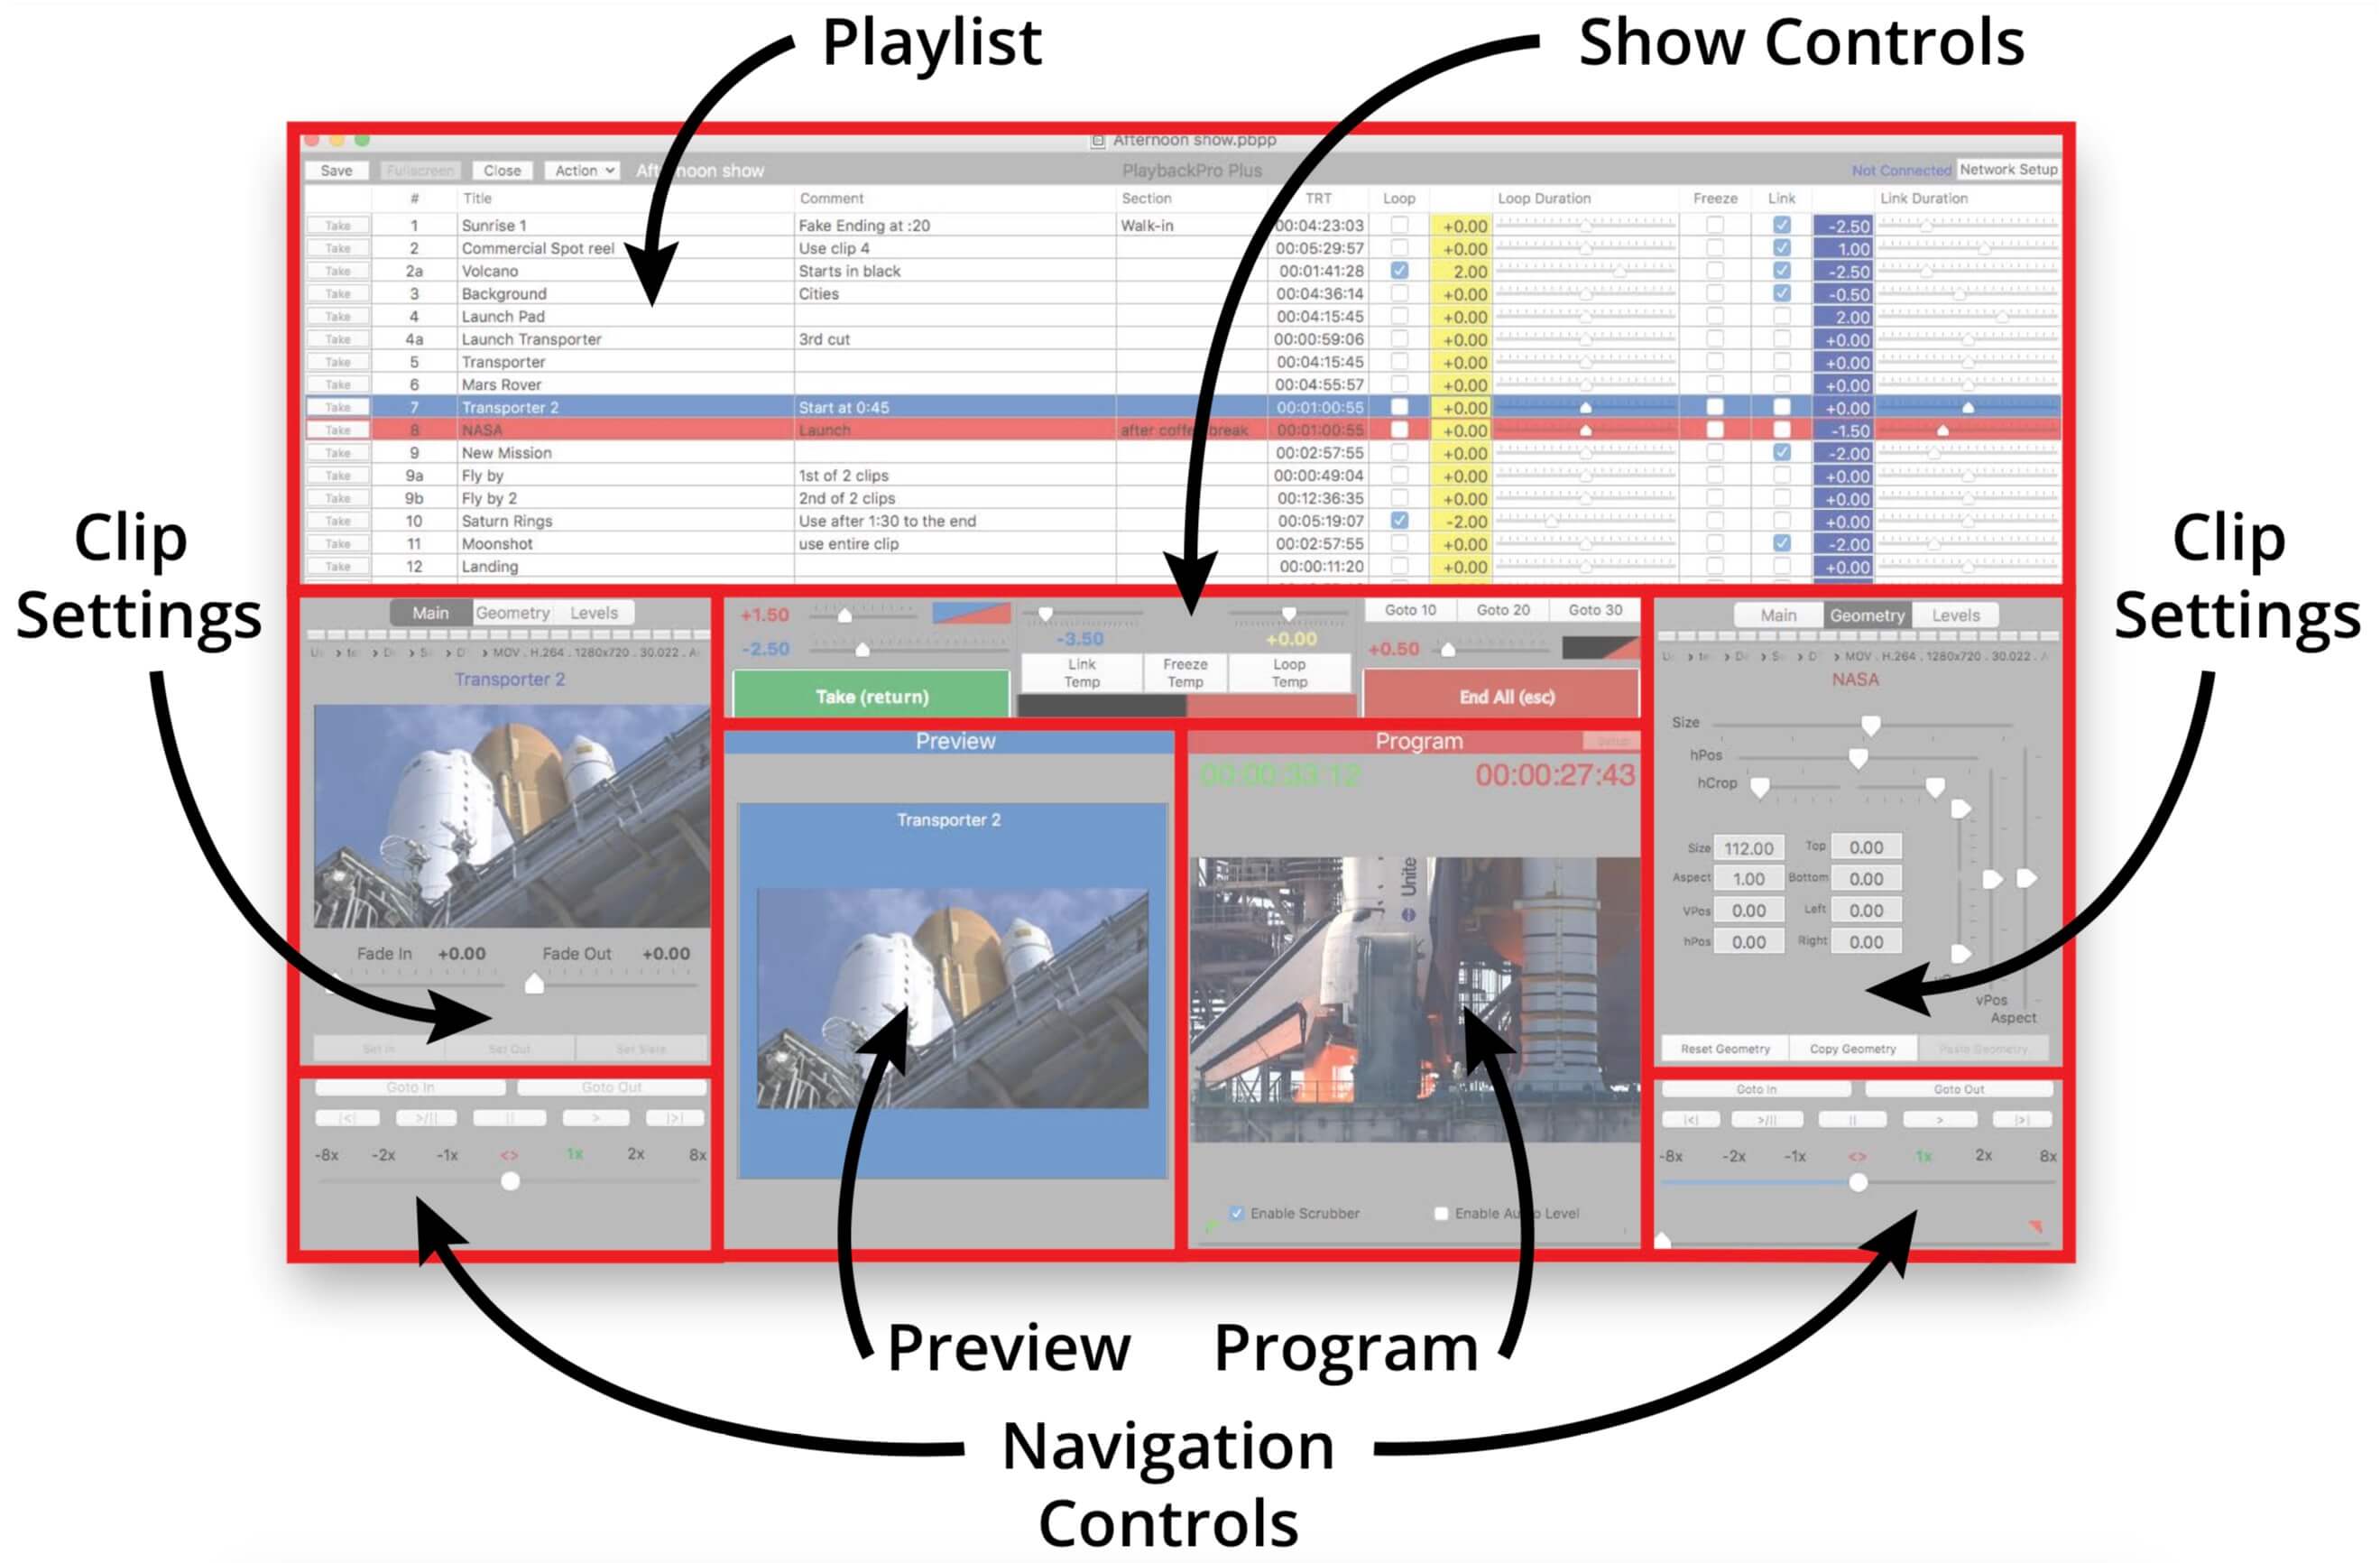

Preview / Program
PlaybackPro Plus is designed on a Preview/Program paradigm, similar to a production switcher.
Preview - Preview is what will play next. Preview is always in blue. When a clip is selected from the playlist, it is placed in Preview and begins to pre-roll in the background to allow direct cuts and immediate transitions with clips playing in Program. Preview is used to set in/ out points, set levels, fades and geometry.
Program - Program is what’s going to the output. Program is always in red. When a clip is Taken from Preview, it transitions to Program and plays with any attributes you’ve set (in/out Points, fades, geometry, levels, etc). The Program window shows the clip exactly as it appears on the external output.
Green counter - The green counter is located over the Preview and Program window and shows the time elapsed relative to the In point.
Red counter - The red counter is located over the Preview and Program window and shows the time remaining relative to the Out point.
Setup - The aspect ratio of the output is reflected in the Preview and Program sections. To change the output resolution use the “Setup” button and select the desired resolution.

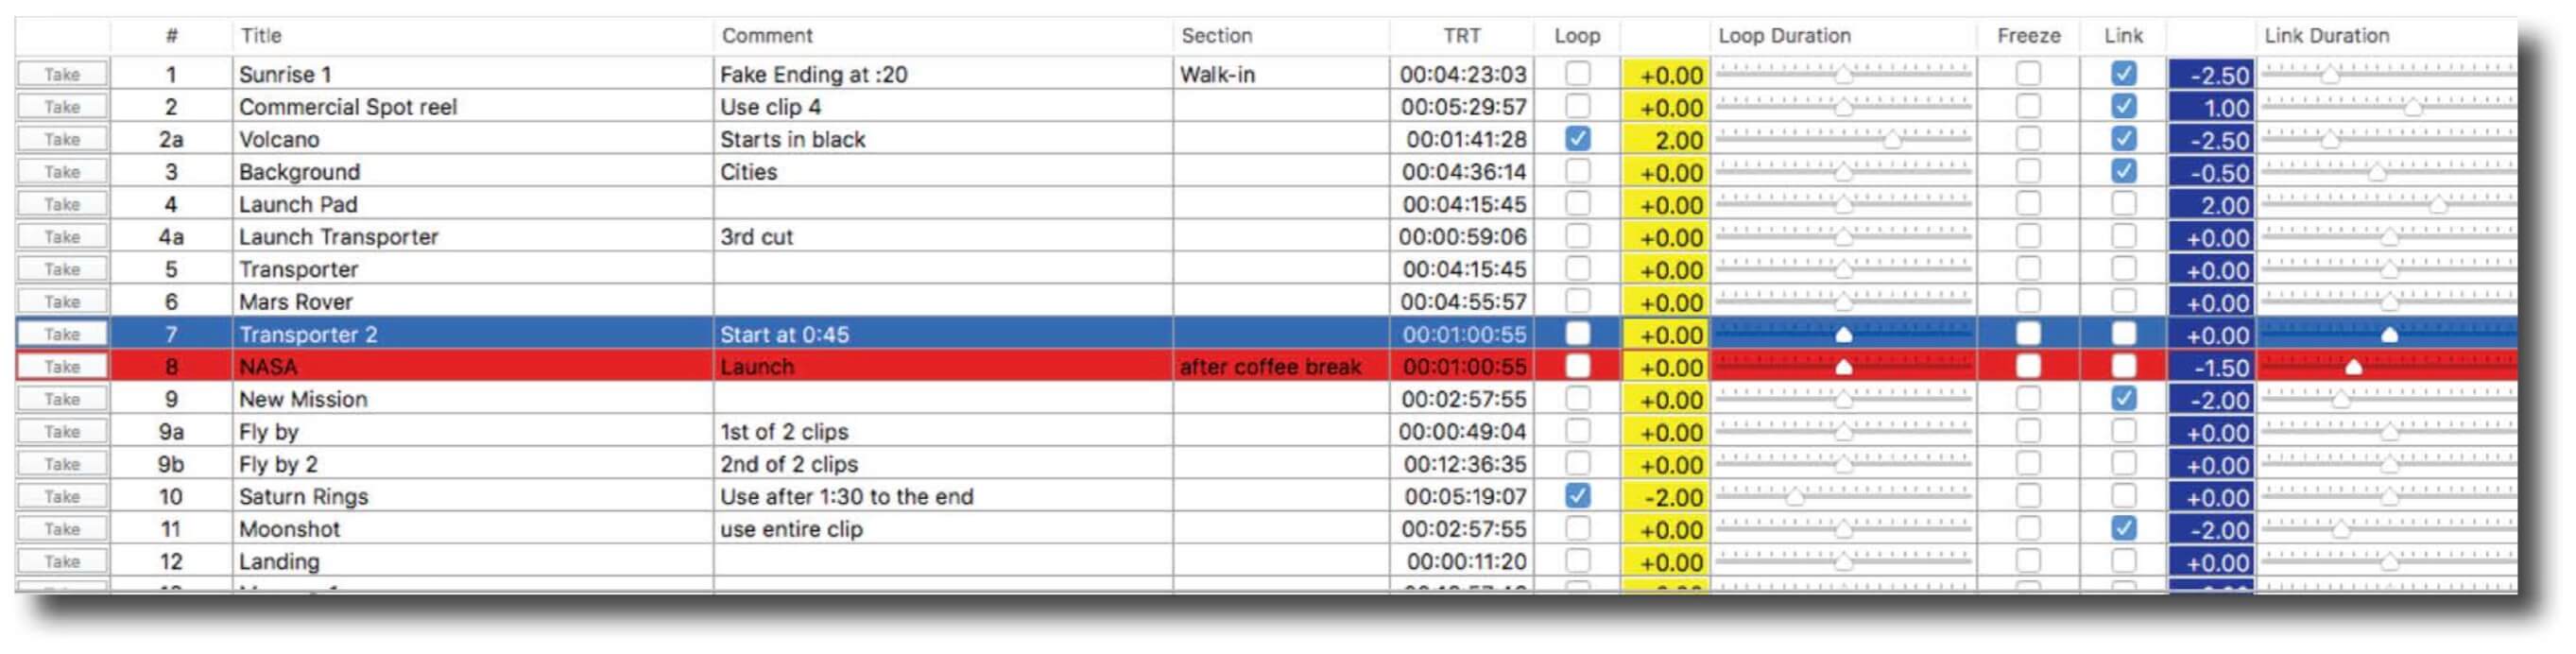
Playlist
The clips are shown in the Playlist and attributes are applied as clips are played. The clips are only being referenced, PlaybackPro Plus is nondestructive to original clips.
Adding Clips
- “File” menu and select “New Clips”
- “Action” button and select “New Clips”
- Press COMMAND + N
- Drag and drop from a Finder window
Removing Clips
- “File” menu and select “Remove Clip”
- Highlight clip and press COMMAND + Delete
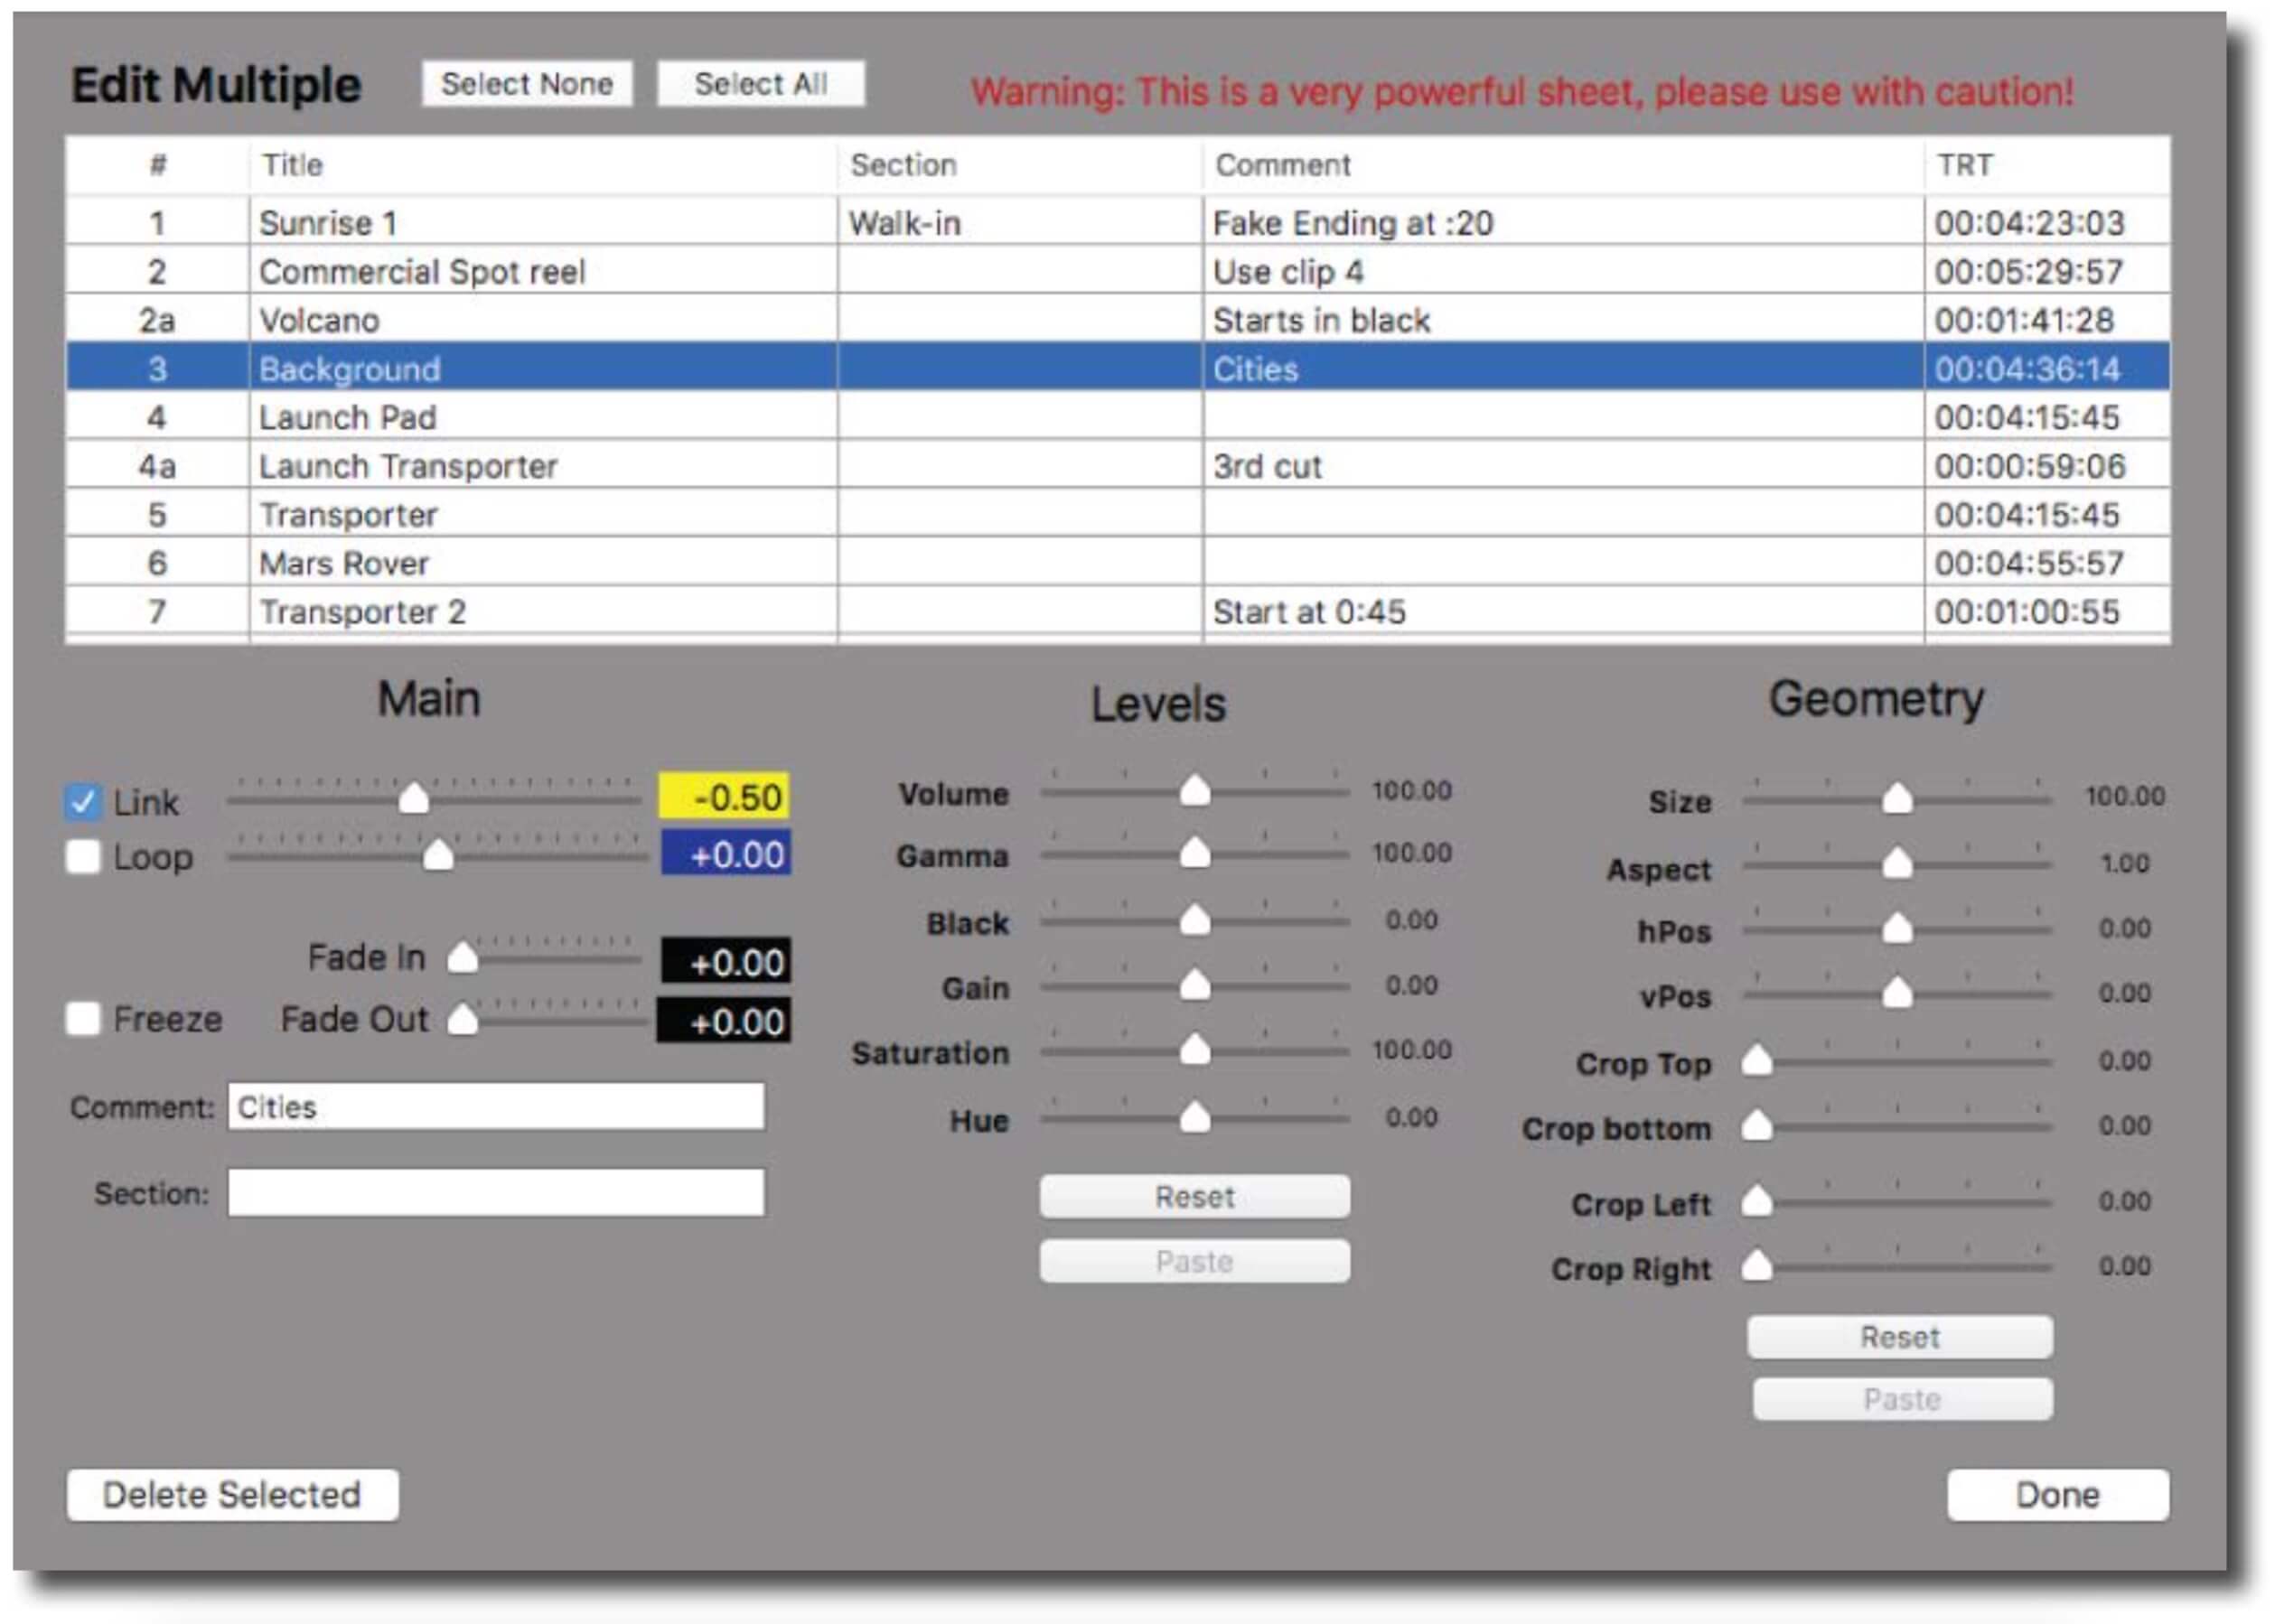
- “Action” button, select “Edit Multiple”, select clips, select “Delete Selected”
Duplicating Clips
- Highlight clip and select “File” and “Duplicate”
- Highlight clip and select “Action” and “Duplicate”
- Highlight clip and press COMMAND + D
- Duplicated clips create a new clip entry in the playlist but do not create a new file on a hard drive
Ordering Clips
Clips can be reordered by dragging and dropping, or by using the “Move Up” and “Move Down” options from the “Action” button.
Locating Clips
If a clip has been moved from its original location or is off-line, its text will be grayed out. By clicking the “Action” button and selecting “Locate” you can redirect the reference to its new location, however the clip must have the same name.
Playlist Fields
# Field - Enter alphanumeric text to allow for easy cueing of the next desired clip. In PlaybackPro Plus, the Clip Number can be entered on the keyboard to directly load a clip into Preview. In SimpleSync, the Clip Number can be used to load clips into Preview across multiple PlaybackPro Plus systems. The Clip Number field is for operator convenience, and does not affect the order in which the clips are played.
Title - Allows you to rename the reference of the clip for easier identification. Changing the title in this field does not change the filename of the original file stored on a hard drive.
Comment - Enter text / production notes for the clip
Section - Enter text / production notes for the clip
TRT - Total runtime of the clip
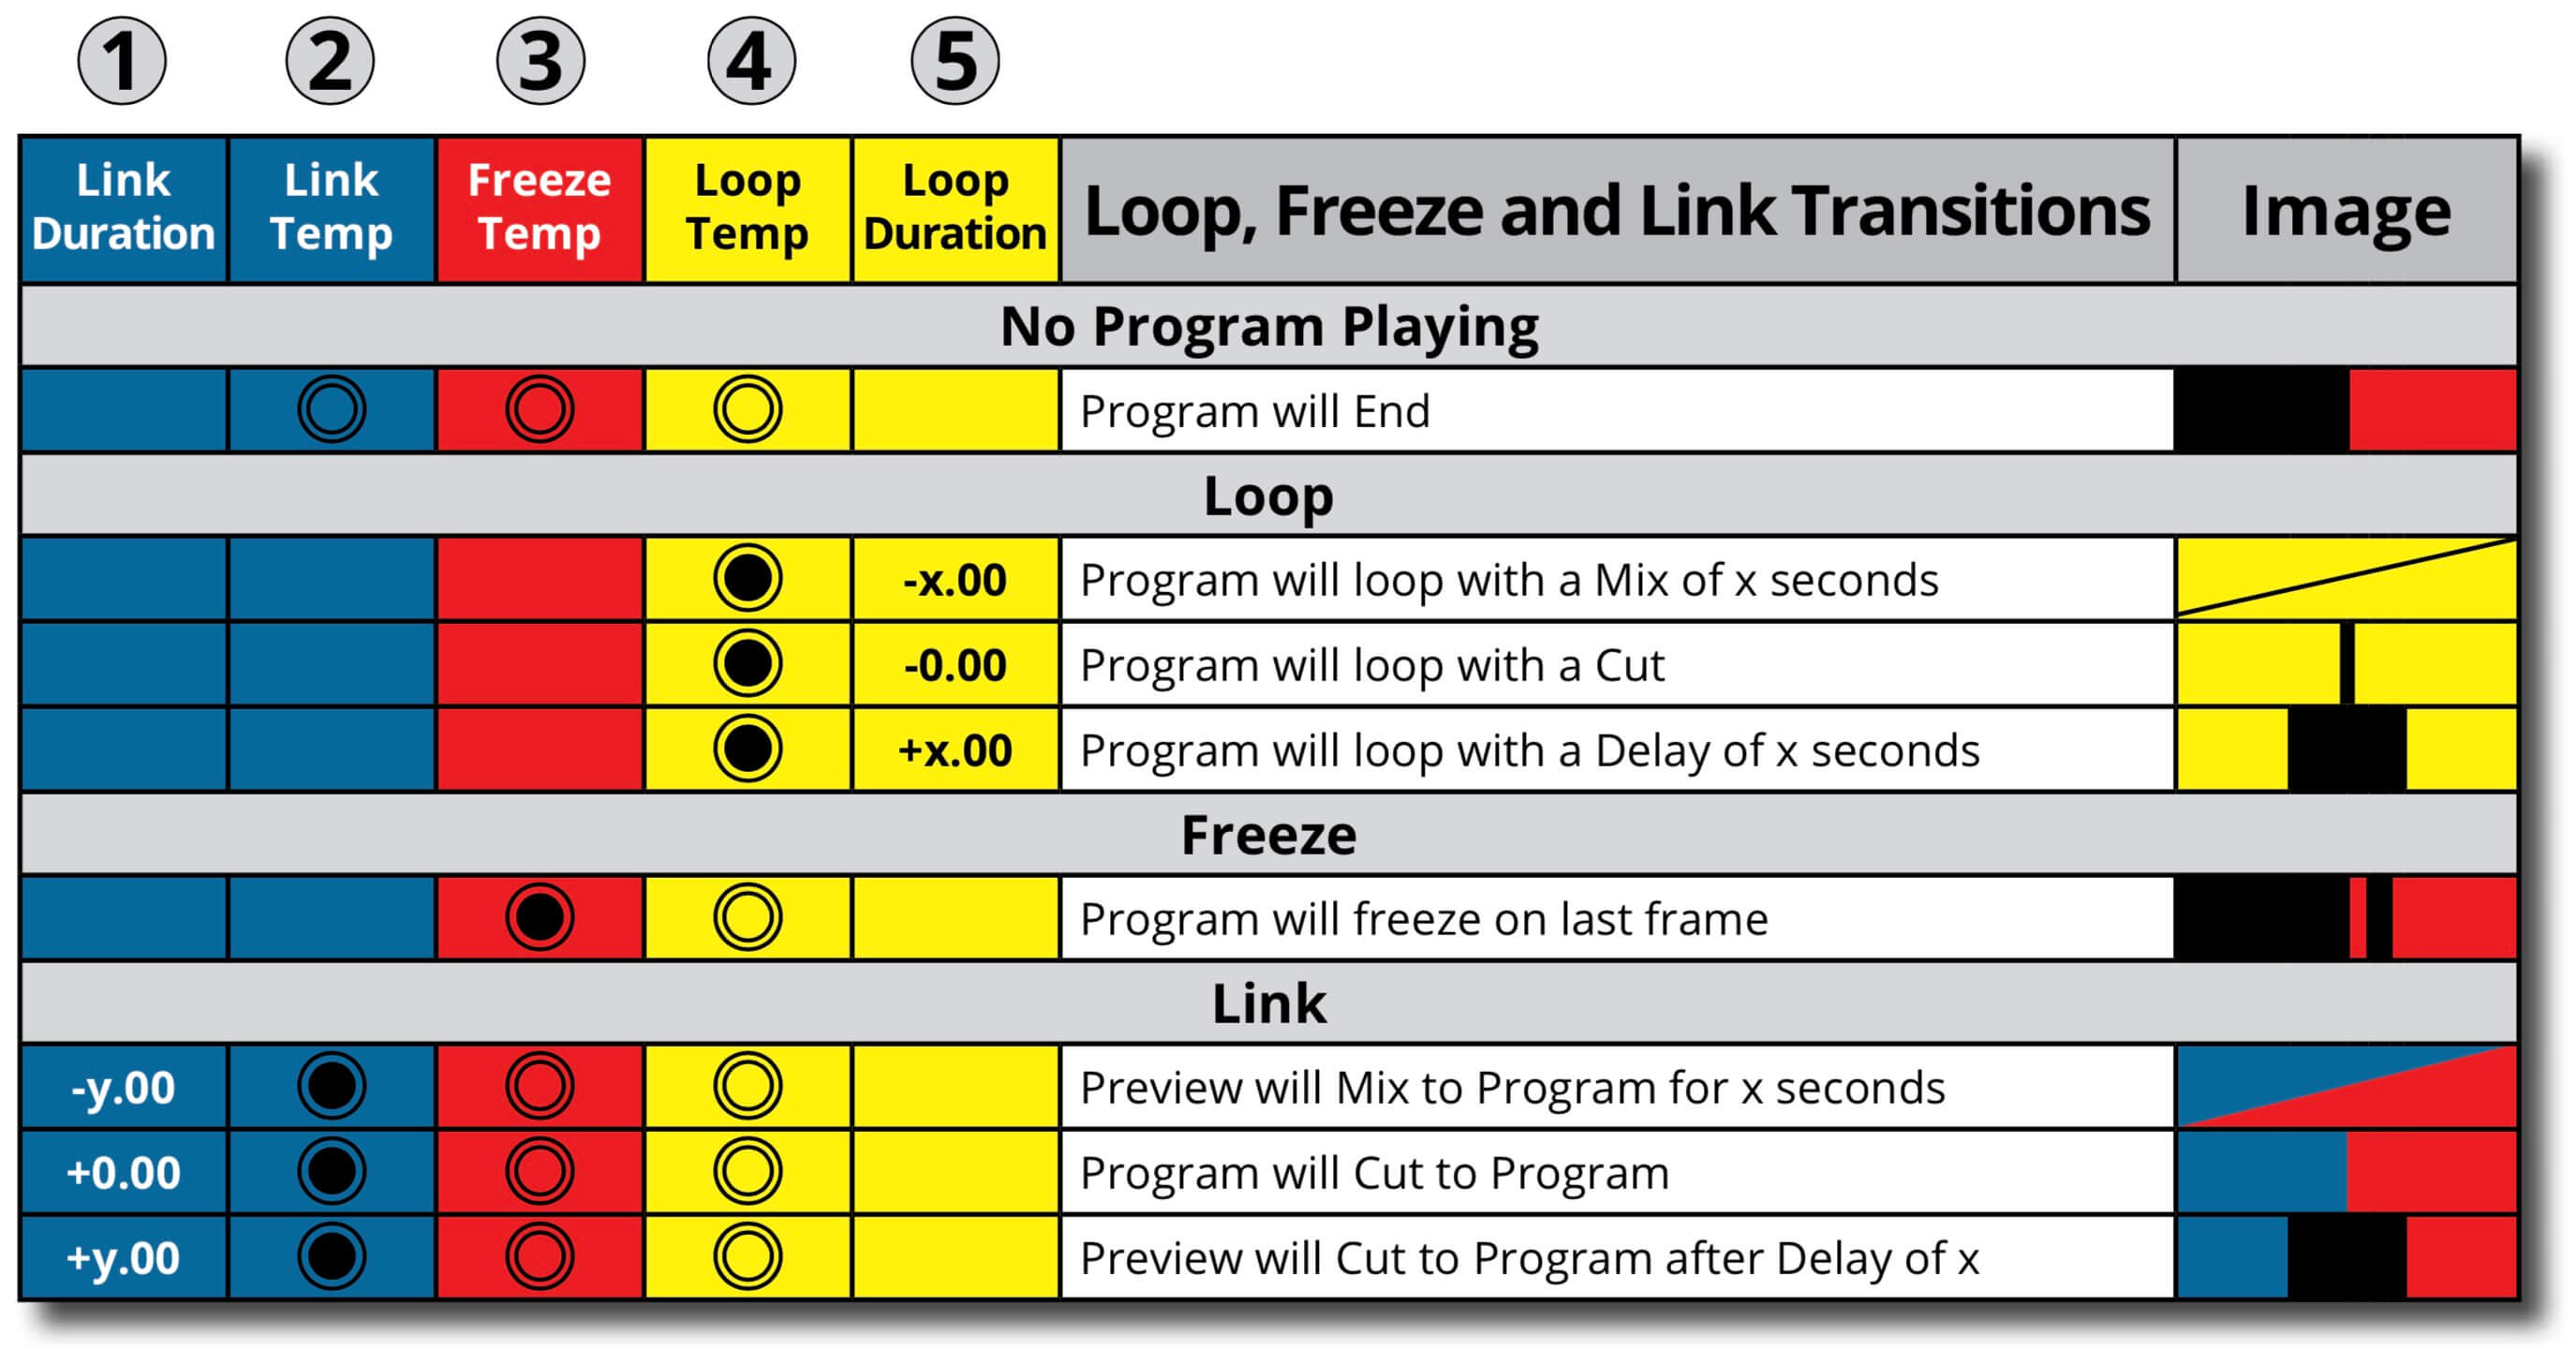
Loop - Select to loop an individual clip. When a clip that’s set to Loop begins playback, the “Loop Temp” button in Show Controls is activated. See Section 4.2 for more information on Show Controls. An entire playlist may be looped by selecting the “Link” checkbox for each clip.
Loop Duration - Sets the loop duration time. A negative number creates a seamless Dissolve (-3.00 = 3 second dissolve) between the end of the clip and the beginning of the clip, zero creates a Cut, and a positive number creates a Delay (+3.00 = 3 sec- ond Delay) before the clip starts playing again. This is the same as clicking the “Loop Temp” button and setting the “Loop Duration” manually in Show Controls.
Freeze - Selecting this checkbox will freeze on the last frame of the clip playing in Program and activates the “Freeze Temp” button in Show Controls. To end the freeze, “Take” another clip or click on the “Freeze Temp” button.
Link - When checked, the next clip in the playlist will automatically load into Preview, the “Link Temp” button in Show Controls will activate and the clip will transition to Program when the clip playing in Program ends. This is the same as manually selecting the next clip in Preview, clicking the “Link Temp” button, and setting the “Link Duration” manually in Show Controls. The clip in Preview (and Link Duration) can still be changed once the clip is playing.
Link duration - Sets the duration for a transition to the next clip when playout of the clip ends. A negative number creates a Dissolve (-3.00 = 3 second dissolve), zero creates a Cut, and a positive number creates a Delay (+3.00 = 3 second Delay).
Print - The playlist can be printed or saved as a PDF file by using the File menu and selecting Print.
Clips can be reordered by dragging and dropping, or by using the “Move Up” and “Move Down” options from the “Action” button.
If a clip has been moved from its original location or is off-line, its text will be grayed out. By clicking the “Action” button and selecting “Locate” you can redirect the reference to its new location, however the clip must have the same name.
# Field - Enter alphanumeric text to allow for easy cueing of the next desired clip. In PlaybackPro Plus, the Clip Number can be entered on the keyboard to directly load a clip into Preview. In SimpleSync, the Clip Number can be used to load clips into Preview across multiple PlaybackPro Plus systems. The Clip Number field is for operator convenience, and does not affect the order in which the clips are played.
Title - Allows you to rename the reference of the clip for easier identification. Changing the title in this field does not change the filename of the original file stored on a hard drive.
Comment - Enter text / production notes for the clip
Section - Enter text / production notes for the clip
TRT - Total runtime of the clip
Loop - Select to loop an individual clip. When a clip that’s set to Loop begins playback, the “Loop Temp” button in Show Controls is activated. See Section 4.2 for more information on Show Controls. An entire playlist may be looped by selecting the “Link” checkbox for each clip.
Loop Duration - Sets the loop duration time. A negative number creates a seamless Dissolve (-3.00 = 3 second dissolve) between the end of the clip and the beginning of the clip, zero creates a Cut, and a positive number creates a Delay (+3.00 = 3 sec- ond Delay) before the clip starts playing again. This is the same as clicking the “Loop Temp” button and setting the “Loop Duration” manually in Show Controls.
Freeze - Selecting this checkbox will freeze on the last frame of the clip playing in Program and activates the “Freeze Temp” button in Show Controls. To end the freeze, “Take” another clip or click on the “Freeze Temp” button.
Link - When checked, the next clip in the playlist will automatically load into Preview, the “Link Temp” button in Show Controls will activate and the clip will transition to Program when the clip playing in Program ends. This is the same as manually selecting the next clip in Preview, clicking the “Link Temp” button, and setting the “Link Duration” manually in Show Controls. The clip in Preview (and Link Duration) can still be changed once the clip is playing.
Link duration - Sets the duration for a transition to the next clip when playout of the clip ends. A negative number creates a Dissolve (-3.00 = 3 second dissolve), zero creates a Cut, and a positive number creates a Delay (+3.00 = 3 second Delay).
Print - The playlist can be printed or saved as a PDF file by using the File menu and selecting Print.

Navigation Controls
Navigation Controls are used for finding specific parts of a clip to set In and Out points and the Slate image. There is a set of controls for both Preview and Program.
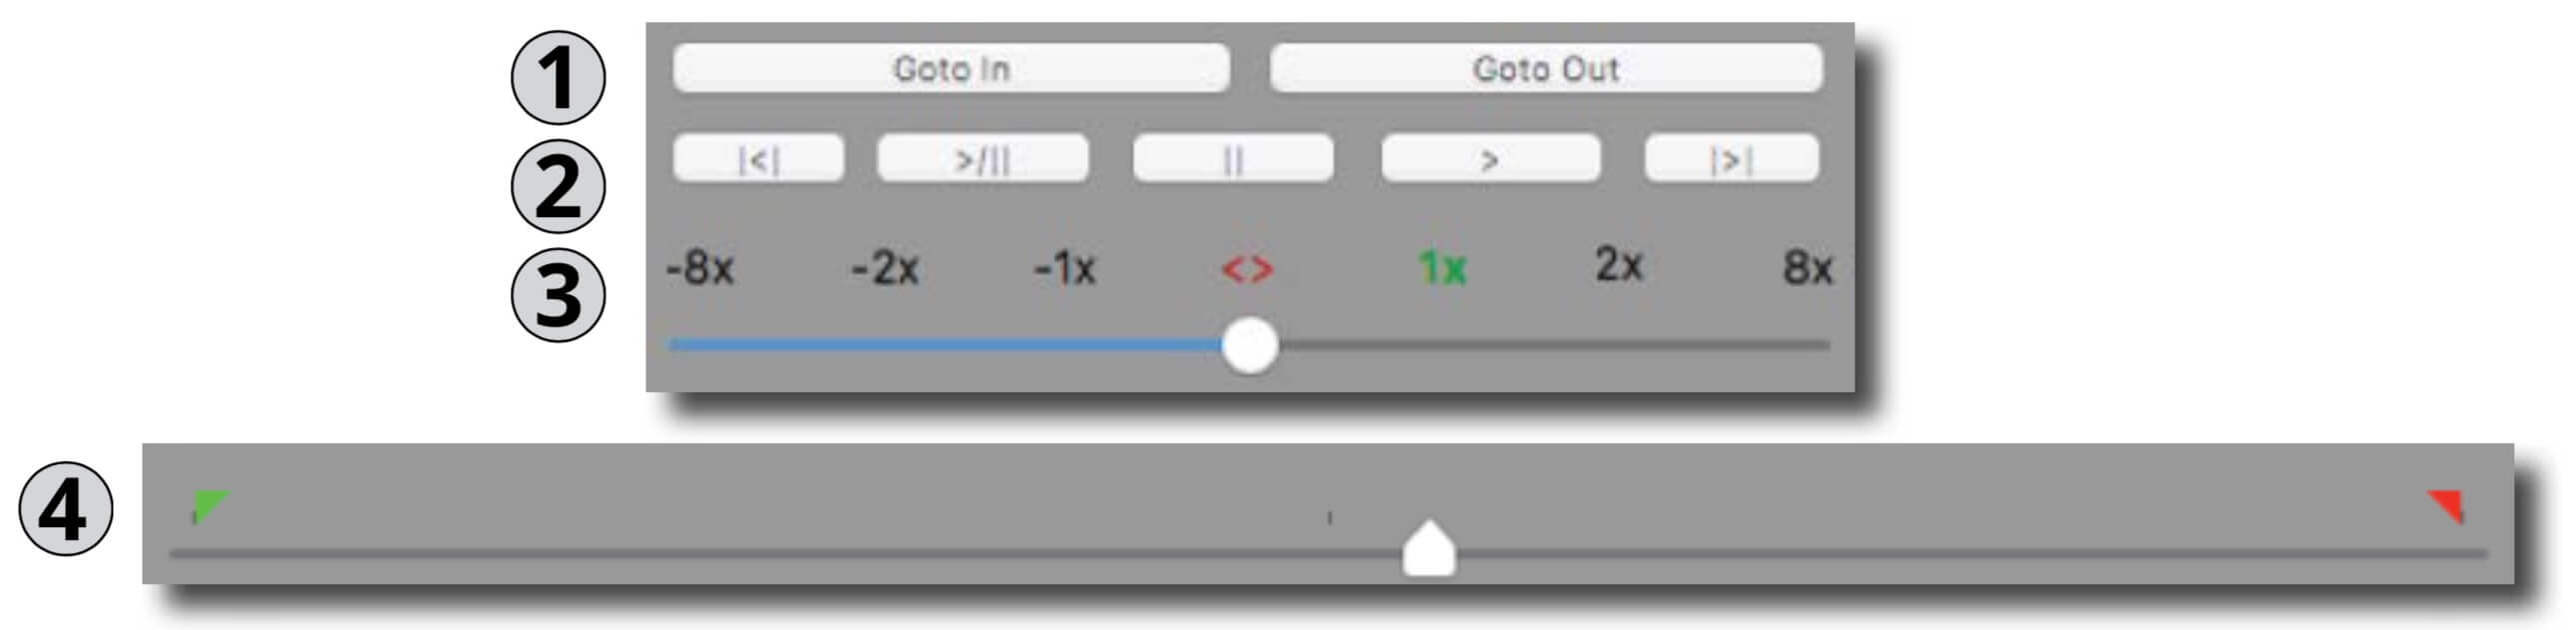
- Goto In / Out - Moves the playback position to the In or Out Point
- Control Buttons - Fast Reverse, Play-Pause Toggle, Pause, Play and Fast Forward buttons (in order from left to right)
- Shuttle - Temporarily changes the playback speed. This is primarily used to set up a clip in Preview, however it can be used in Program. Clips in Program always begin playback at normal speed.
- Scrubber - Used to find specific parts of a clip so that In, Out, and Slates can be set. This is primarily used in Preview, however can be used while in Program. When a Preview clip is Taken to Program, it starts from its In Point regardless of the Scrubber position.
Functions

Clip Settings
The Clip settings determine how a clip is played back in Program, and only affects the selected clip (whether in Preview or Program). All settings are saved when the Show File is saved.
Main Tab
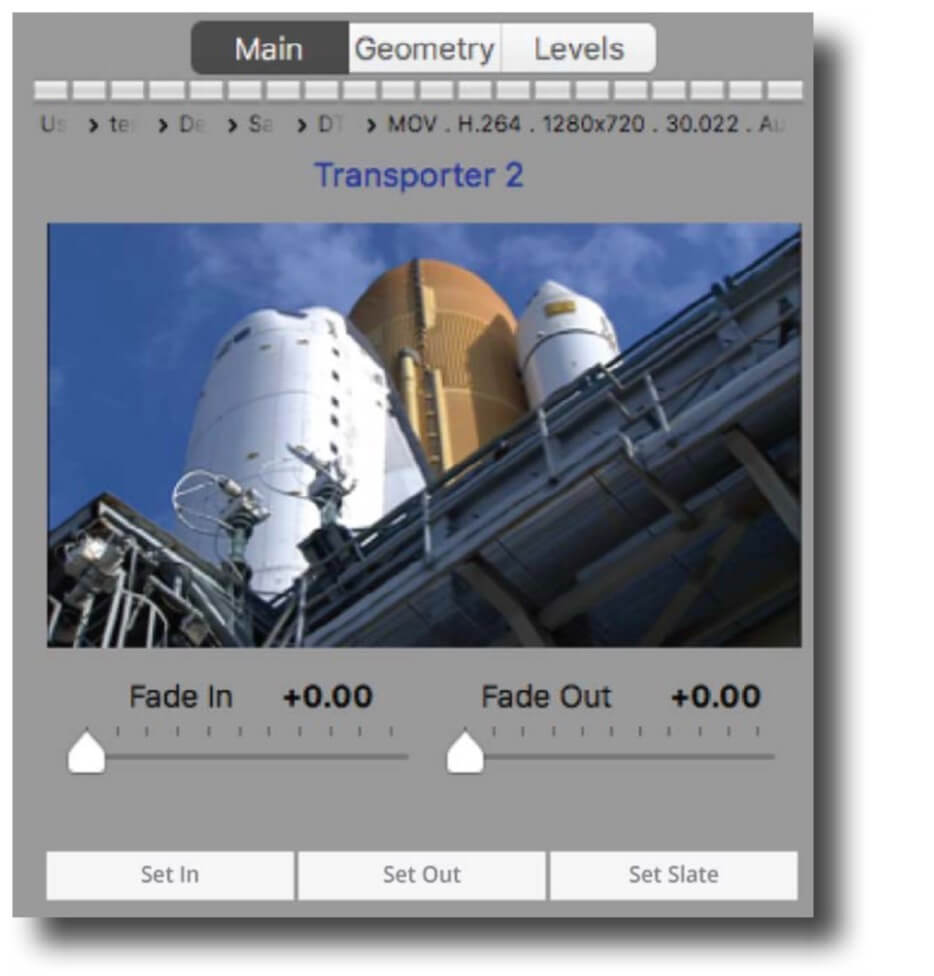
- File Path Indicator - Shows the path and name of the referenced file
- Fade-In Duration - Tells clip how long to Fade-In on Take
- Fade-Out Duration - Tells clip how long to Fade-Out at end
- Set In - Sets where clip will begin playback
- Set Out - Sets where clip will end playback
- Set Slate - Used to set the Slate image for that clip
Geometry
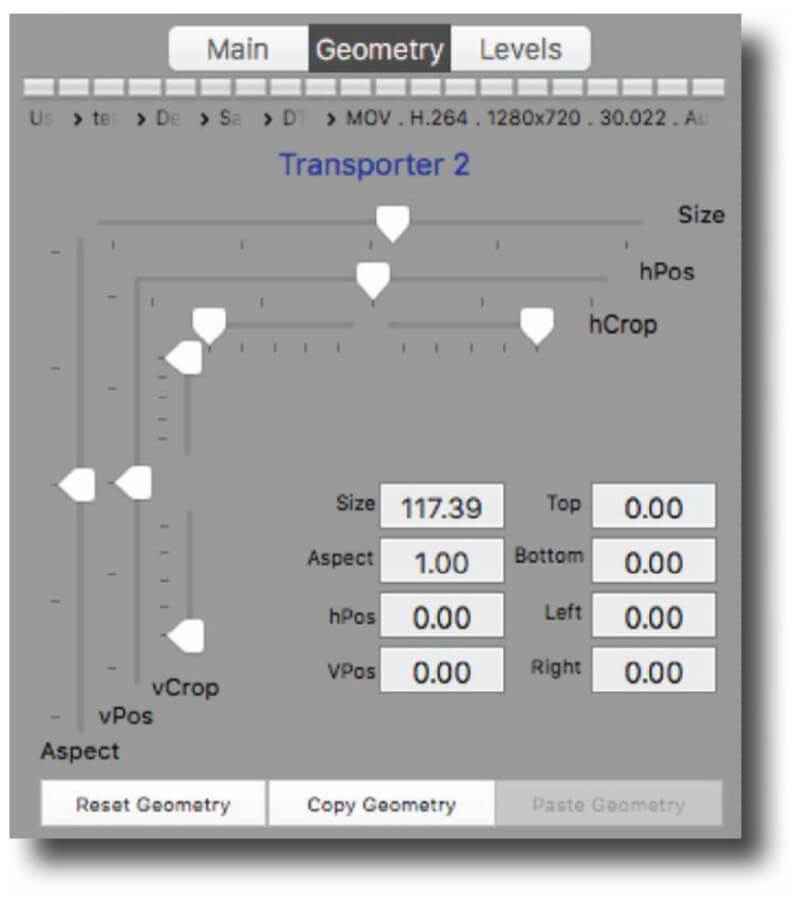
Geometry settings are available on both the Preview and Program side to control the size, aspect ratio, cropping and positioning of clips and will be stored in the playlist if altered.
Geometry can be copied and pasted between clips using the “Copy Geometry” and “Paste Geometry” buttons.
Levels
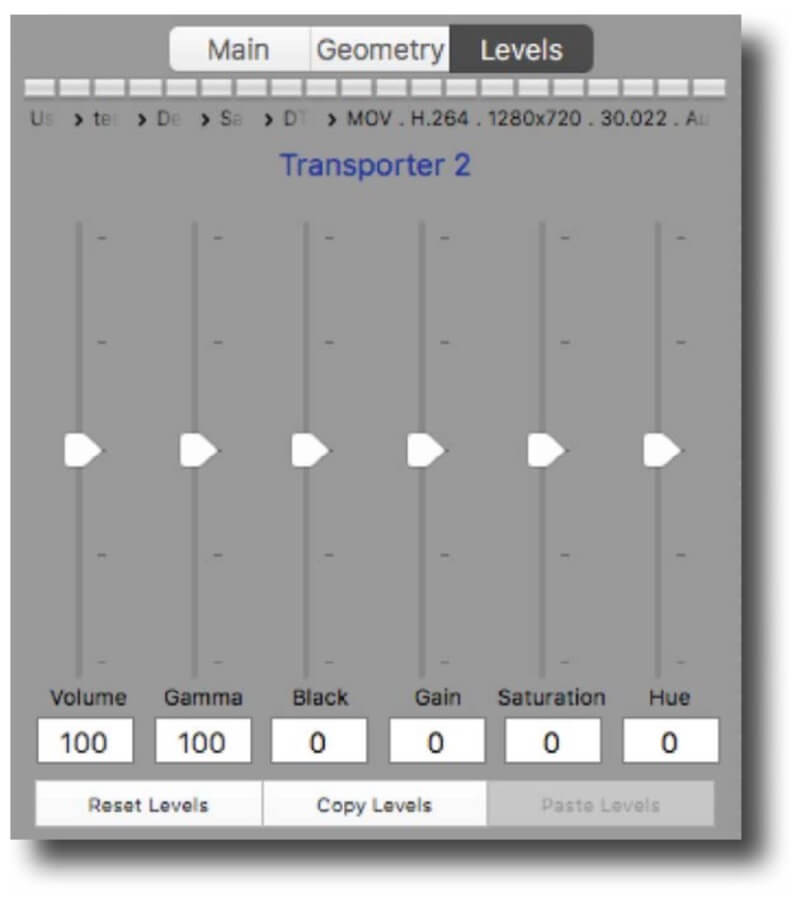
Level settings are also available on both the Preview and Program side to control the black level, gain, gamma, color, hue and volume of the current clip. If the clip is in Program, changes are seen on the video output as well as in the Program section.
Levels can also be copied and pasted between clips using the “Copy Levels” and “Paste Levels” buttons.

Show Controls and Clip Transitions
The Show Controls breakdown into 3 areas: Take, Program’s End and End All. Each is covered in the following sections.
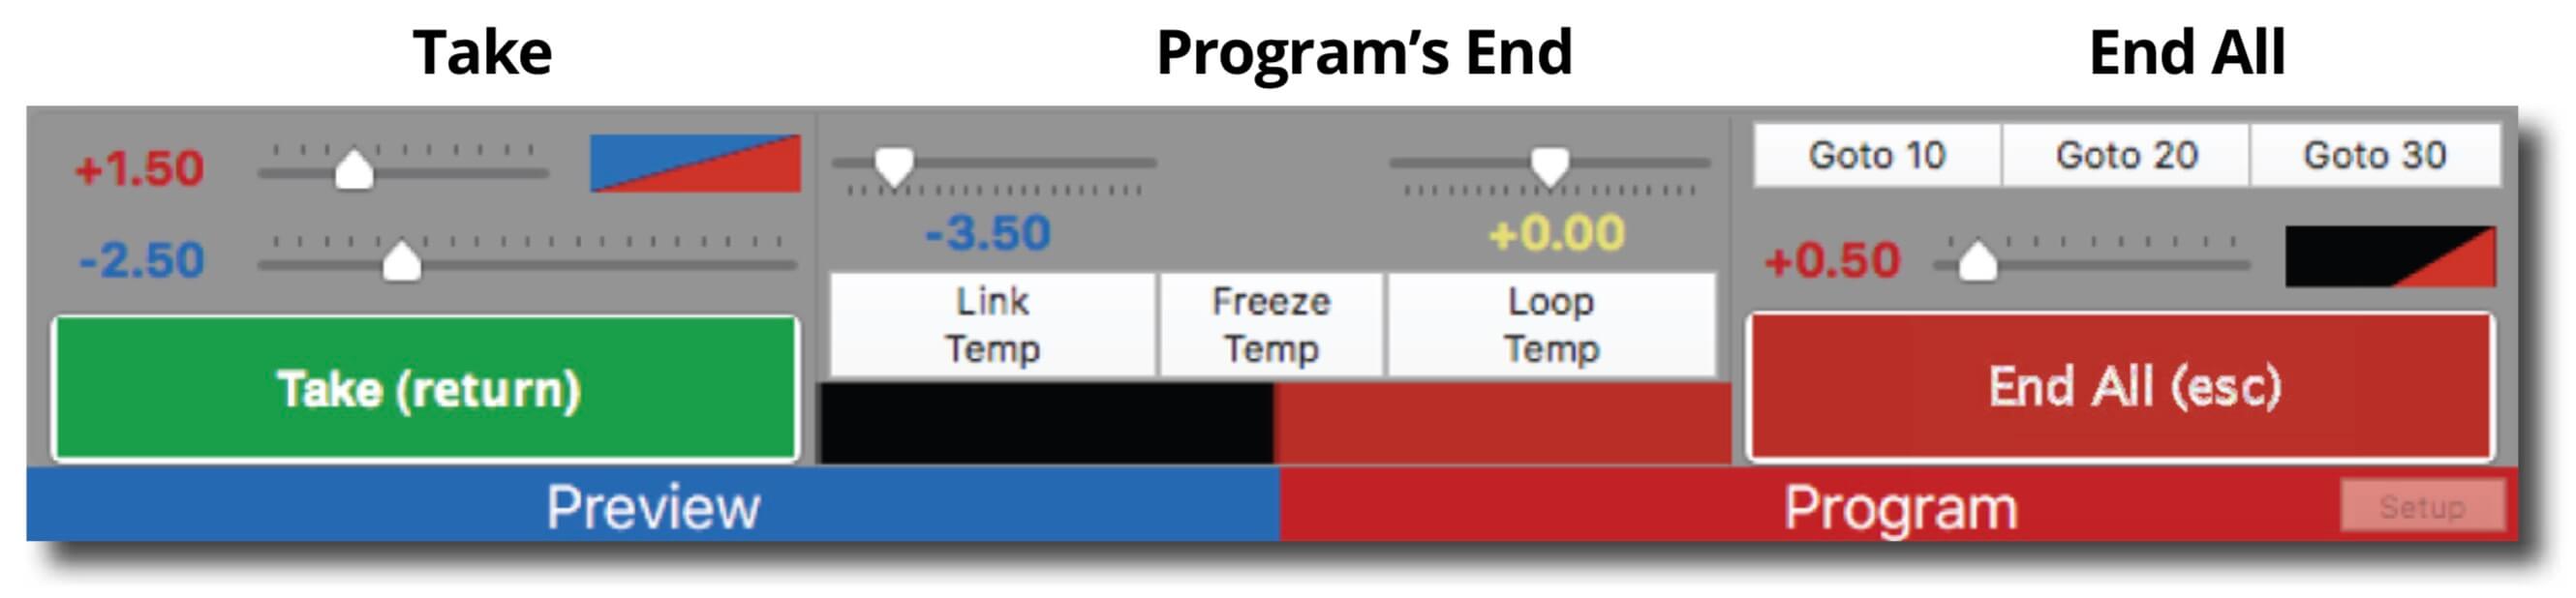
Take
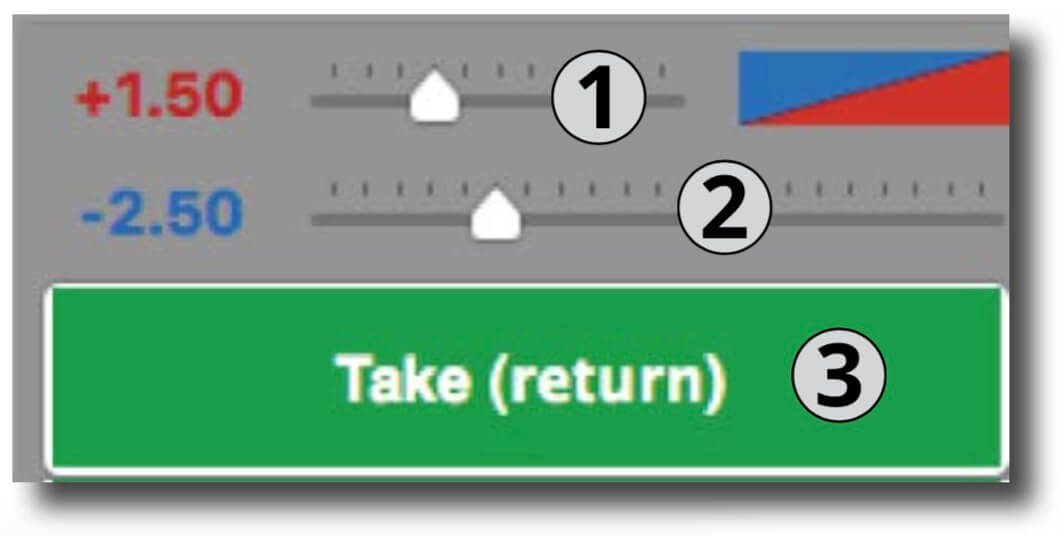
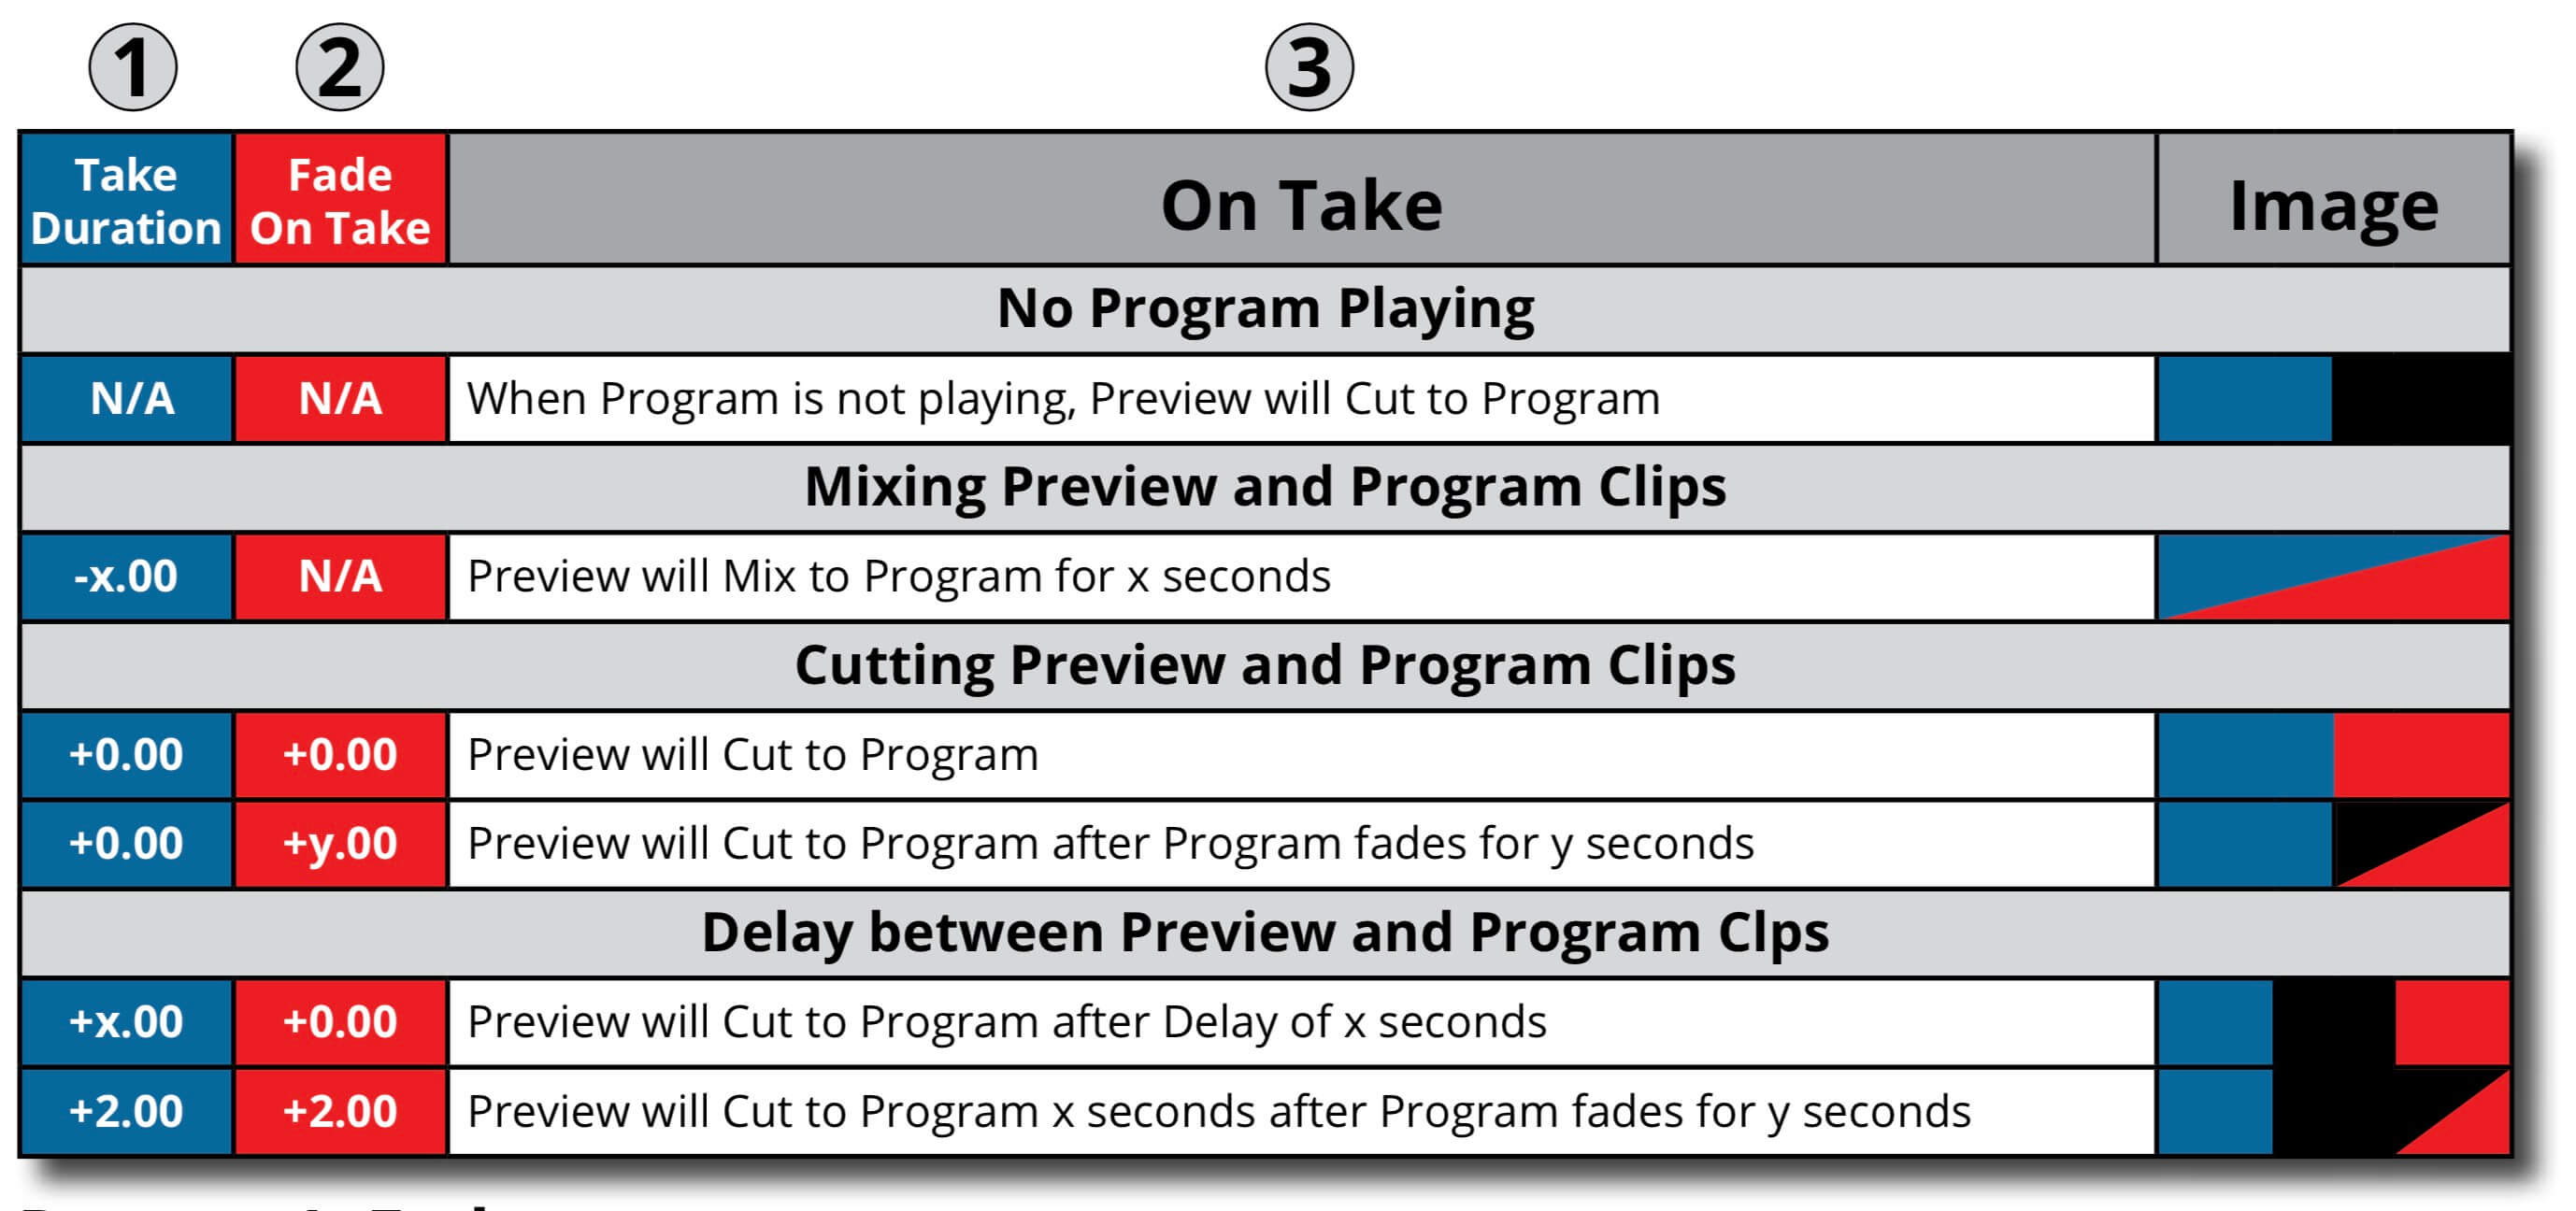
- Fade On Take Duration - If “Take” is clicked while a clip is playing in Program, and the Take Duration is +0.00 or greater (a Cut or Delay), this control fades Program video and audio for the designated duration, before performing the Cut or Delay.
- TakeDuration - Controls how the Preview clip transitions to Program when “Take” is clicked. A negative number creates a Dissolve (-3.00 = 3 second dissolve), zero creates a Cut, and a positive number creates a Delay (+3.00 = 3 second Delay).
- Take - Takes the Preview clip to Program
If there is nothing playing in Program, clicking “Take” causes the Preview clip to begin playing immediately (as a Cut), regardless of the Take Duration.
Possible Take Transitions
Program's End
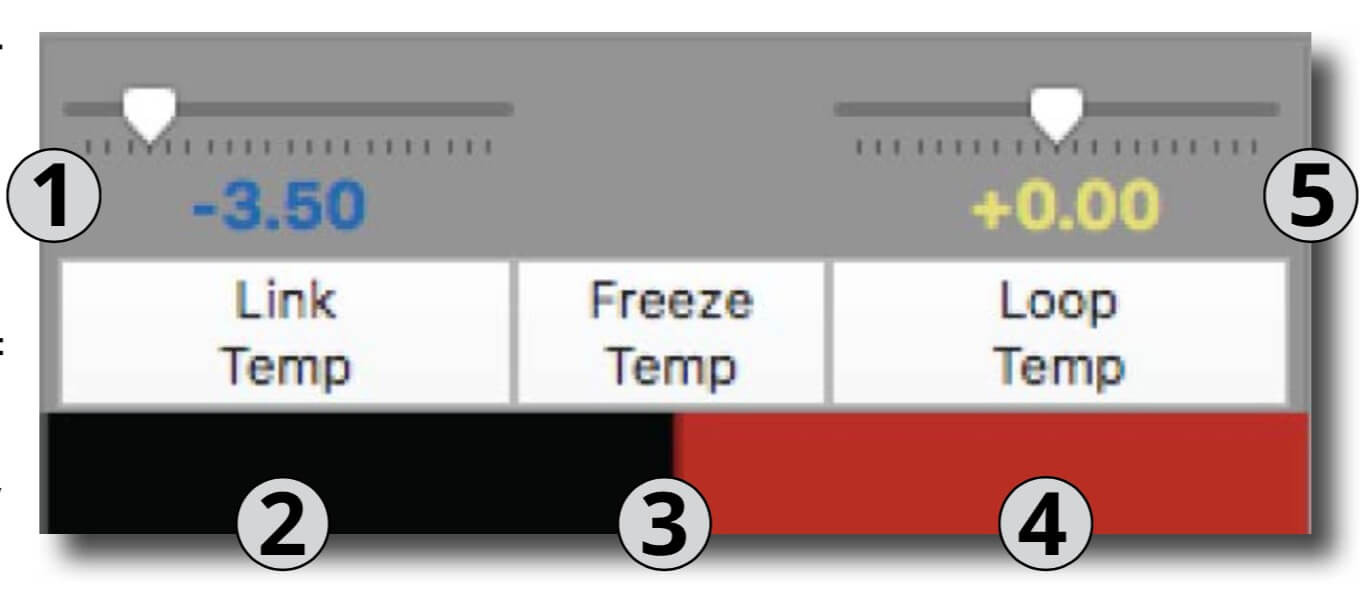
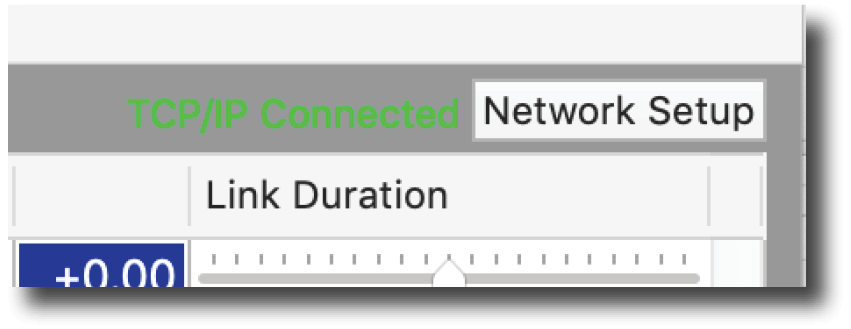
- Link Duration - Controls how the Preview clip transitions to Program when “Link Temp” is 1 selected and the Program clip has reached its end. A negative number creates a Dissolve (-3.00 = 3 second dissolve), zero creates a Cut, and a positive number creates a Delay (+3.00 = 3 second Delay).
- Link Temp - Temporarily Links or Un-links Preview and Program based on the Link Duration. The preview clip will not play if either “Freeze Temp” or “Loop Temp” is selected. This does not affect the clip’s permanent Link setting.
- Freeze Temp - Temporarily freezes Program clip when it reaches its Out Point. A freeze can be terminated by either unselecting “Freeze Temp”, “Taking” a Preview Clip, or clicking “End All”. The program clip will not Freeze if “Loop Temp” is selected. This does not affect the clip’s permanent Freeze setting.
- Loop Temp - Temporarily Loops or Un-loops the Program clip. Click “End All” to immediately end a loop, or “Take” if a clip is loaded in Preview. This does not affect the clip’s permanent Loop setting.
- Loop Duration - Controls how a loop will transition upon itself. A negative number creates a Dissolve (-3.00 = 3 second dissolve), zero creates a Cut, and a positive number creates a Delay (+3.00 = 3 second Delay).
Goto Buttons
The Goto 10 / Goto 20 / Goto 30 buttons immediately take the progarm to 10, 20 or 30 seconds from the clip’s Out Point.
End All
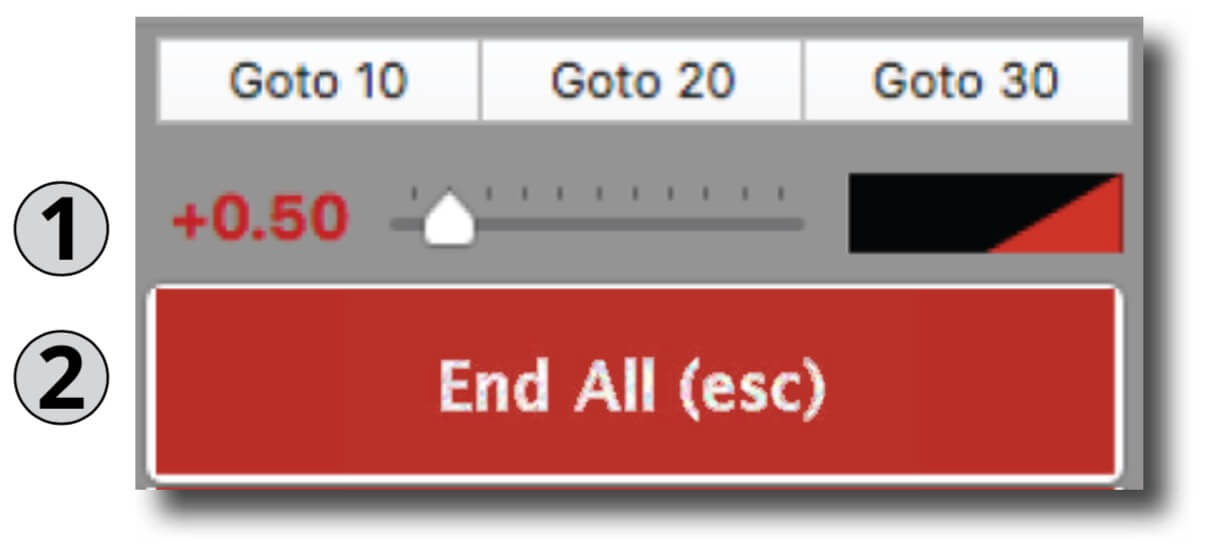
- End All Duration - Specifies how long audio and video will fade out when “End All” is clicked
- End All - Ends Program playback and Preview clip will not play


Edit Multiple Mode
The “Edit Multiple” mode may be selected from the “Action” menu to make changes across multiple clips and must be used with great care. Please make sure you are comfortable with any changes before you save your playlist.
Controller Options
Remote Control
Overview
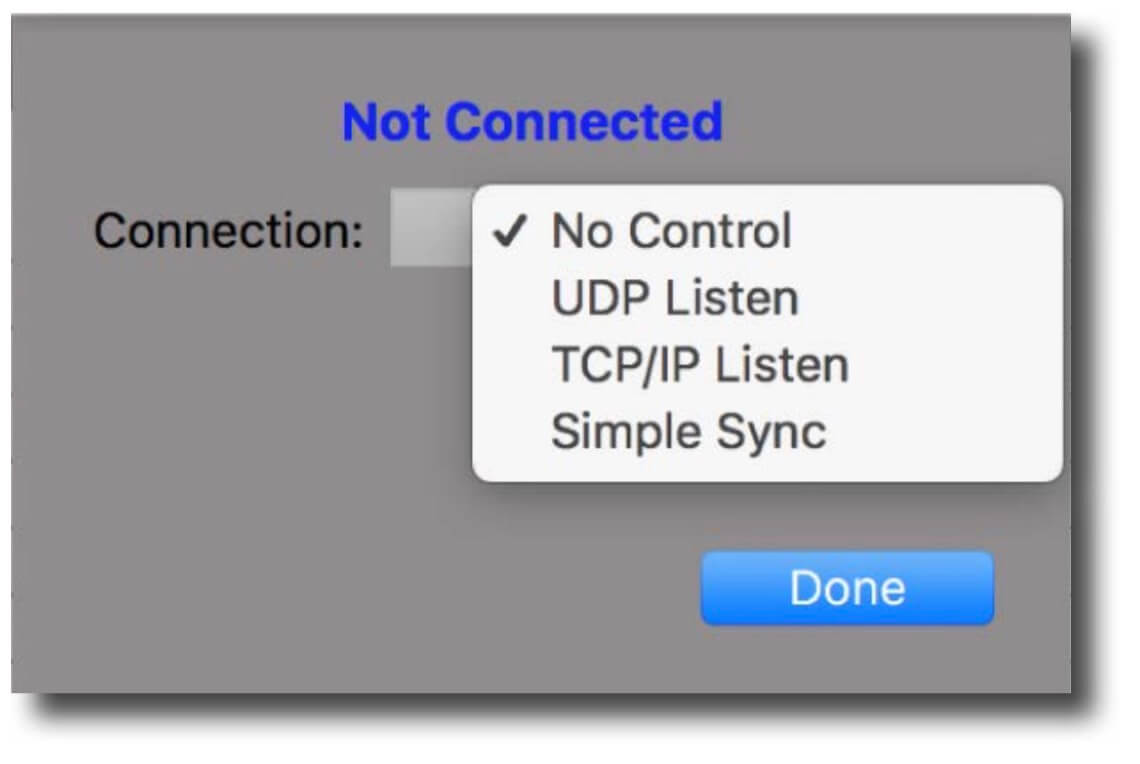
PlaybackPro Plus offers several remote control options.
- No Control - Stops all listening for remote commands
- UDPListen - System listens for commands over ethernet from remote system
- TCP/IPListen - System listens for commands over ethernet from remote system
- SimpleSync - System listens for commands from SimpleSync

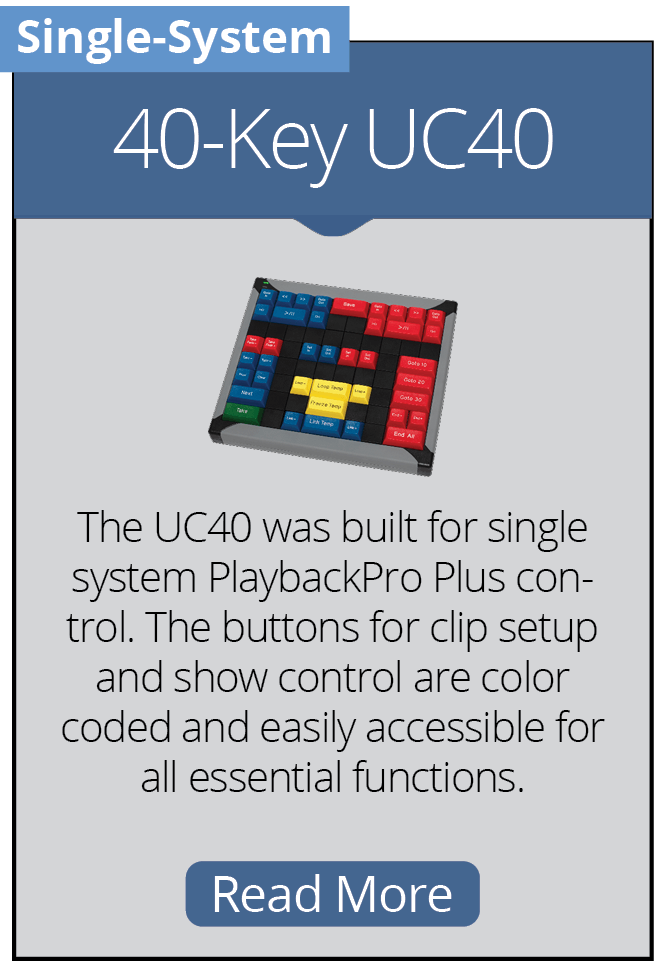
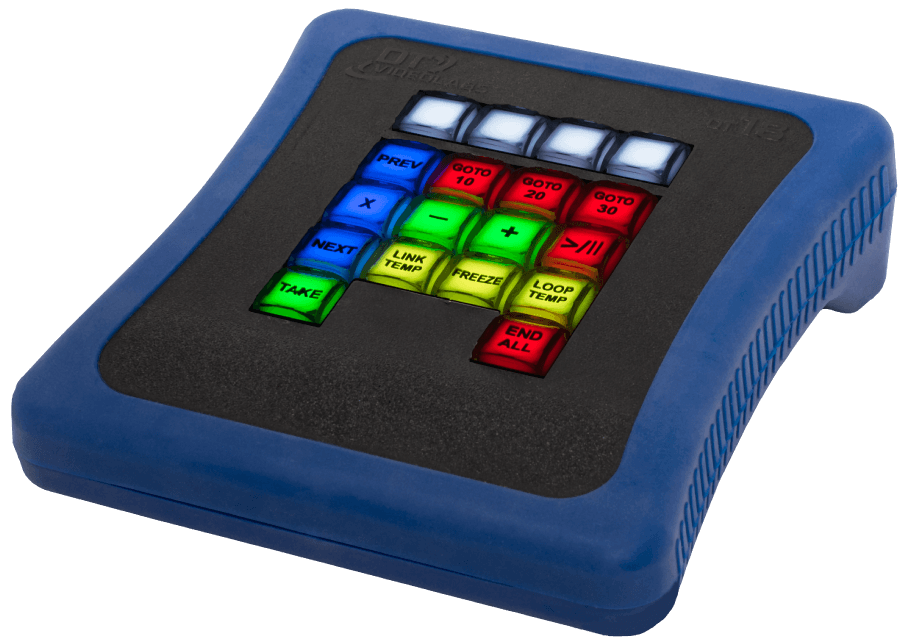
DT18
The DT18 Multi-System Controller is designed and built by DT Videolabs. It allows ethernet control of up to four PlaybackPro Plus systems. For more information, including technical specifications and the User Guide, visit www.dtvideolabs.com/controller-dt18

SimpleSync
SimpleSync is a free, multi-sync roll companion application for PlaybackPro Plus. To download SimpleSync and the detailed User Guide please use these links.
Download User Guide - www.dtvideolabs.com/dt-videolabs-user-guides
Download SimpleSync - www.dtvideolabs.com/downloads

UDP and TCP/IP Remote Control
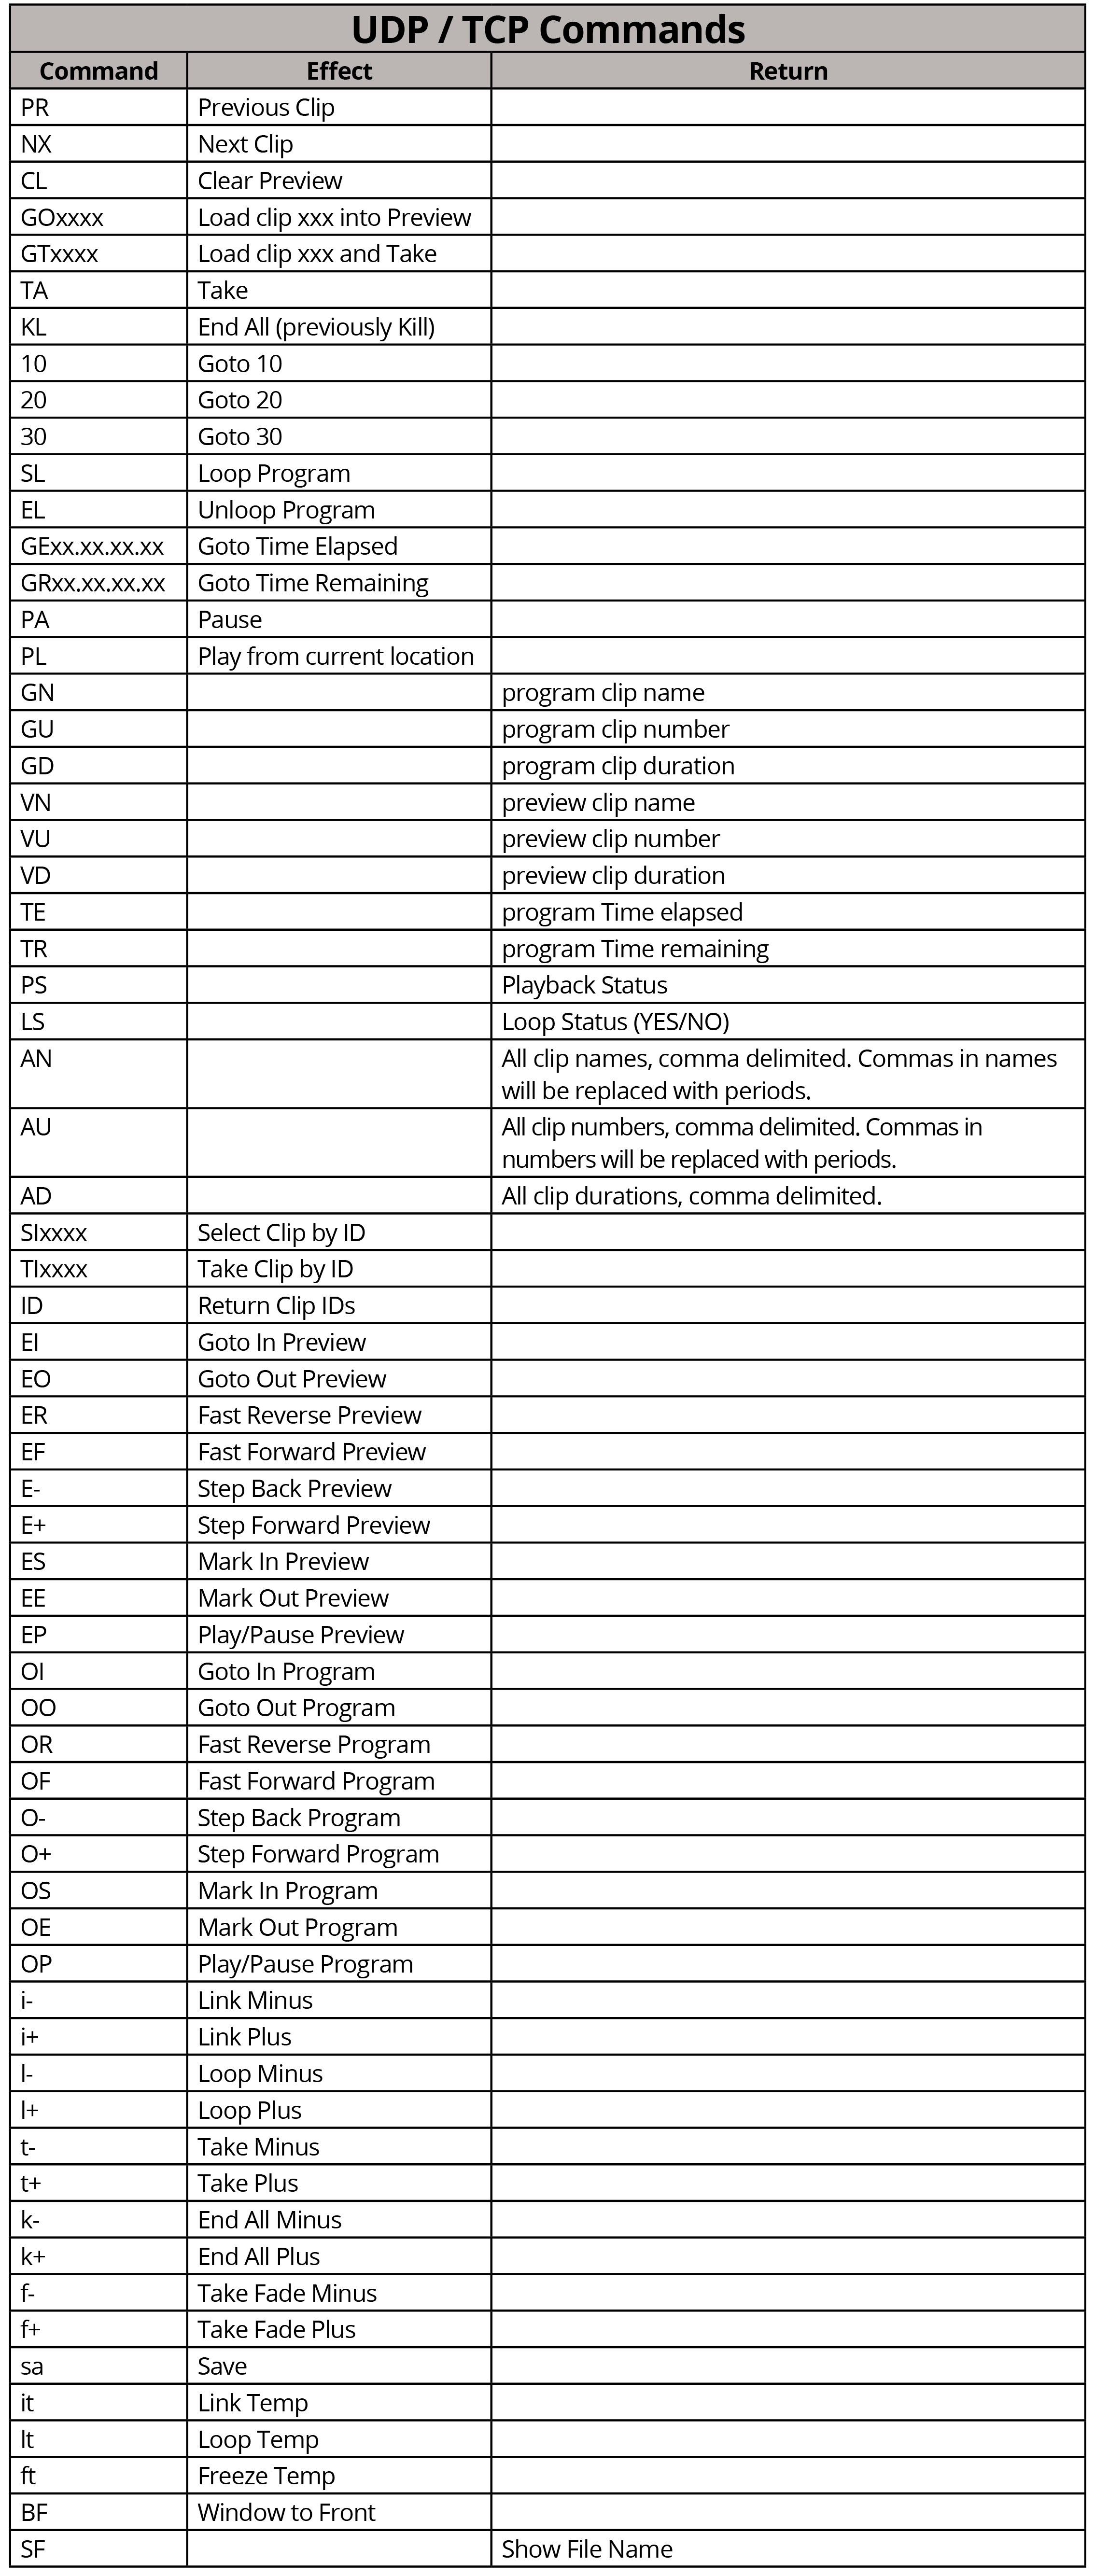
To control PlaybackPro Plus from a device other than SimpleSync, use UDP or TCP IP control. Select UDP Listen or TCP Listen from the “Network Setup” menu. To stop all communications, select “No Control” from the “Network Setup” menu.
UDP
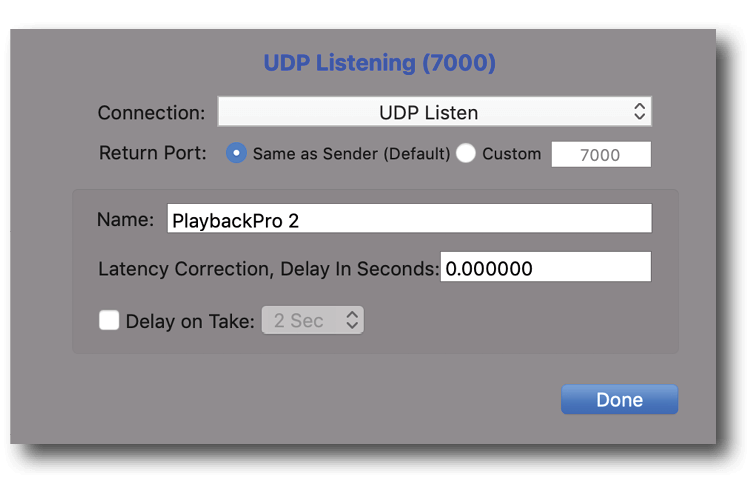
PlaybackPro Plus listens for commands on port 7000. Set the IP address (should be static) and port number on the device that will be controlling PlaybackPro Plus. See the “UDP / TCP Commands” below for commands.
TCP
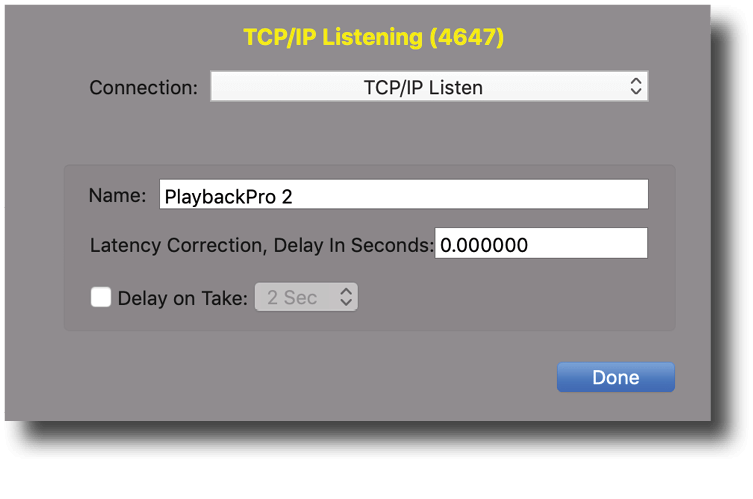
PlaybackPro Plus listens for commands on port 7000. Set the IP address (should be static) and port number on the device that will be controlling PlaybackPro Plus. See the “UDP / TCP Commands” below for commands.
All Keyboard Commands