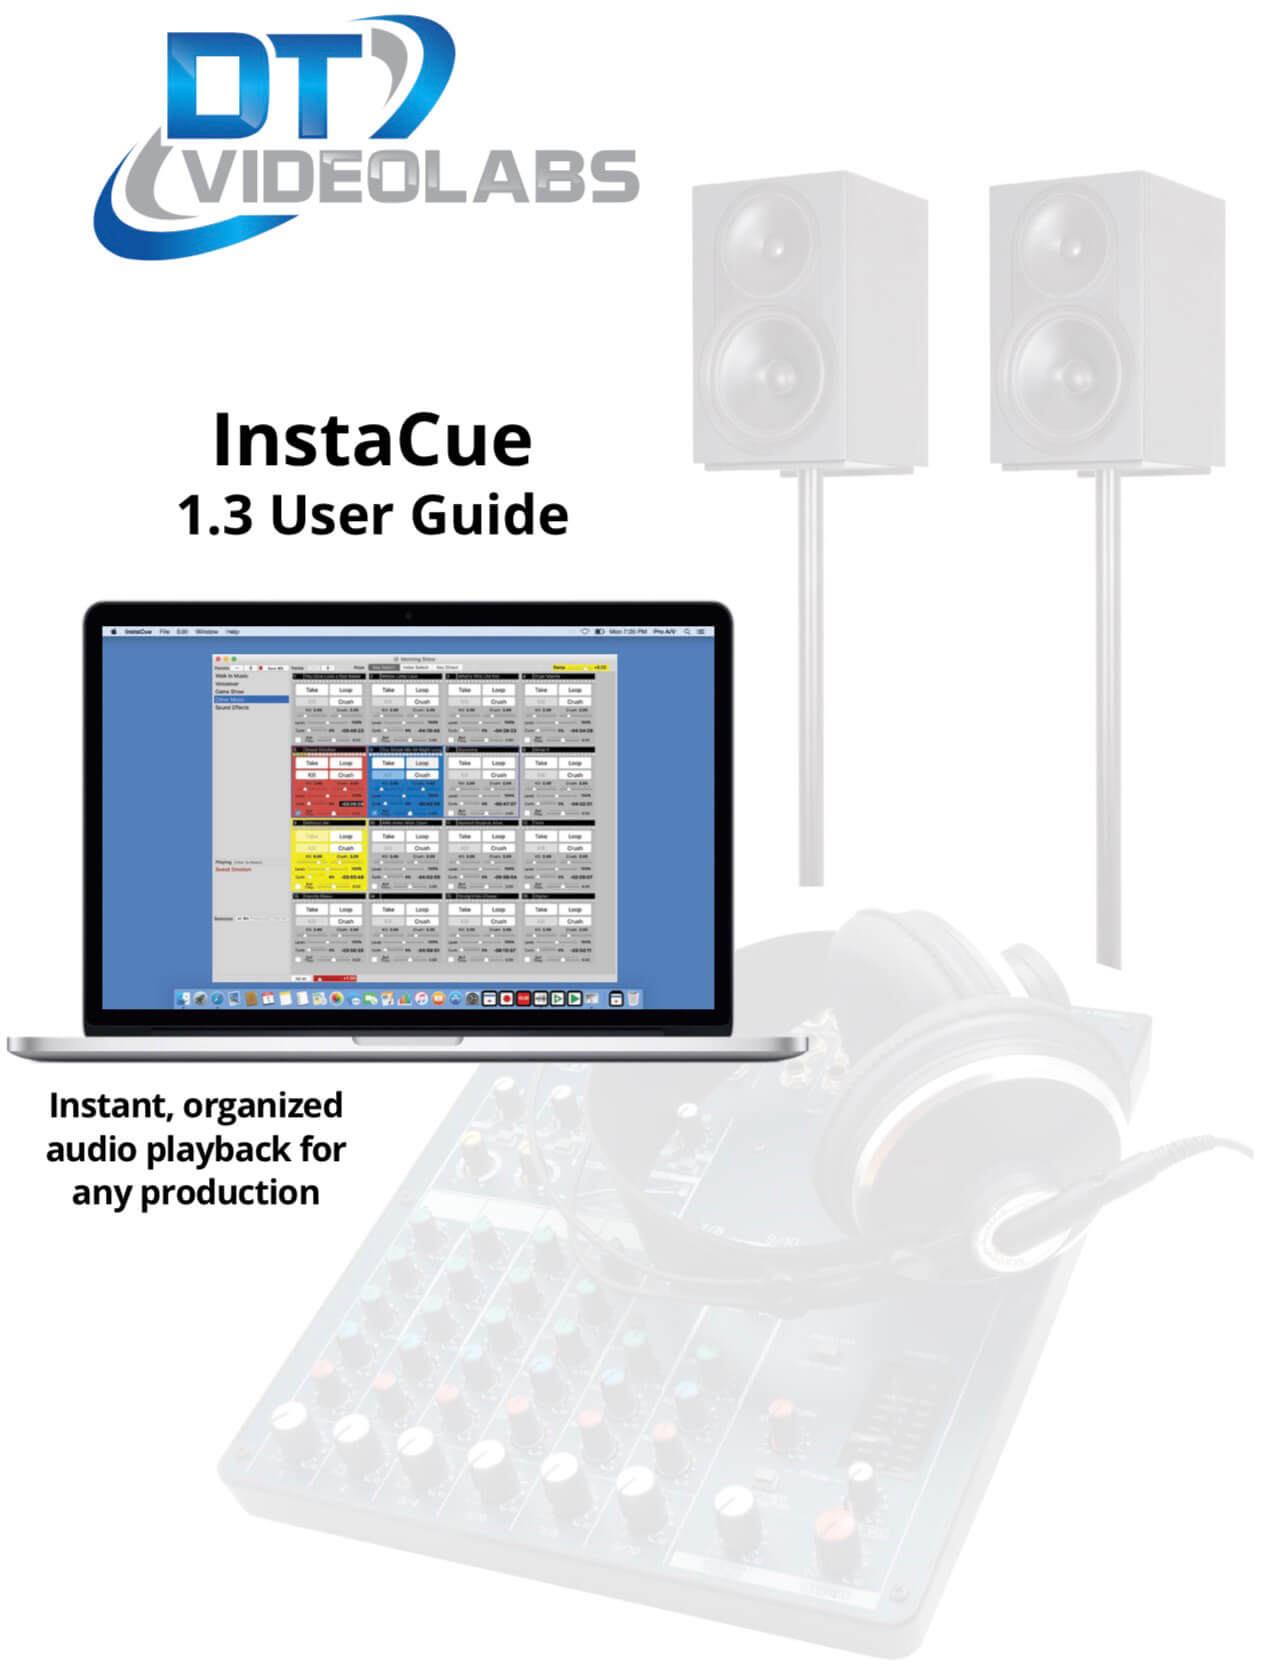
About InstaCue
InstaCue is a Mac based software solution for organized, instantaneous professional audio playback. Similar to, but more flexible than, Instant Replay hardware boxes. InstaCue is ideal for live events, game shows, theater and sports stadiums — anywhere music, voiceover announcements and sounds effects are needed.
Live event professionals require control and organization of content and InstaCue provides a solution with three core elements, Clips, Panels and Show files. Clips can be any Quicktime compatible audio files like m4a, mp3, AAC or Apple Lossless. Clips are added to Panels for organization and application of custom playback attributes like Cross Fade, Loop, Gain and Volume level controls. All attributes are nondestructive to the original files. Show files save all Clip and Panel data for complete show recall.
InstaCue keyboard shortcuts or on-screen show controls allow clips to be played instantly, in any order, individually or even layering multiple clips simultaneously.
Table of Contents
Before You Begin

PreFlight

Each version of macOS has specific settings which have a great impact on playback performance. Before you begin, please visit www.dtvideolabs.com/preflight.This page also includes a link to a printable PDF if needed.
Setup

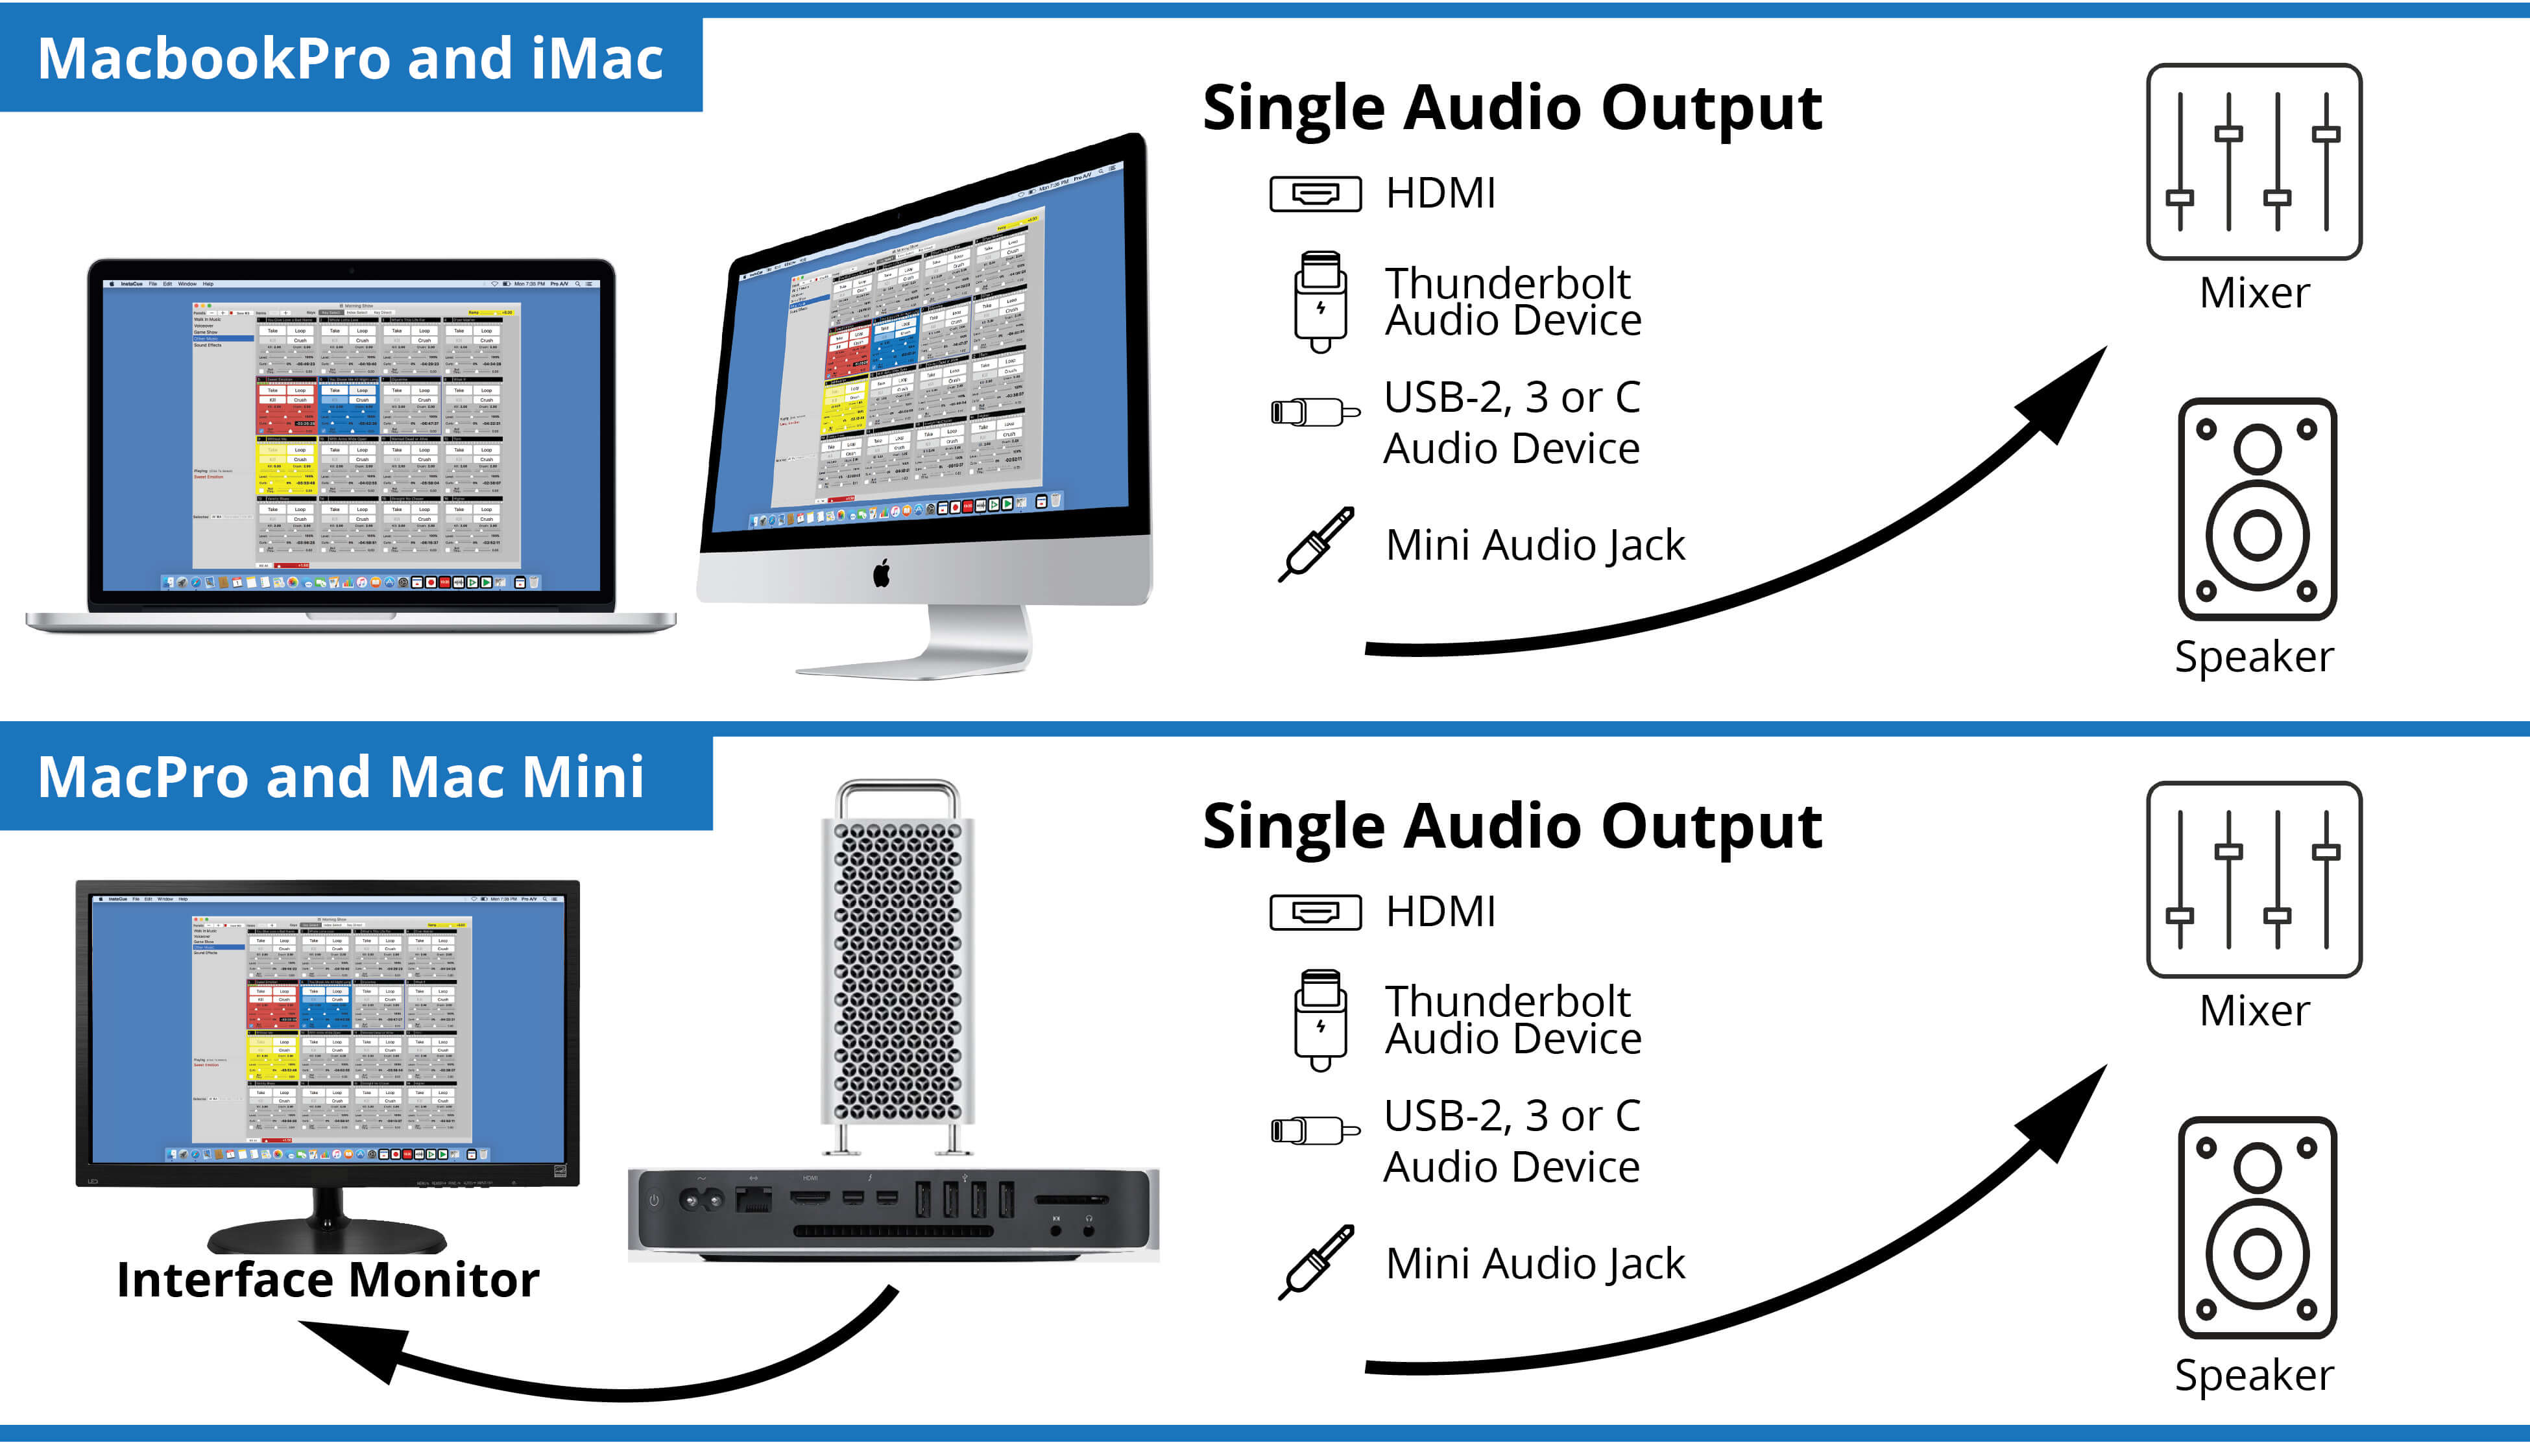
General Hardware Setup
InstaCue can use any available audio compatiable connection from the Mac. Outputs can include USB audio devices, Thunderbolt audio devices, built in mini-jacks and HDMI. Audio output is managed under the “Sound” system preference.

License Activation
Activating an Internet Activated (IA) Serial Number
InstaCue can be activated using a serial code from either InstaCue or the PlaybackPro Collection.
- Download the InstaCue application from the link provided in your purchase email or from the Internet Activated (IA) table on www.dtvideolabs.com/downloads
- Place the unzipped program file into the Applications folder then double click to launch.
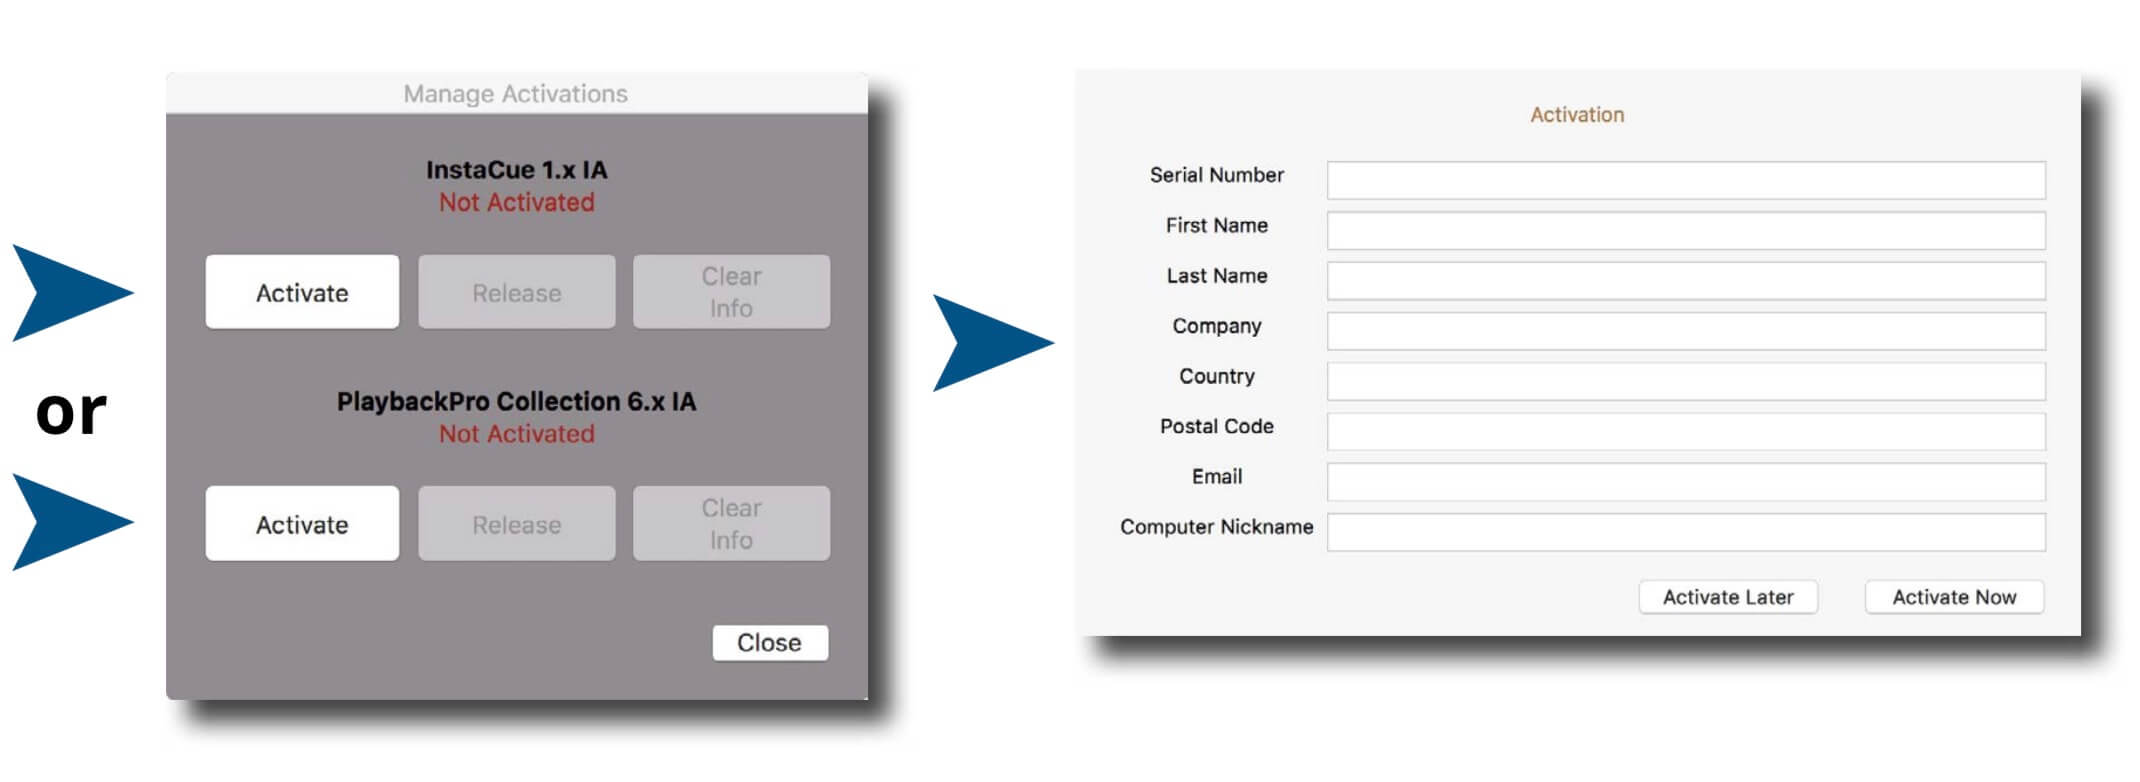
A delay of up to 10 seconds can occur when launching the application. This is normal behavior as the application checks the license. - In the dialog box click the “Activate” button under the name of the application to be activated
- Enter the serial number provided at the time of purchase, including the dashes. A DT Videolabs serial number will always be 4 sets of 8 digits, separated by dashes. For example, xxxxxxxx-xxxxxxxx-xxxxxxxx-xxxxxxxx. Enter your personal registration information in the remaining fields and click “Activate Now”. It is important that you enter something in each of the fields.
Notes
Internet access is required to activate or release a license, however it is not necessary for program use once a license is activated
- Registration information can be unique each time an application is activated
- Licenses are single seat and allow for the use of one application at a time, on one computer at a time
- License may be released from one computer and moved to another using the release process outlined below and at www.dtvideolabs.com/activation
Once activated, the Application Control Window will appear. If you encounter any problems during activation, please visit www.dtvideolabs.com/contact or email technical@dtvideolabs.com.
Releasing an Internet Activated Serial Number
Connect the computer to the internet
- Launch PlaybackPro
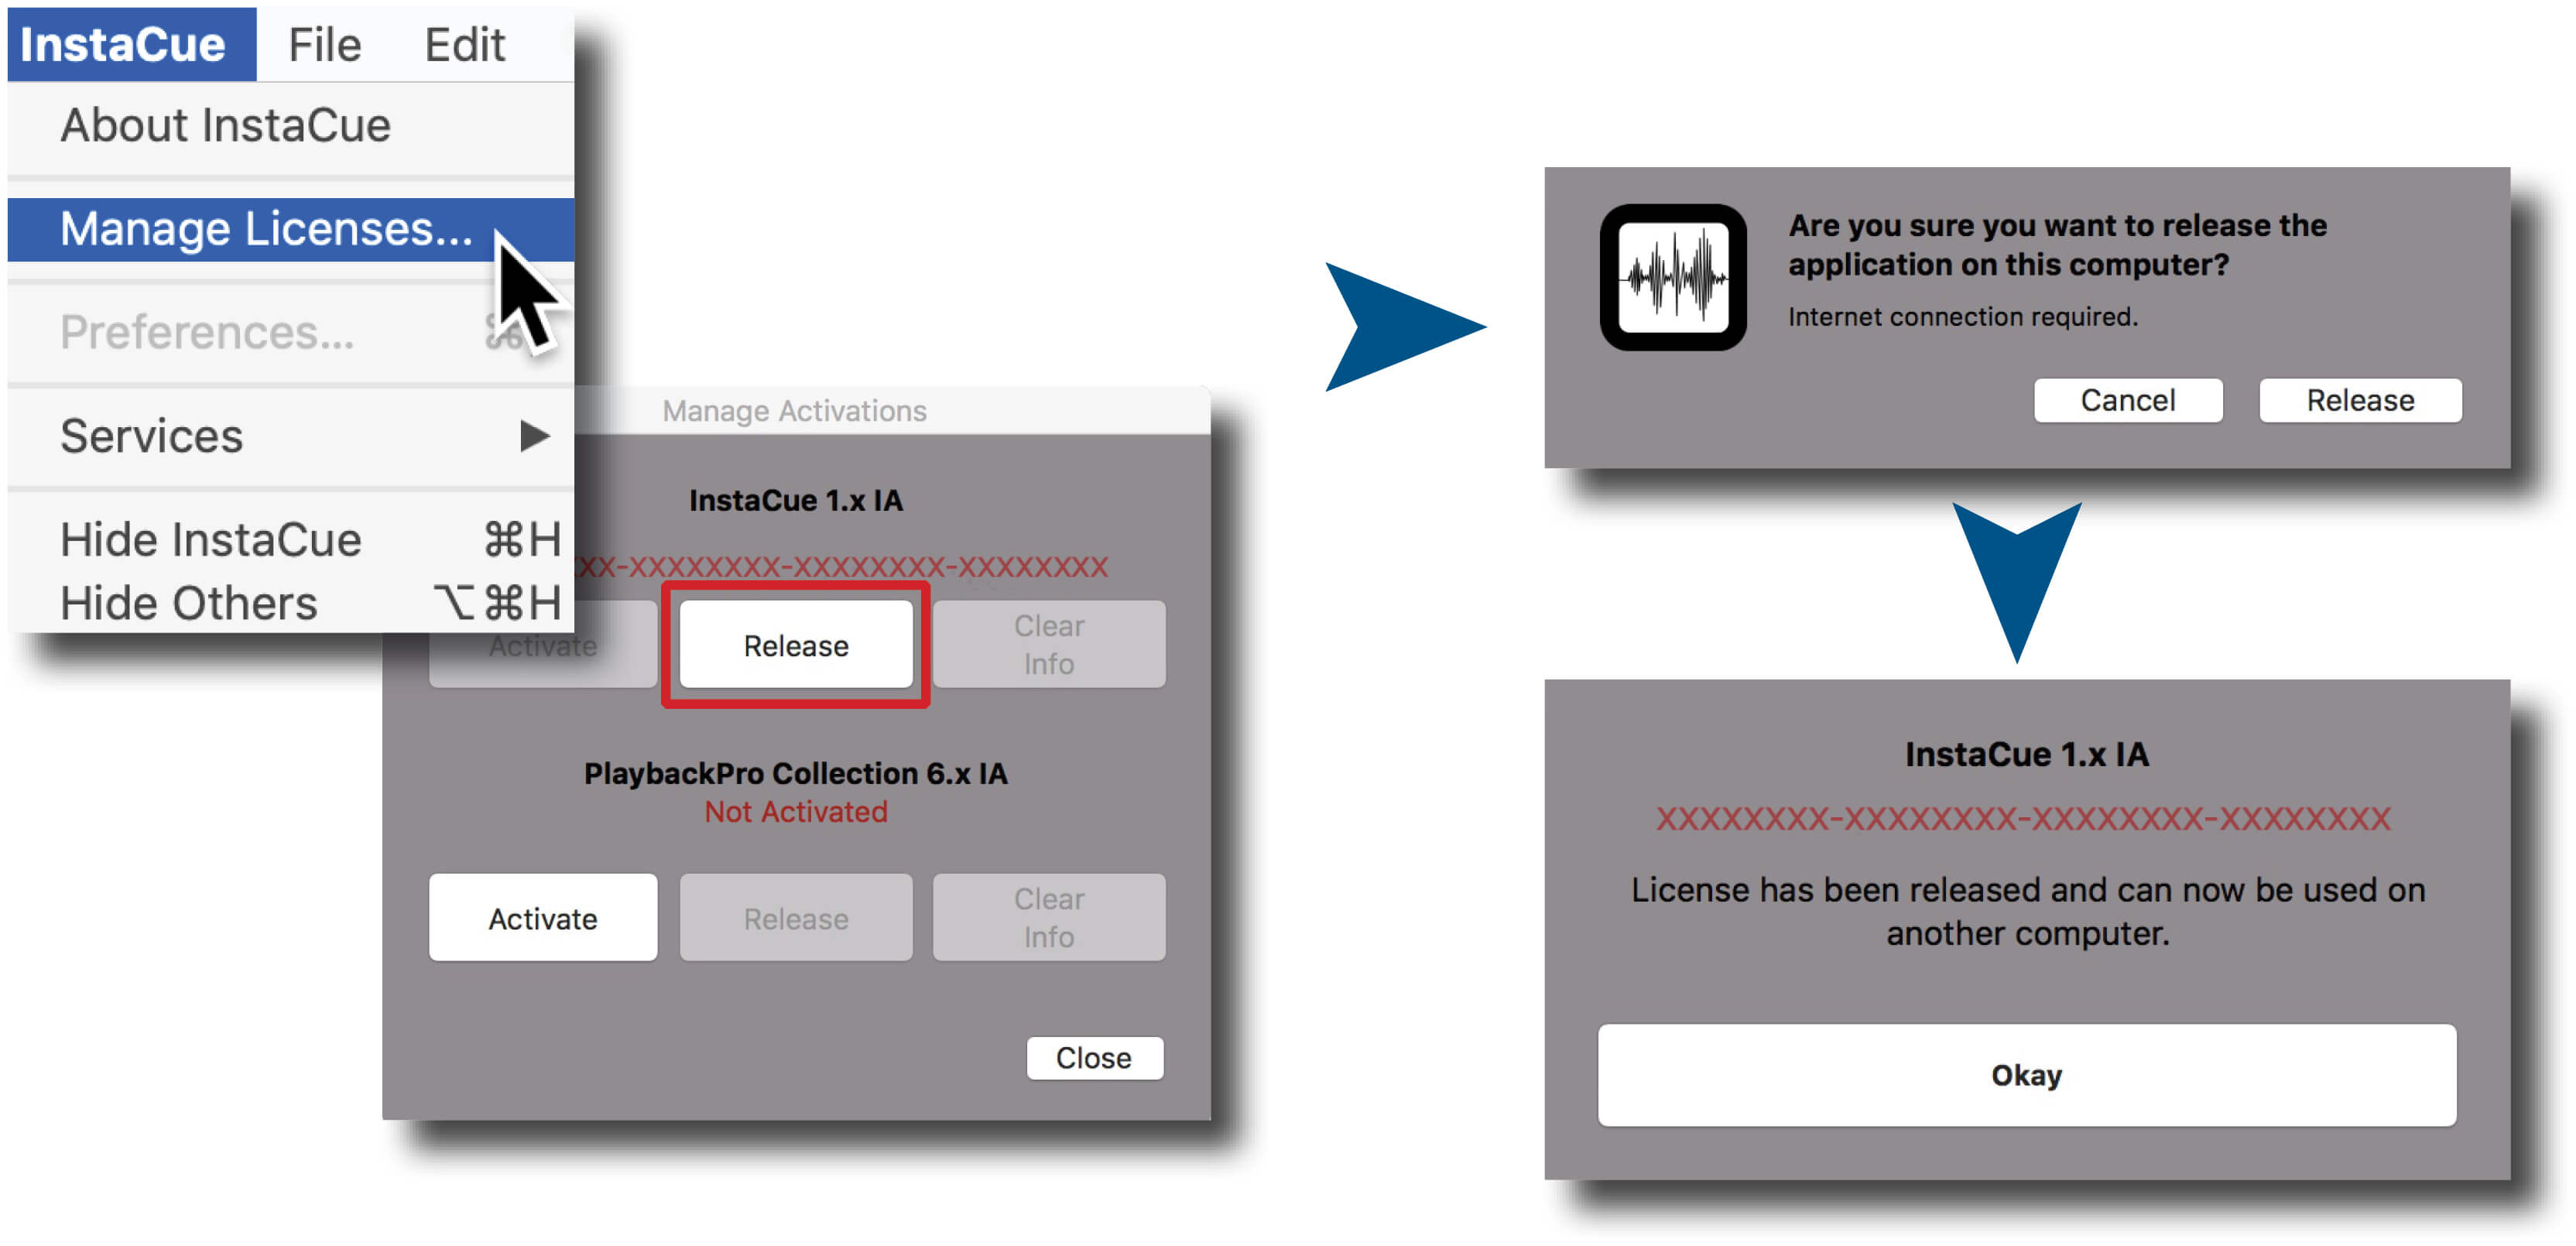
- Go to the PlaybackPro menu (to the left of the File Menu), select “Manage Licenses”
- Store the serial number. A DT Videolabs serial number will always be 4 sets of 8 digits with dashes in-between.
- Click on “Release License”. The system will report when the license has been successfully released and available to activate on another system.
***IMPORTANT*** License information will be retained on your system after you release a license. Users of previous versions will notice the addition of the “Clear Info” button which removes previous license info from your system and can aid in troubleshooting. If you have trouble activating a license, clear the info and try activating again. If you use the “Clear Info” button, it is important for you to retain a copy of your license number so you can reactivate.
New USB Installation Collection Instructions
Connect the computer to the internet
- Insert the USB Enabler key into the system
- If you haven’t already, go to www.dtvideolabs.com/downloads to download the Collection
- Place the unzipped program files into the Applications folder then double click an application to launch
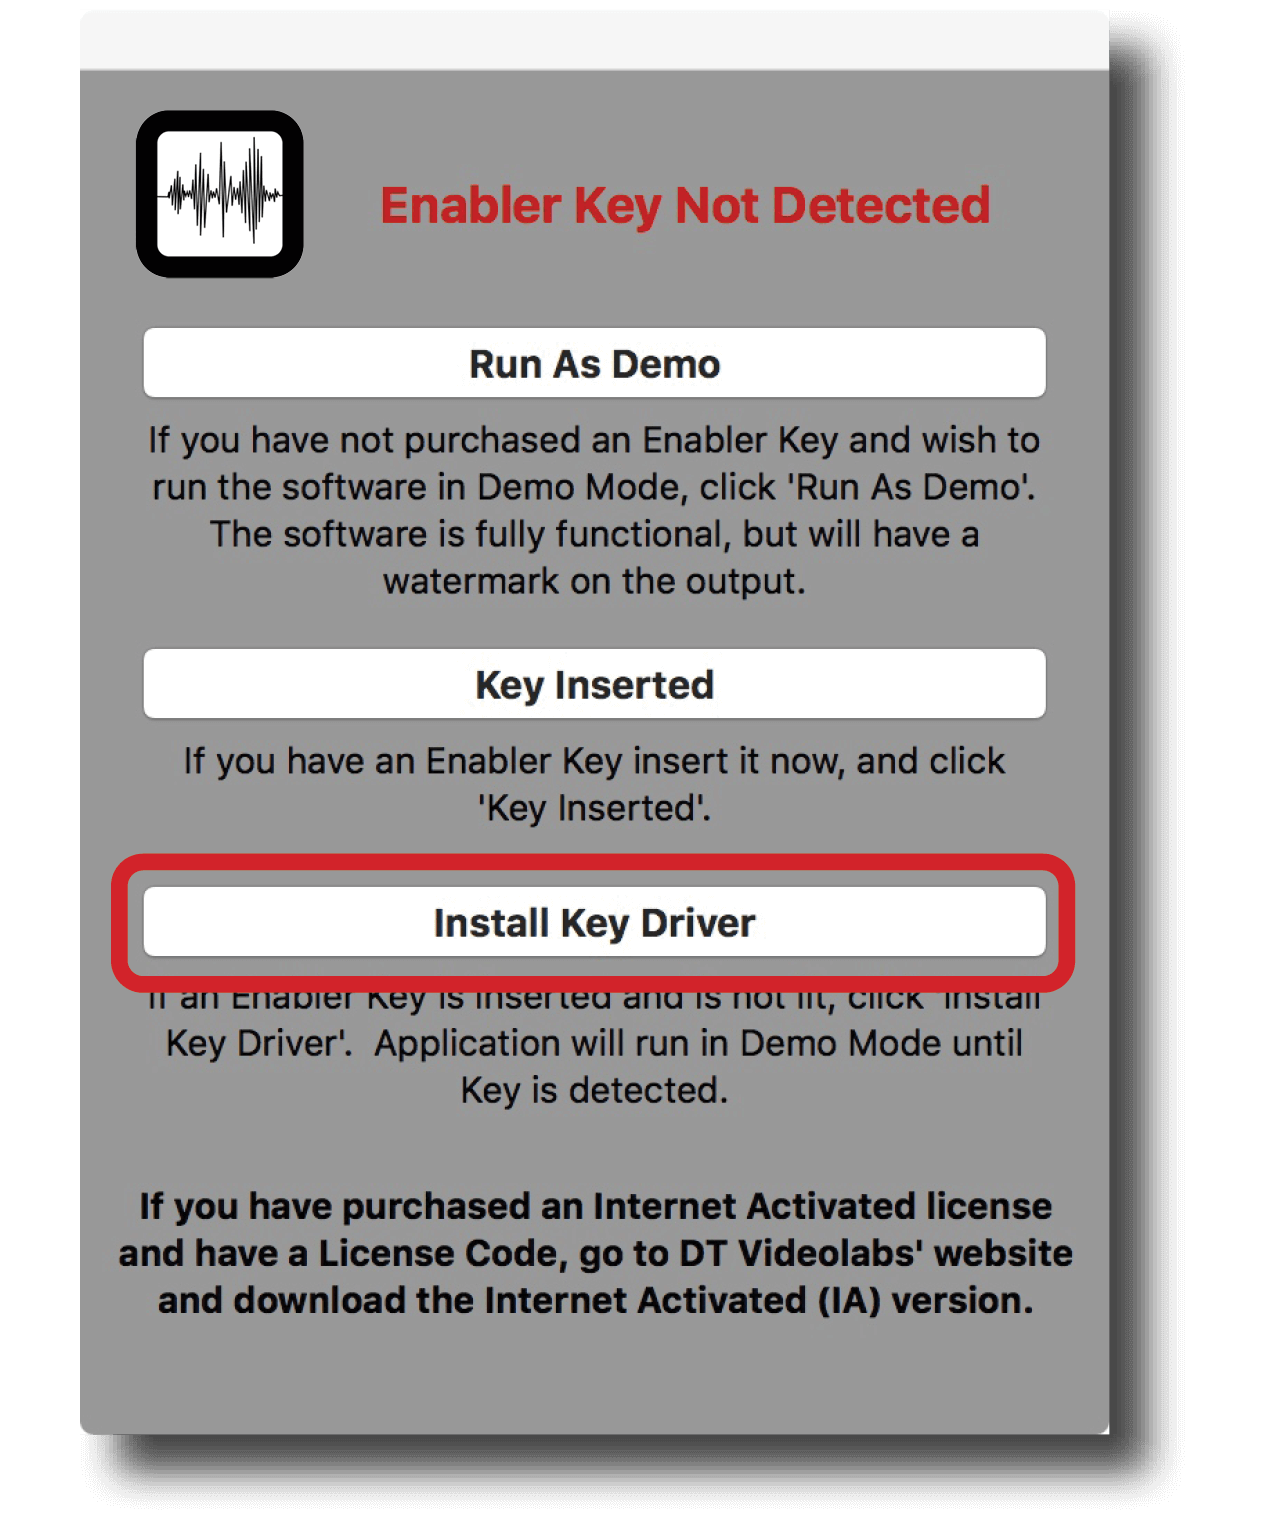
- If running an application on a system for the first time, a window will open after you attempt to create or open a show. Select “Install Key Driver”and follow the on-screen instructions
***IMPORTANT*** License information will be retained on your system after you release a license. Users of previous versions will notice the addition of the “Clear Info” button which removes previous license info from your system and can aid in troubleshooting. If you have trouble activating a license, clear the info and try activating again. If you use the “Clear Info” button, it is important for you to retain a copy of your license number so you can reactivate.

Demo Mode
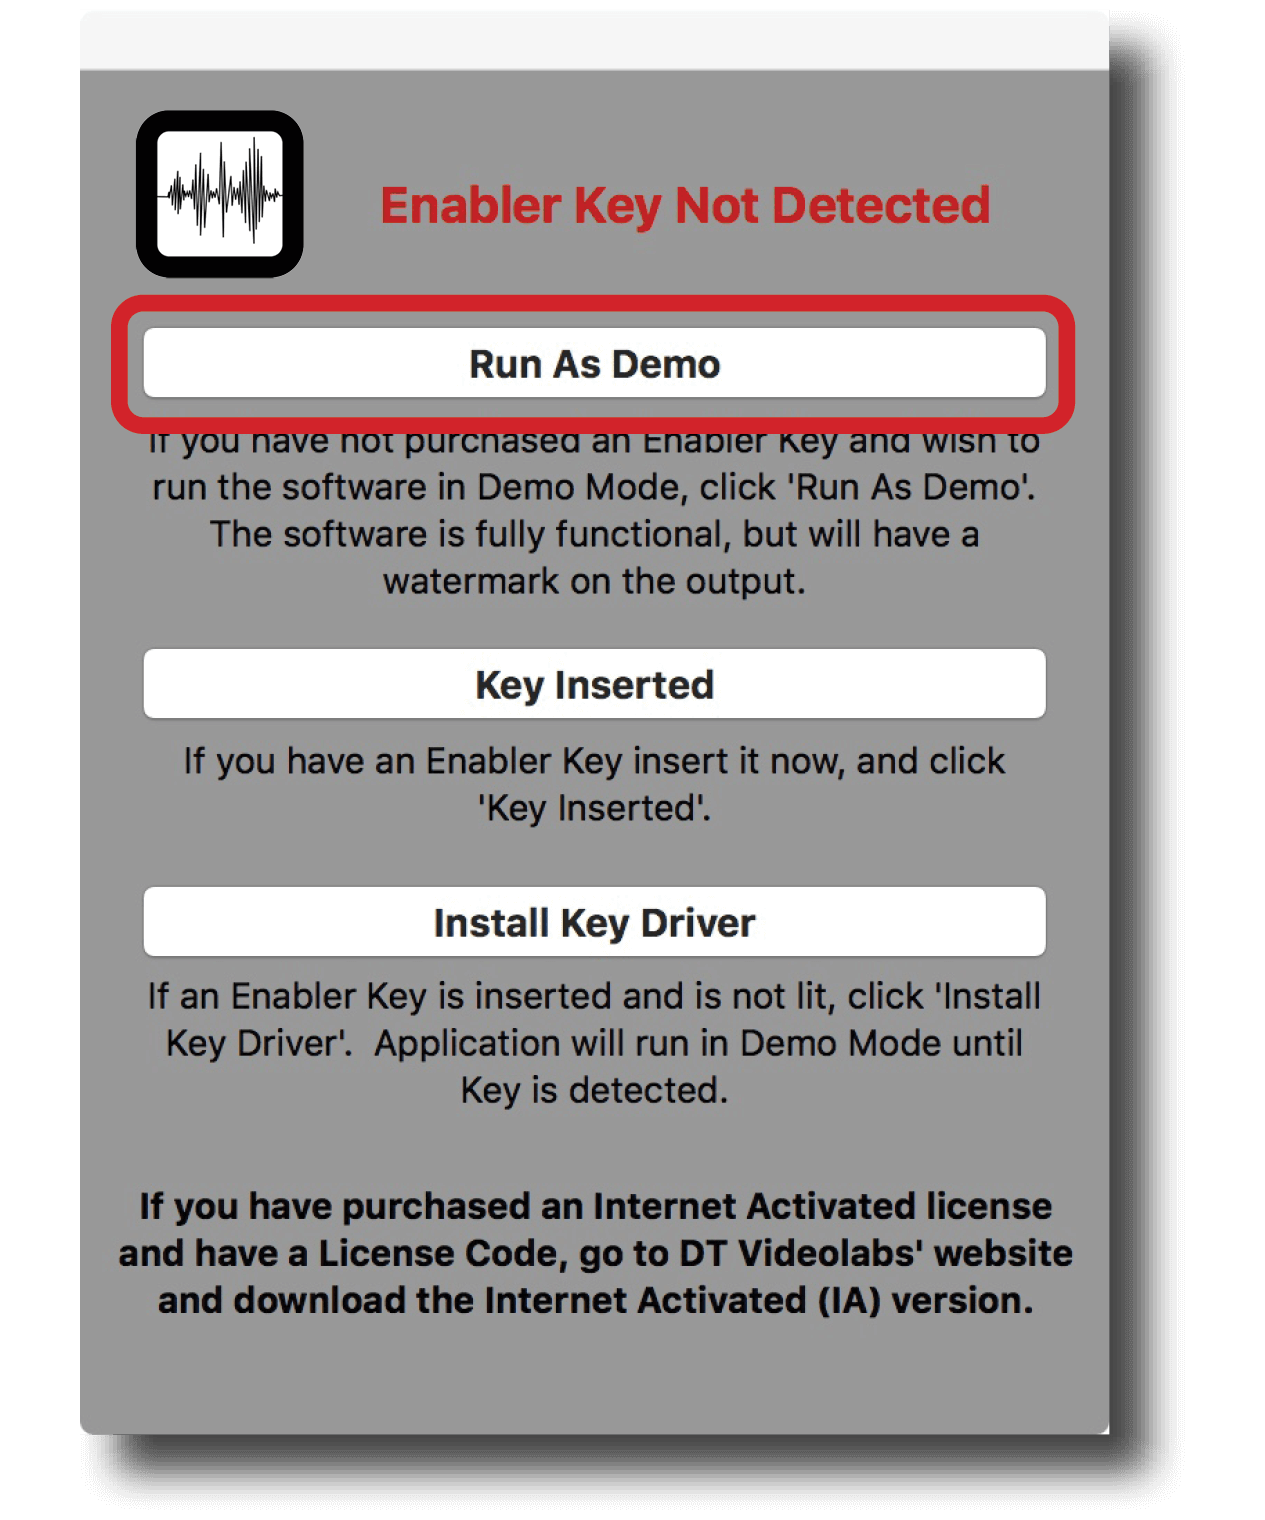
If you need to evaluate InstaCue, the USB version can be used in Demo mode. It is fully functional but audio will fade out after 30 seconds. When the InstaCue app is launched and the system does not detect a USB dongle, a dialog box will appear with options, select “Run as Demo”.
Interface
Functions
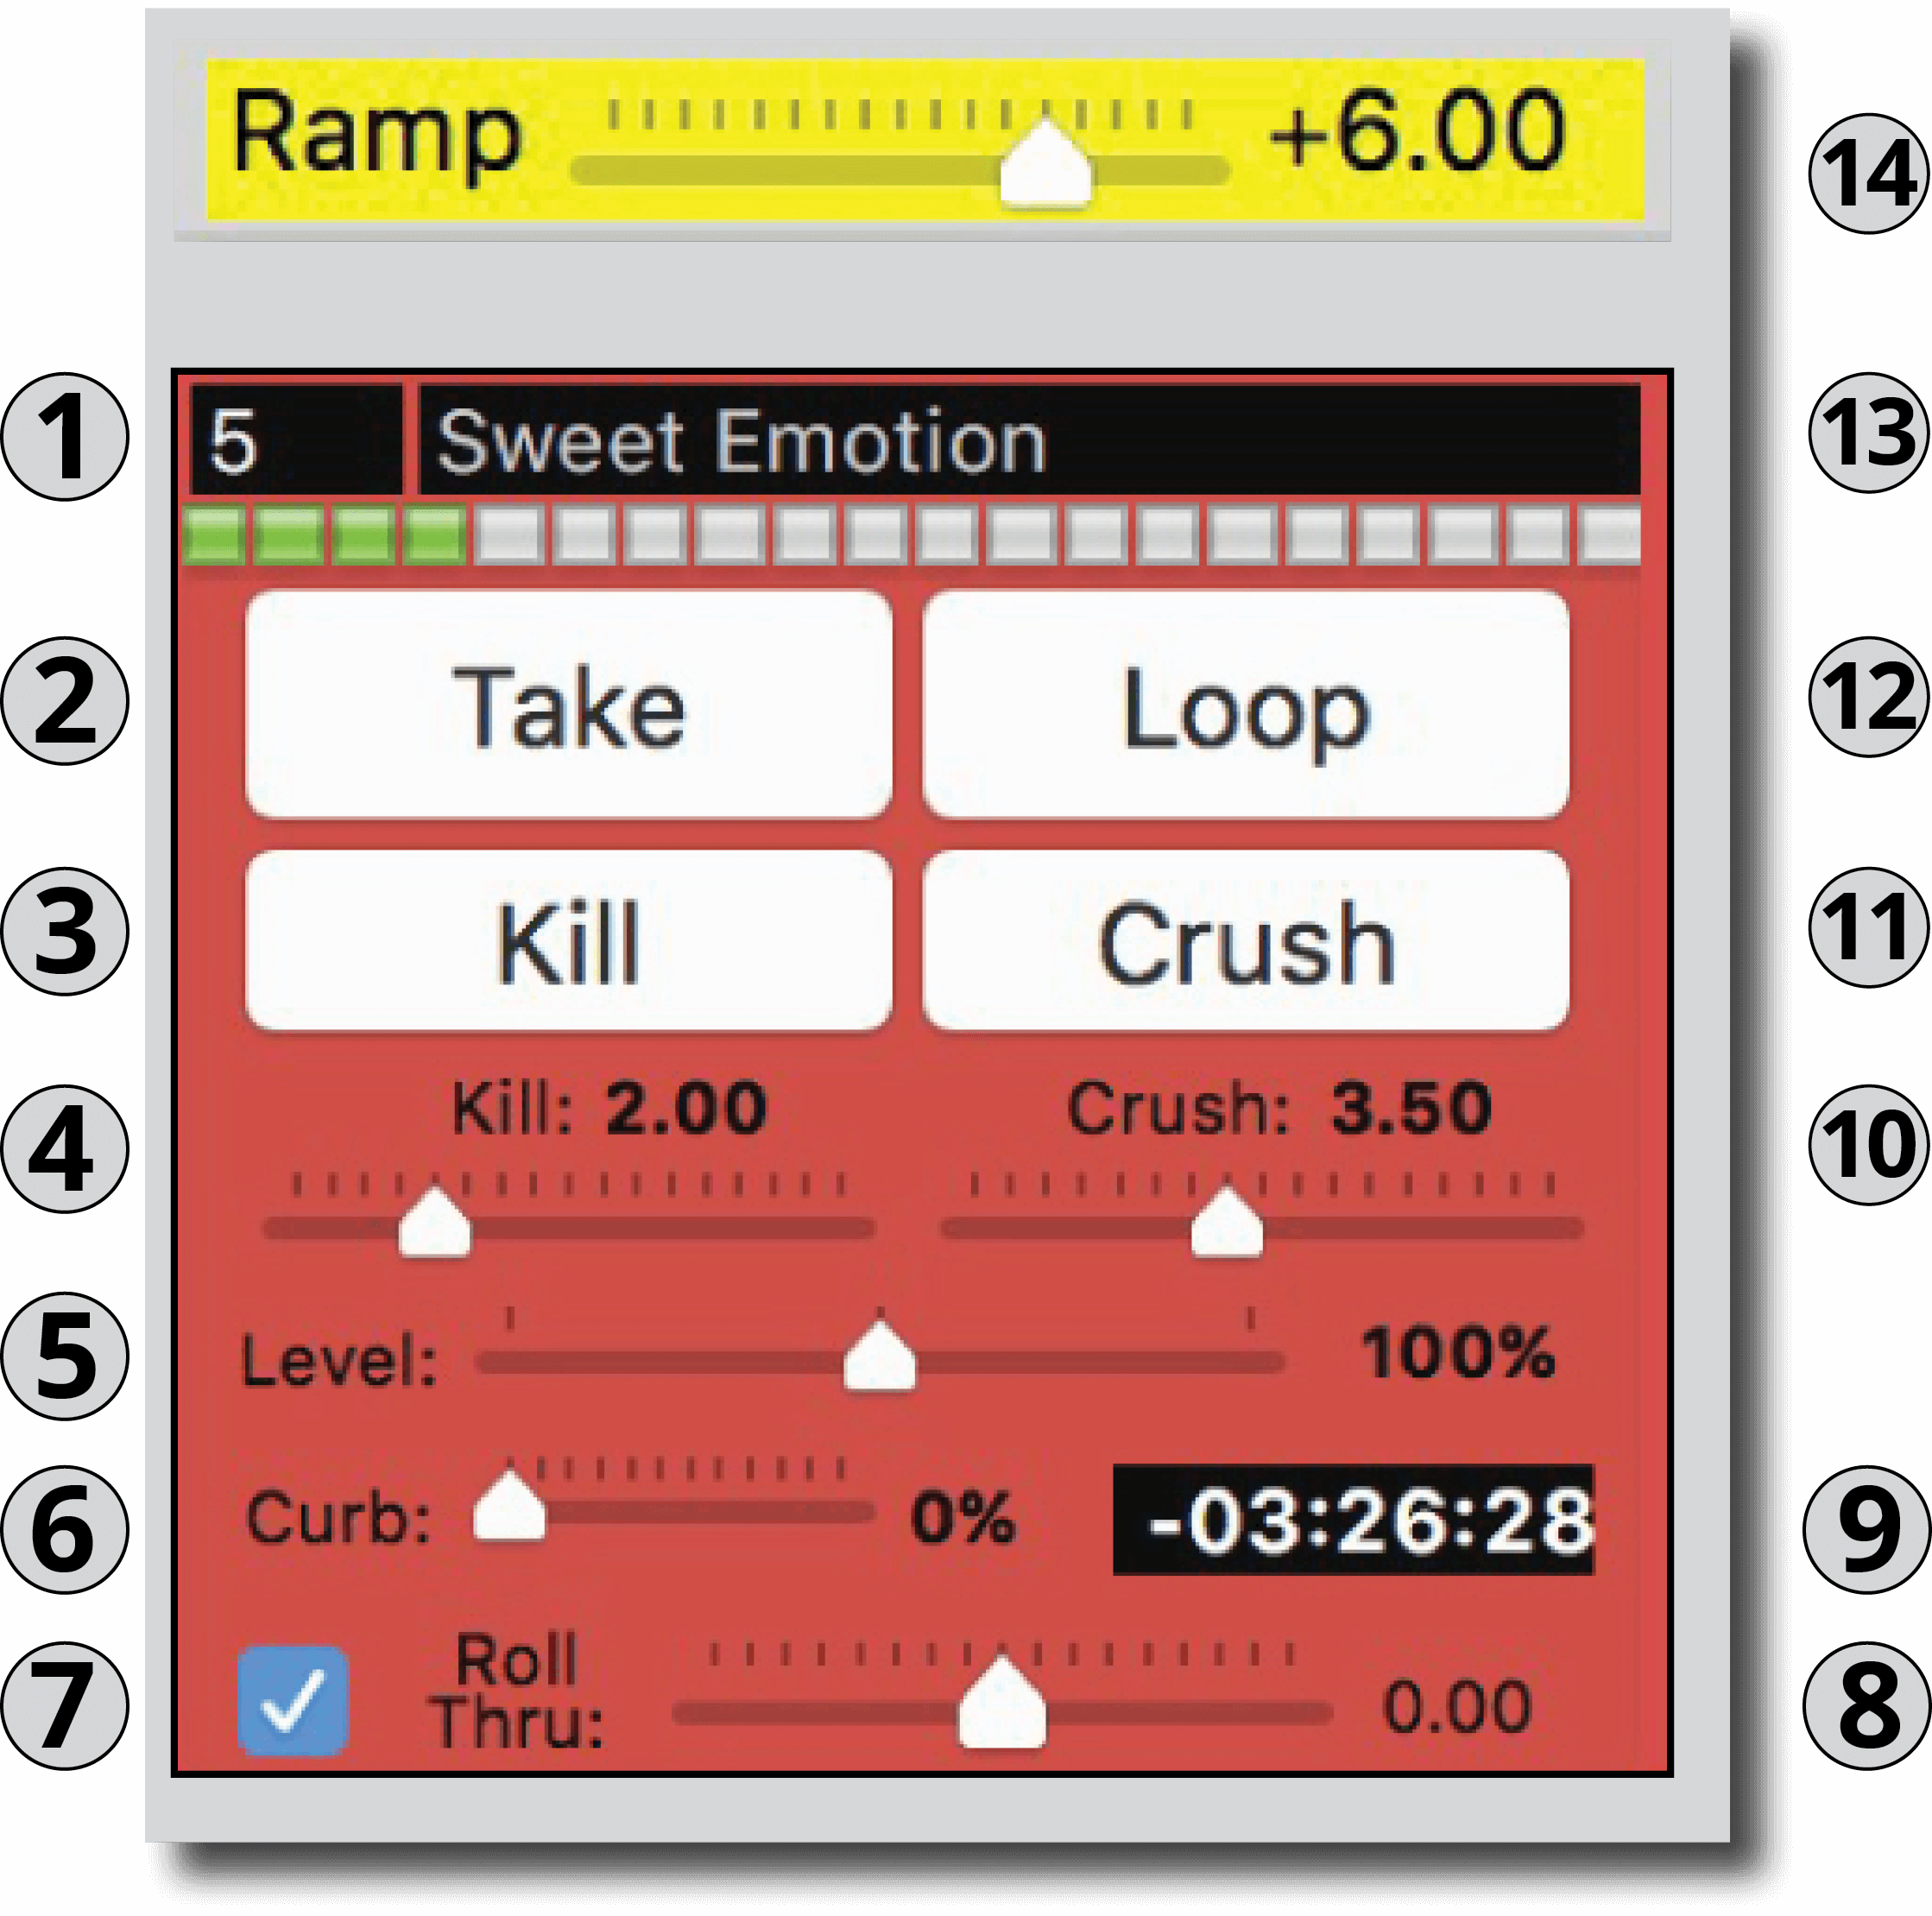
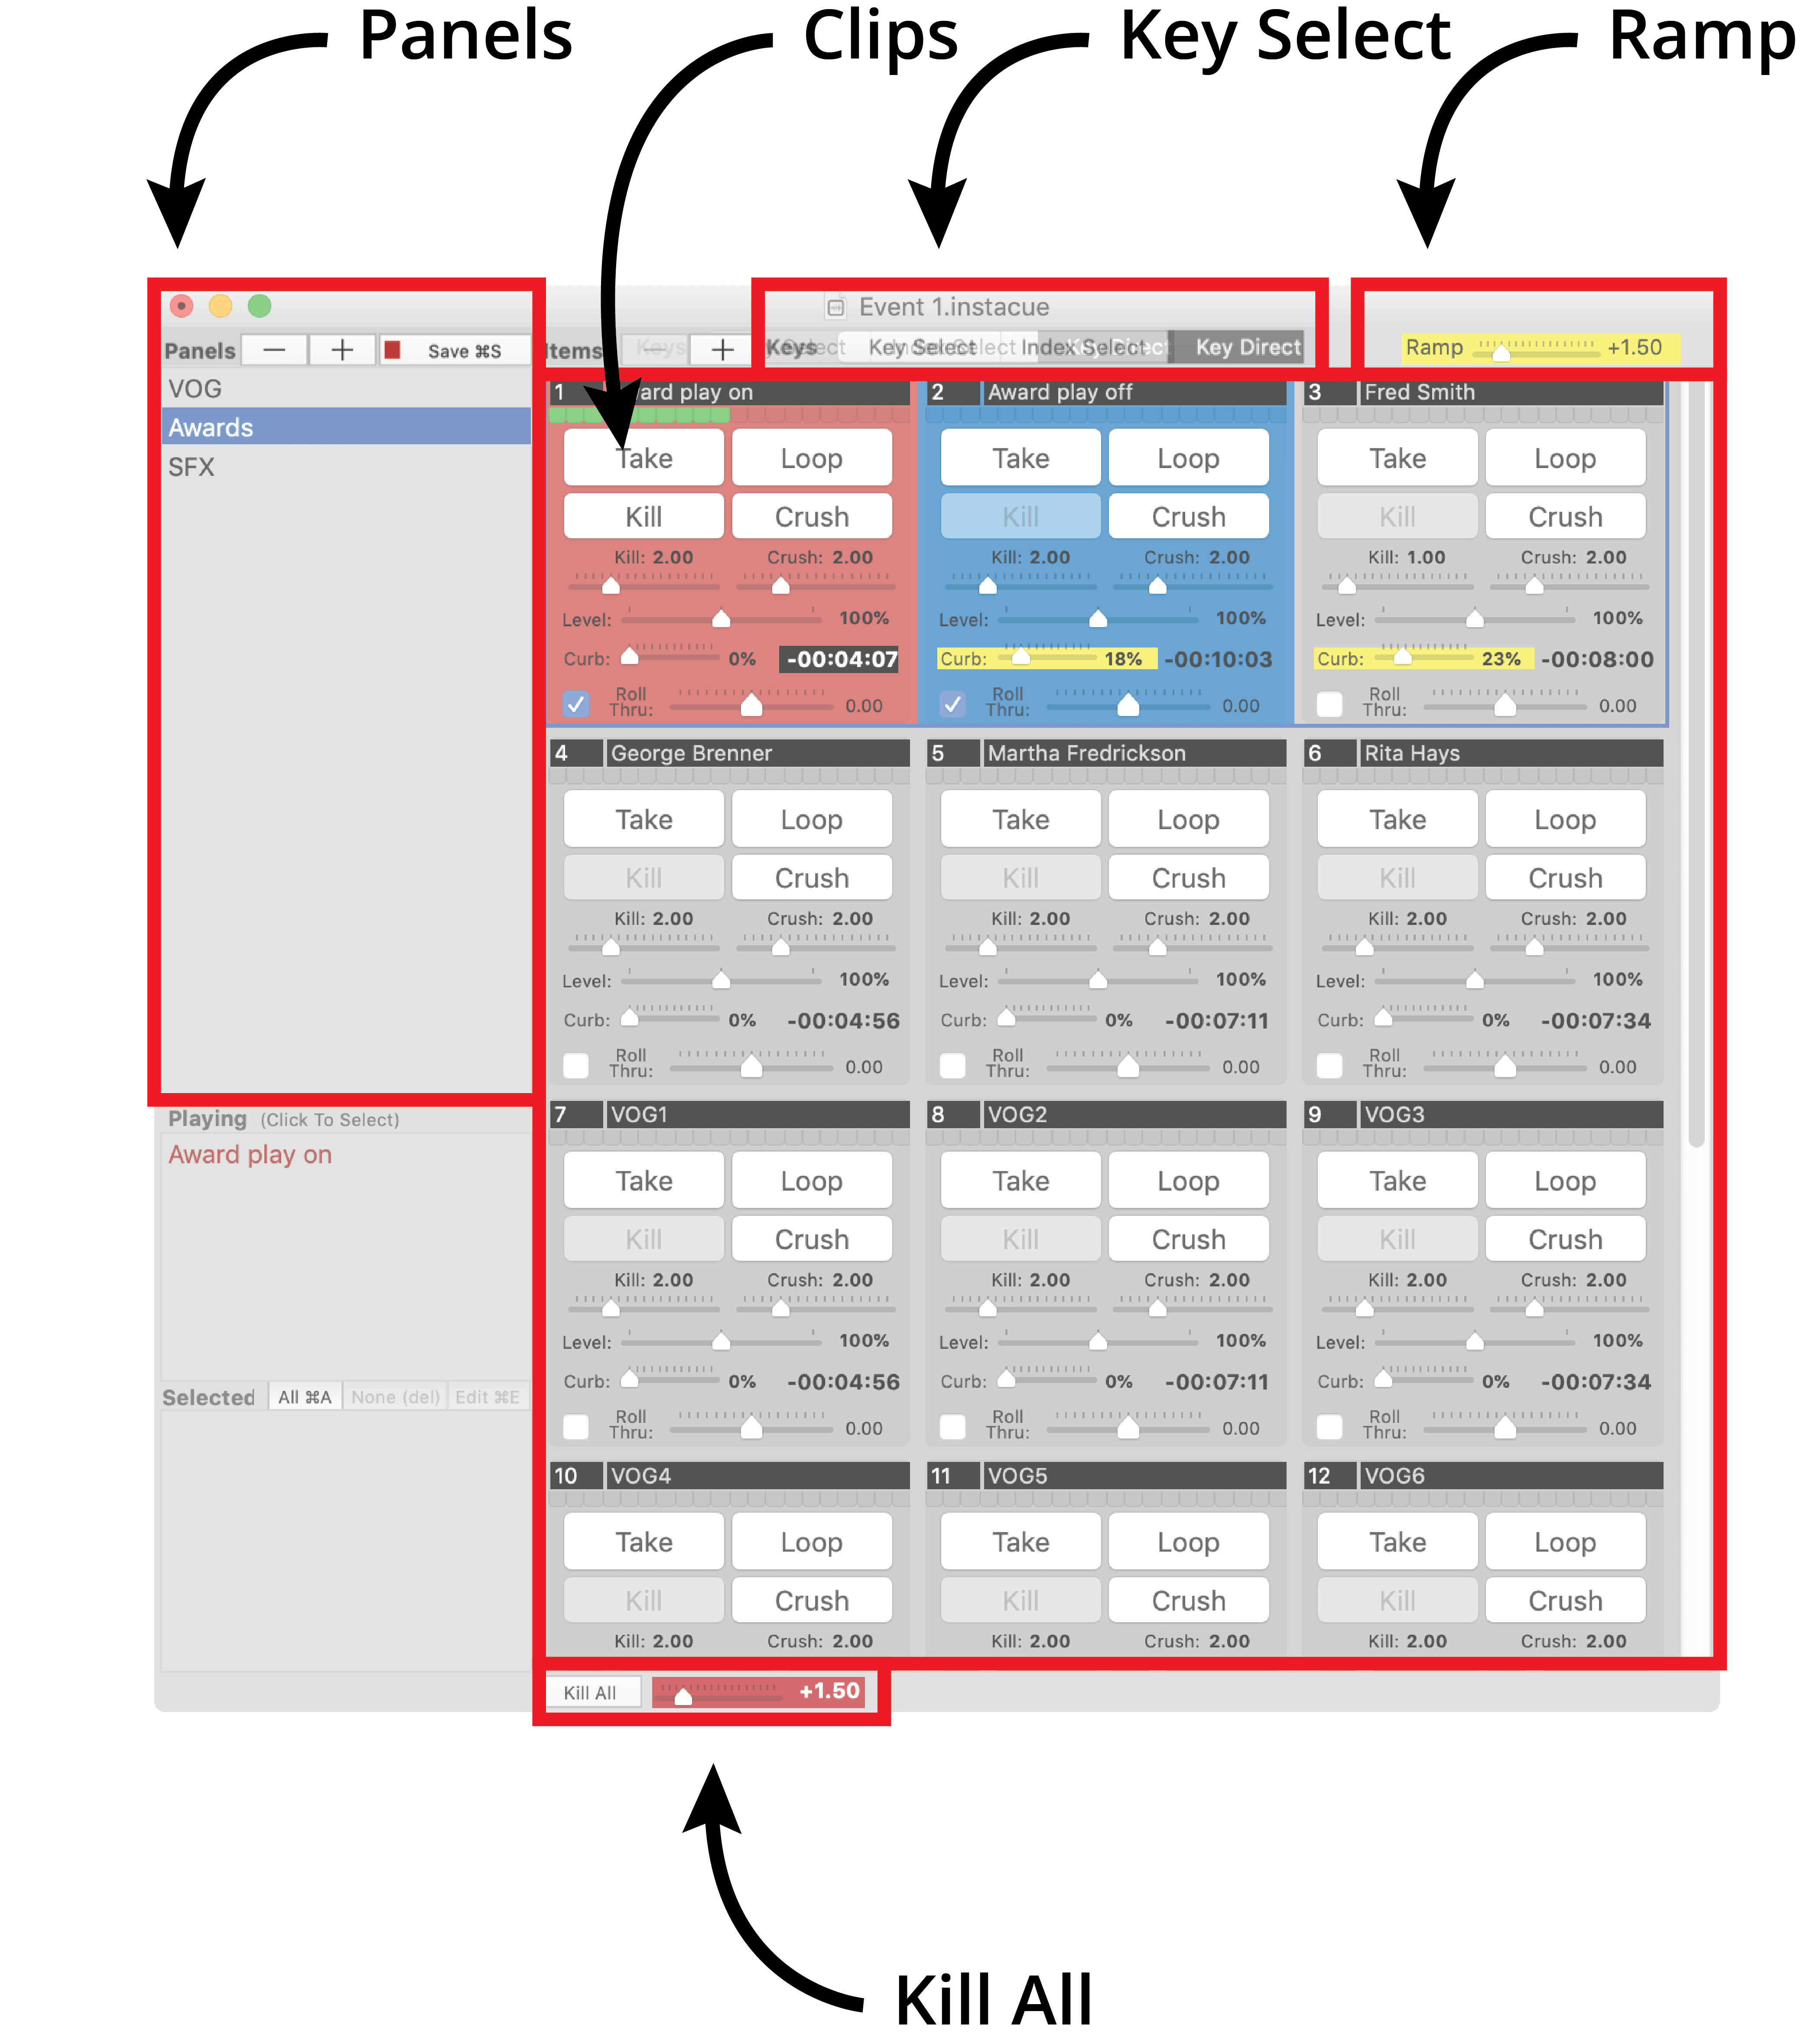
- Index Number - The Index Number of the clip. Clips can be reordered via Drag and Drop.
- Take - Begins playback
- Kill - Fades out this clip for the Kill Duration and ends playback
- Kill Duration - Determines how long the clip fades
- Level - Controls overall volume of clip. There is also a Gain control in the Single Clip Edit Sheet. Both controls have the same effect.
- Curb - Lowers the volume of all other playing clips
- Roll-Through Checkbox - When enabled, plays the next clip when this one ends
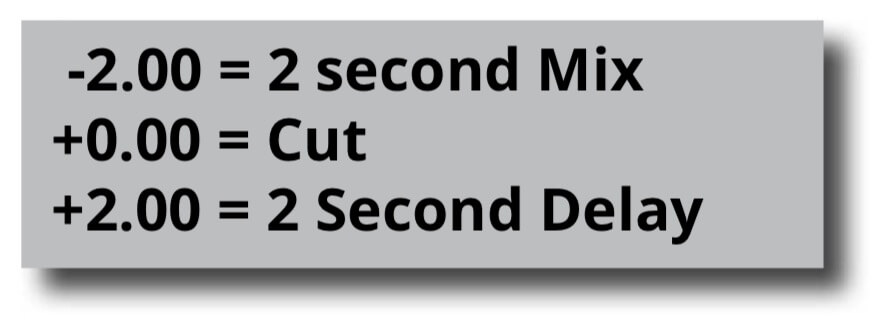
- Roll-Through Duration - Controls how a clip will Roll-Through to the next, when the Roll-Through Checkbox is enabled. A zero value will cut to the next clip. A negative value will mix for that duration with the Next clip. A positive value will delay playback of the Next clip by that duration.
- Time Remaining - Shows duration of a clip when not playing. Counts down to zero when playing
- Crush Duration - Determines Fade Duration of other clips
- Crush - Kills any other playing clip for the Crush Duration
- Loop - Causes a clip to repeat when it reaches the end
- Clip Name - Clip’s title, originally obtained by the filename. The name be changed via the Single Clip Edit Sheet or by double clicking on the clip.
- Ramp - On a clip with Curb value, when Take is clicked, all playing clips will Fade for this duration, and clip will begin playback. When playback ends, other playing clips will return to their normal levels.
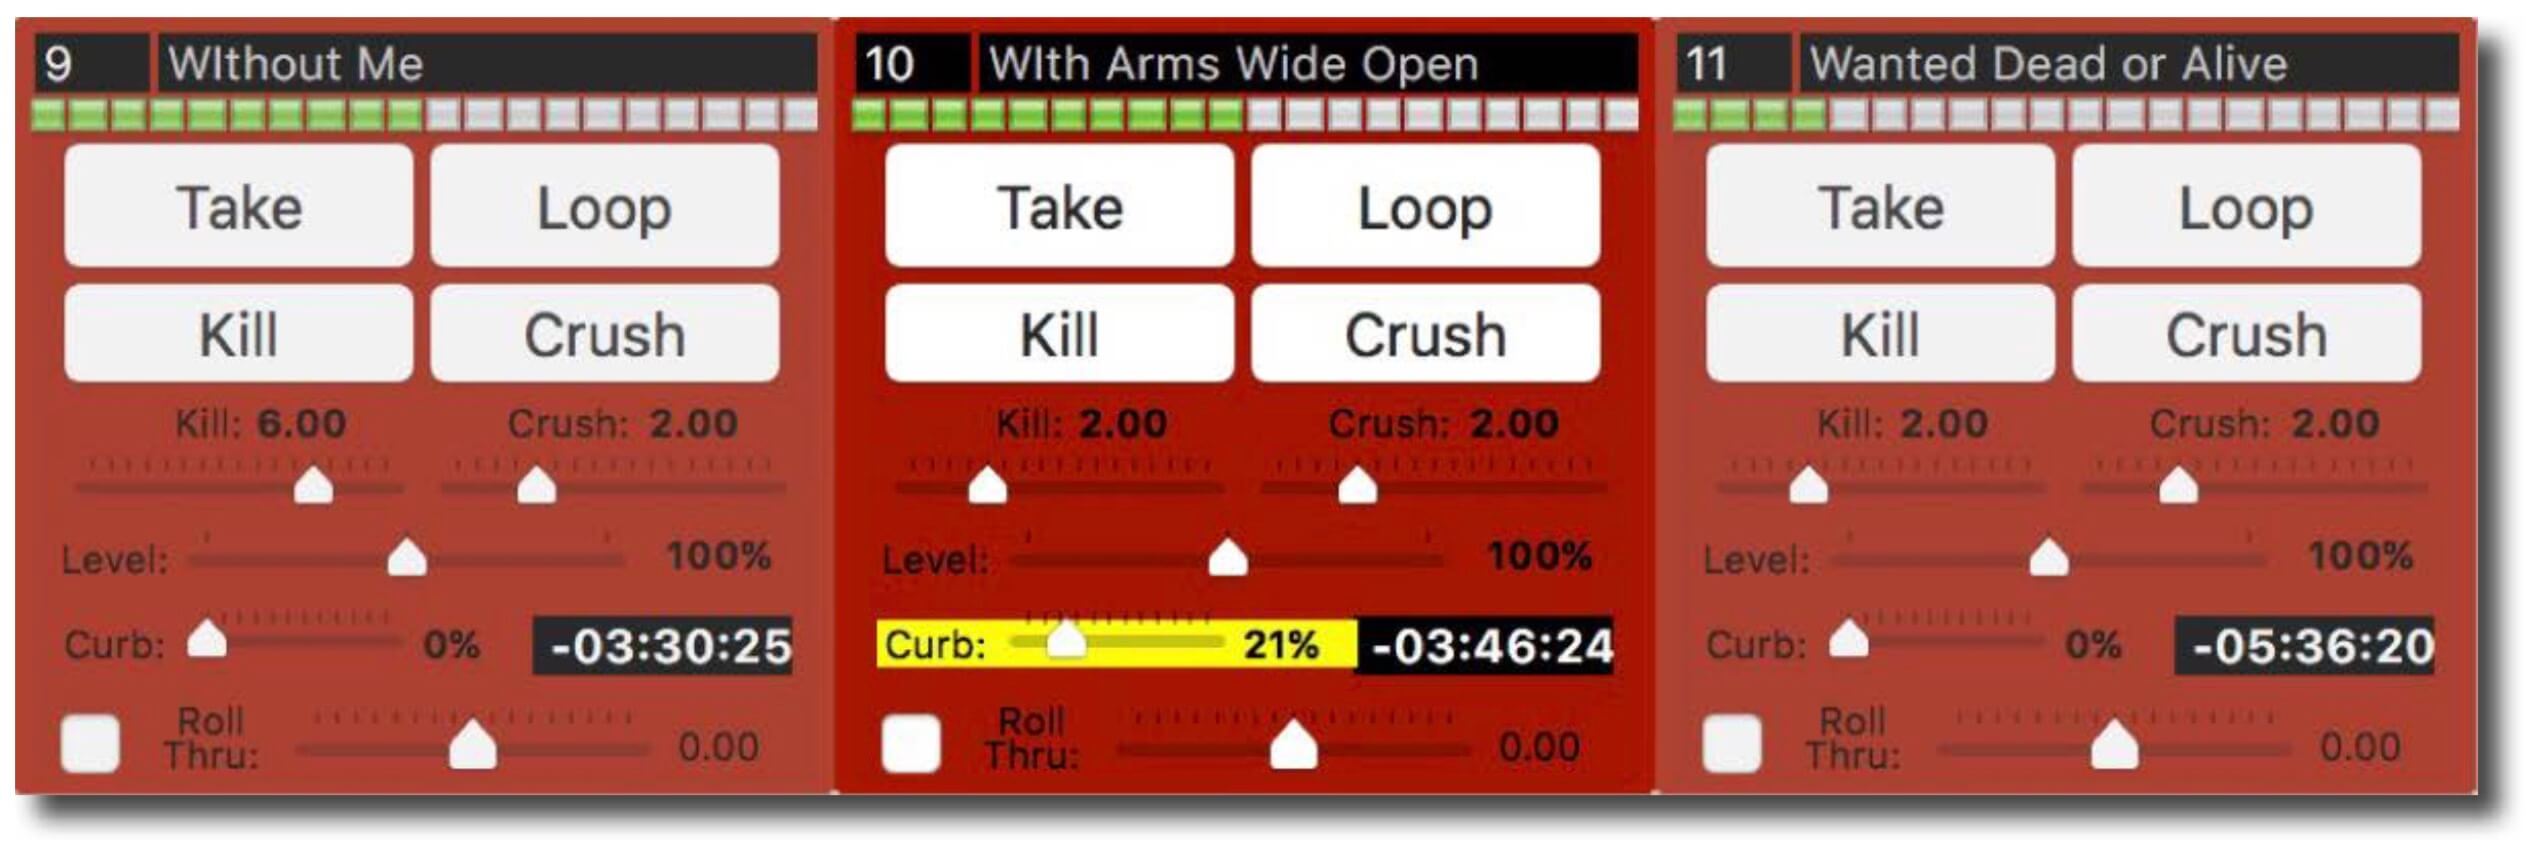
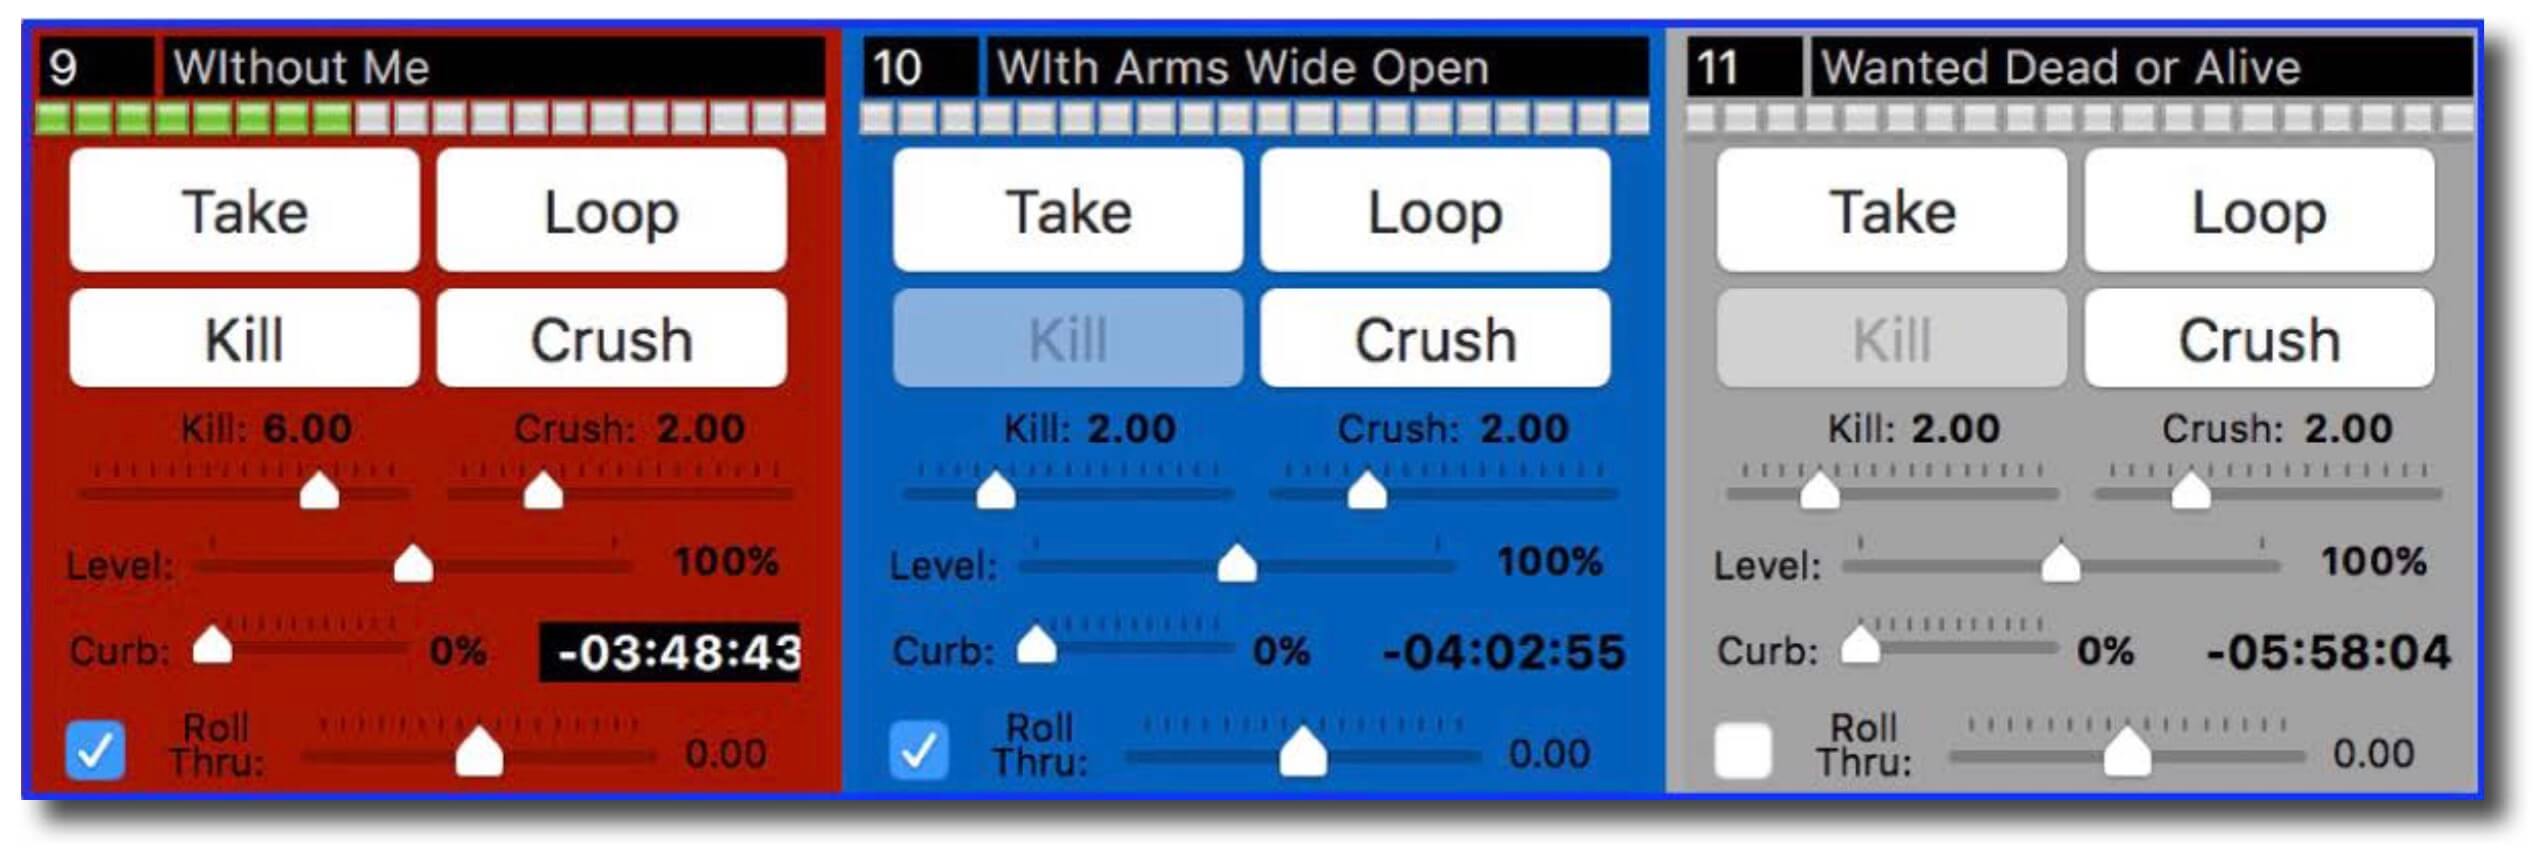
Color Coding/Red - Indicates clip is playing
Color Coding/Blue - Indicates clip is next in a Roll-Through
Color Coding/Yellow - Indicates clip is either Curbing, Ramping or waiting to start from a Delay Roll-Through

Single Clip Edit Sheet
The Single Clip Edit Sheet comes up when one clip is selected and you click Edit ( E ) or when you double click on a clip.
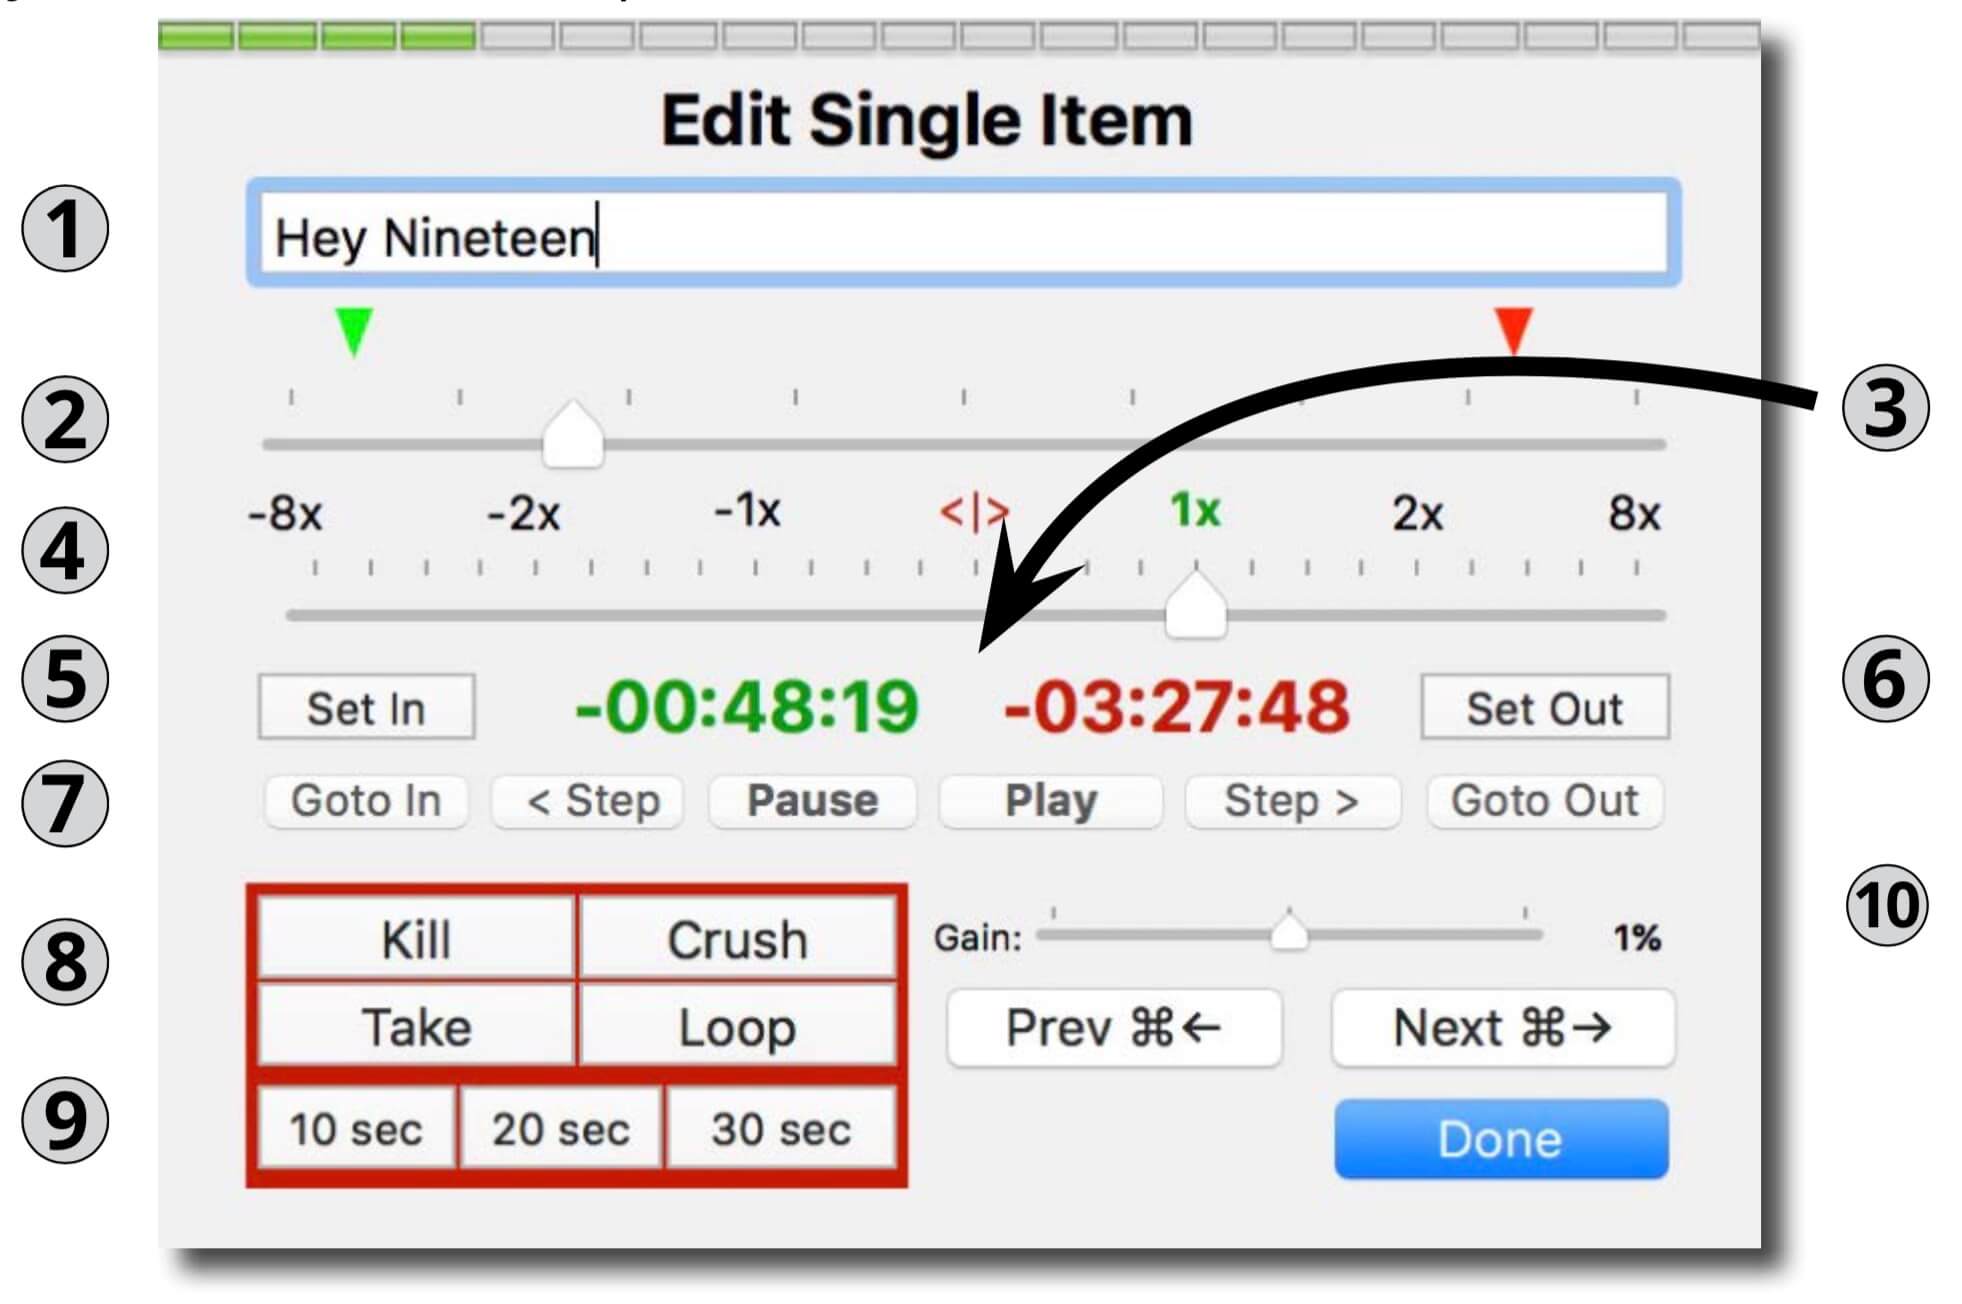
- Clip Name - Clip’s title, originally obtained by the filename
- Scrubber - Allows rapid movement through a clip. The scrubber pointer can be moved on the clip timeline to set values for In and Out Points. The green triangle indicates the In Point and the red triangle indicates the Out Point.
- Counters - The green counter shows the time elapsed relative to the In Point. The red counter shows the time remaining relative to the Out Point.
- Shuttle - Temporarily sets clip’s playback speed
- Set In - Sets where clip begins playback
- Set Out - Sets where clip ends playback
- Navigation Controls - Allows standard play and pause functions, stepping the timeline forward or backward in small increments and jumping to the In or Out point
- Show Controls - Playback controls to start, stop, and loop a clip as well as stop other clips from playing using Crush
- Goto Buttons - Sets the playback position to 10, 20 or 30 seconds from the Out Point
- Gain - Sets clip’s overall level

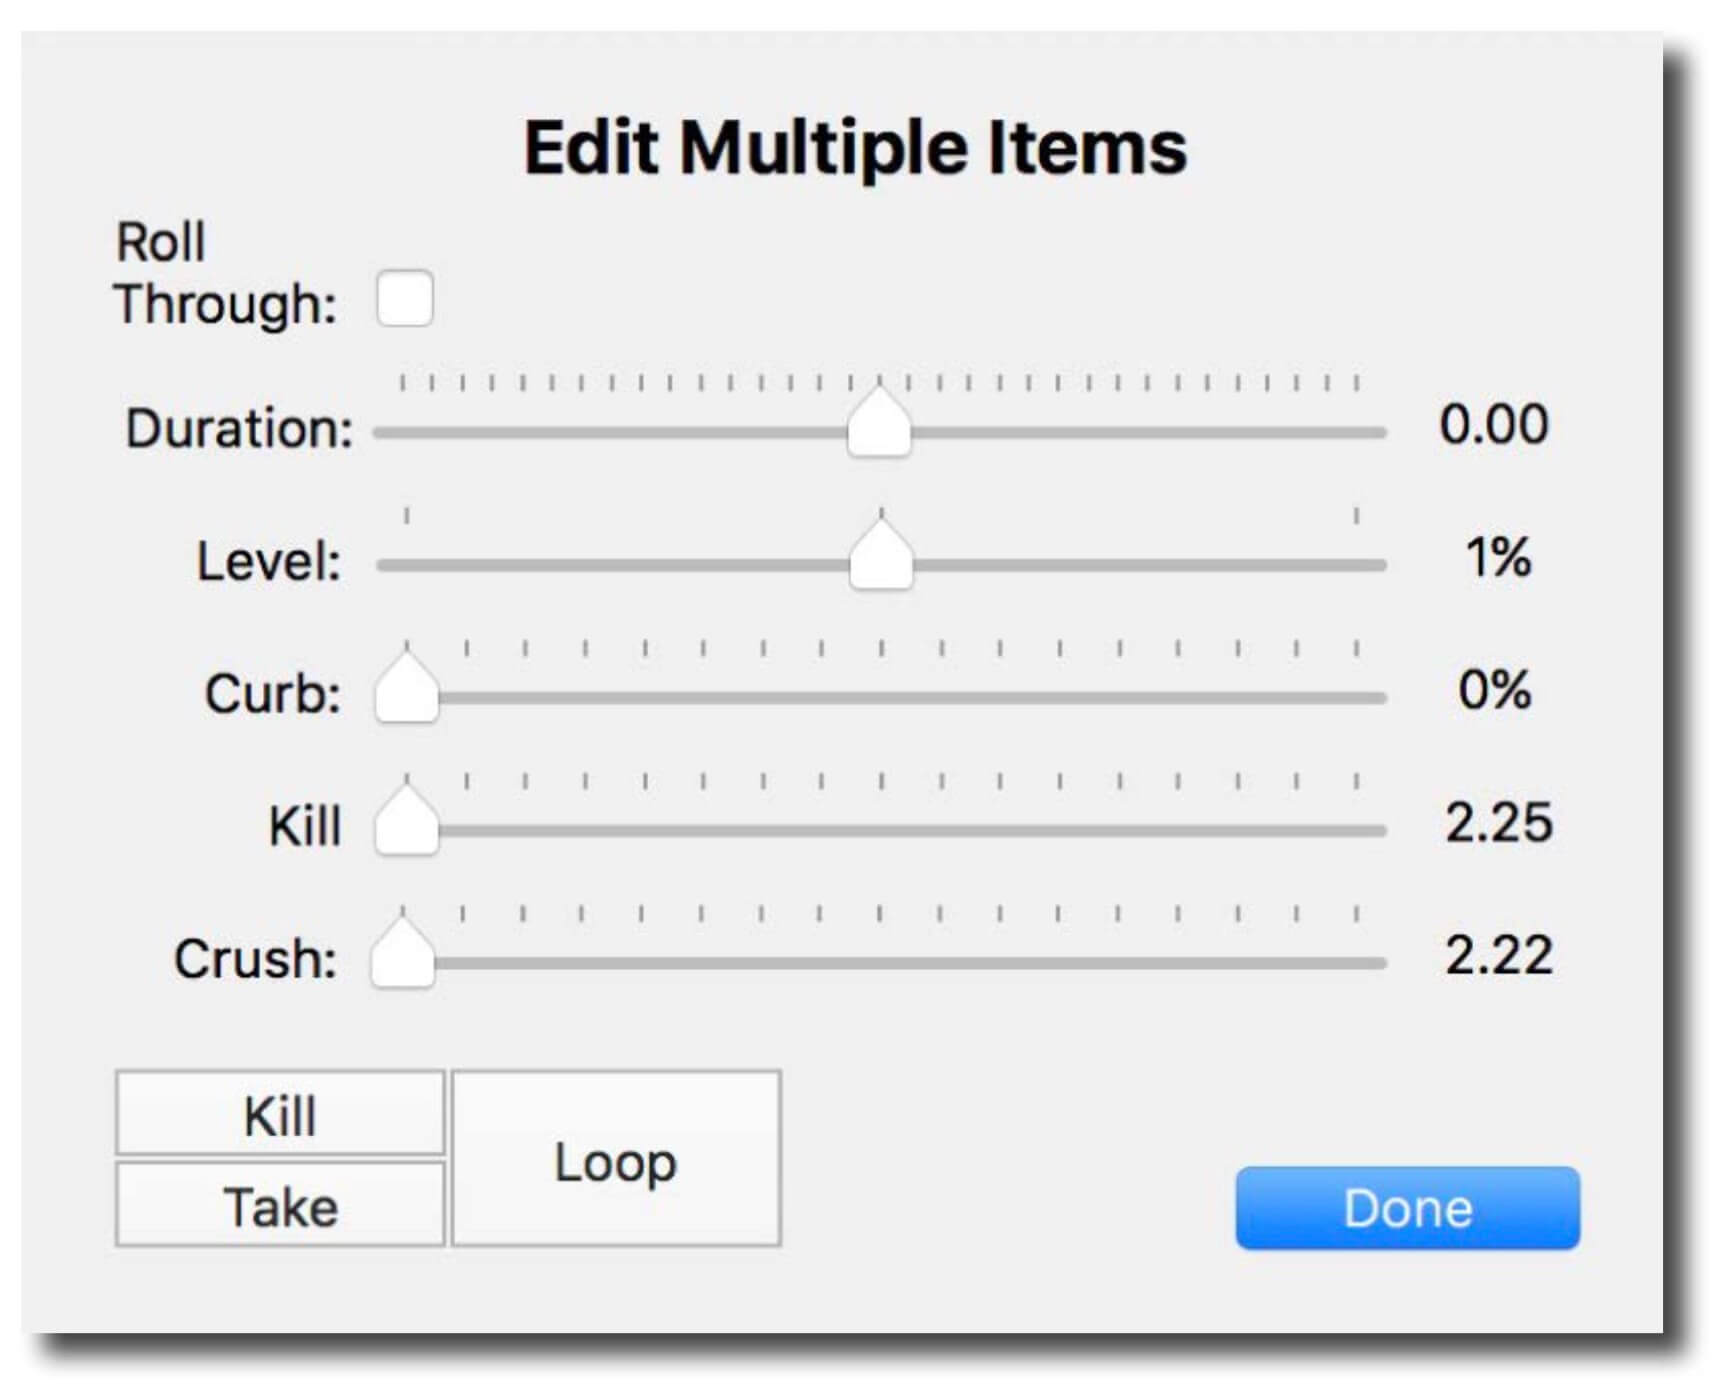
Multiple Clip Edit Sheet
The Multiple Clip Edit Sheet comes up when multiple clips are Selected and you click Edit ( E ) or when you double click the selection.

Curbing and Ramping
The Curb setting allows one clip to fade the audio level of all other playing clips. It can be used for voiceovers and announcements that play over other audio. It can also be used to isolate one clip when doing layered sound effects.
The Ramp setting determines how long clips will take to fade (both in and out) when a Curbed clip begins or ends playback.

Roll Through
A Roll-Through is easily created by enabling the Roll-Through checkbox on any clip. When a clip finishes playback it will Roll-Through to the next clip. A clip will display a blue background when it is linked by a Roll-Through.
The Roll-Through Duration determines how the clip transitions. A zero value cuts to the next clip. A negative value mixes for that duration with the next clip. A positive value will delay playback of the next clip by that duration.

A clip will only Roll-Through if it completely reaches its Out Point. It will not Roll-Through if a clip is Killed, Crushed, or if the first clip is Looped.
Clips can be reordered during playback for dynamic control of Roll-Throughs.

Clip Selection
There are three modes for using keystrokes to select and cue clips.

Key Select - Allows you to select clips with the keyboard based on their relative position on the program interface. The number of columns will determine which keys will select which clips. Multiple clips can be selected by holding down more than one key simultaneously. After clips are selected, playback is controlled using the keyboard commands described above.
1, 2, 3 .... Selects the clip on the top row of the interface window
q, w, e .... Selects the clip on the 2nd row of the interface window
a, s, d ... Selects the clip on the 3rd row of the interface window
z, x, c ... Selects the clip on the 4th row of the interface window
Index Select - Clips are selected individually by typing the Index Number of the clip. This mode is best for shows that are called by cue number. After clips are selected, playback is controlled using the keyboard commands described above.
Key Direct - This works much like Key Select except playback begins immediately. The keyboard commands described above to control playback do not work in this mode. The only keyboard command available is Option+Clip Index Number to end playback.

Stopping Playback
- Kill Button - Ends playback of the clip that is playing
- Kill Duration Slider - Sets the amount of time it will take for a clip to fade out
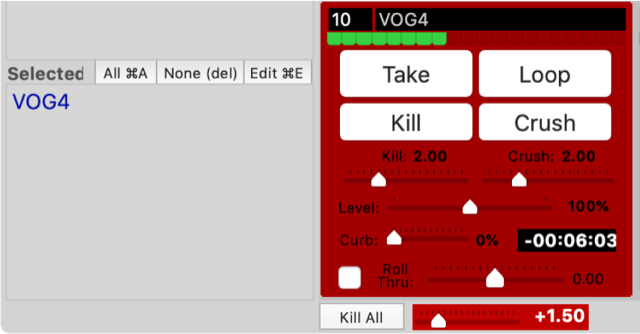
- Kill All Button - Stops playback of all clips
- Kill All Duration Slider - Sets the amount of time it will take for all playback to fade out

Keyboard Commands
Before and during playback, Key Select and Index Select modes described below, clips can be controlled by using the following keys:
ESC - Kills playback of Selected clips
SHIFT ESC - Crushes all Non-Selected clips
SHIFT RETURN - Toggles the Loop setting on Selected clip
Arrow Keys - Used to change the selection in the direction of the Arrow Key
Dragging - Moves clip or panel to another location
Also From DT Videolabs