Safety
To prevent severe injury and loss of life or property, read this section before using to ensure safe operation of this product.
- Use only the power source supplied with the product.
- Do not overload power outlets or extension cords which may result in electric shock or fire.
- Do not operate in an explosive atmosphere.
- Connect the product power supply to a grounded power source.
- Unplug the product from power outlets if there are any abnormal smells, smoke or unusual noises.
- Ensure that the product enclosure is intact and that no power cords are frayed or damaged before use.
- Do not expose the product to any wet or moist environments and do not handle with wet hands.
- Do not disassemble the product, there are no user serviceable parts inside.
- Unplug unit when not used for extended periods of time.
What's Included
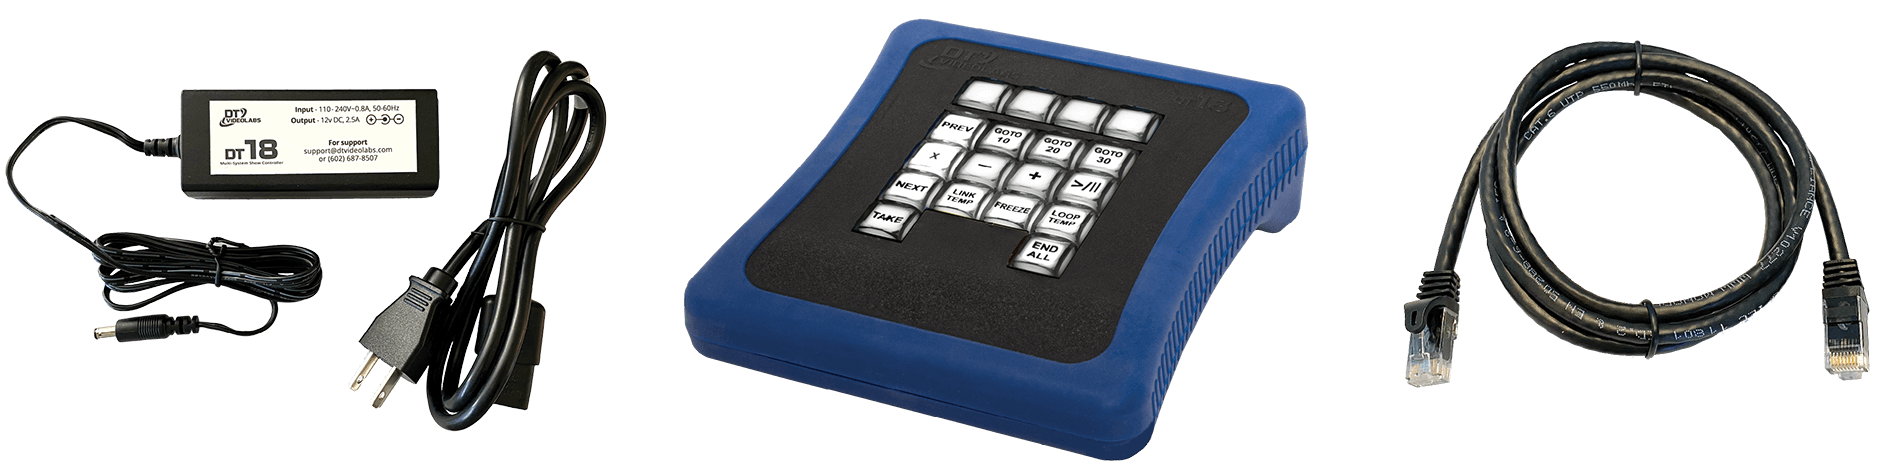
The DT18 order includes a DT18 Multi-System Show Controller, 6ft (1.8m) Ethernet cable and a 110-220 universal power supply with US Type B power cord. Non-US customers will receive an additional Type F, G or I power cord where applicable.
Table of Contents
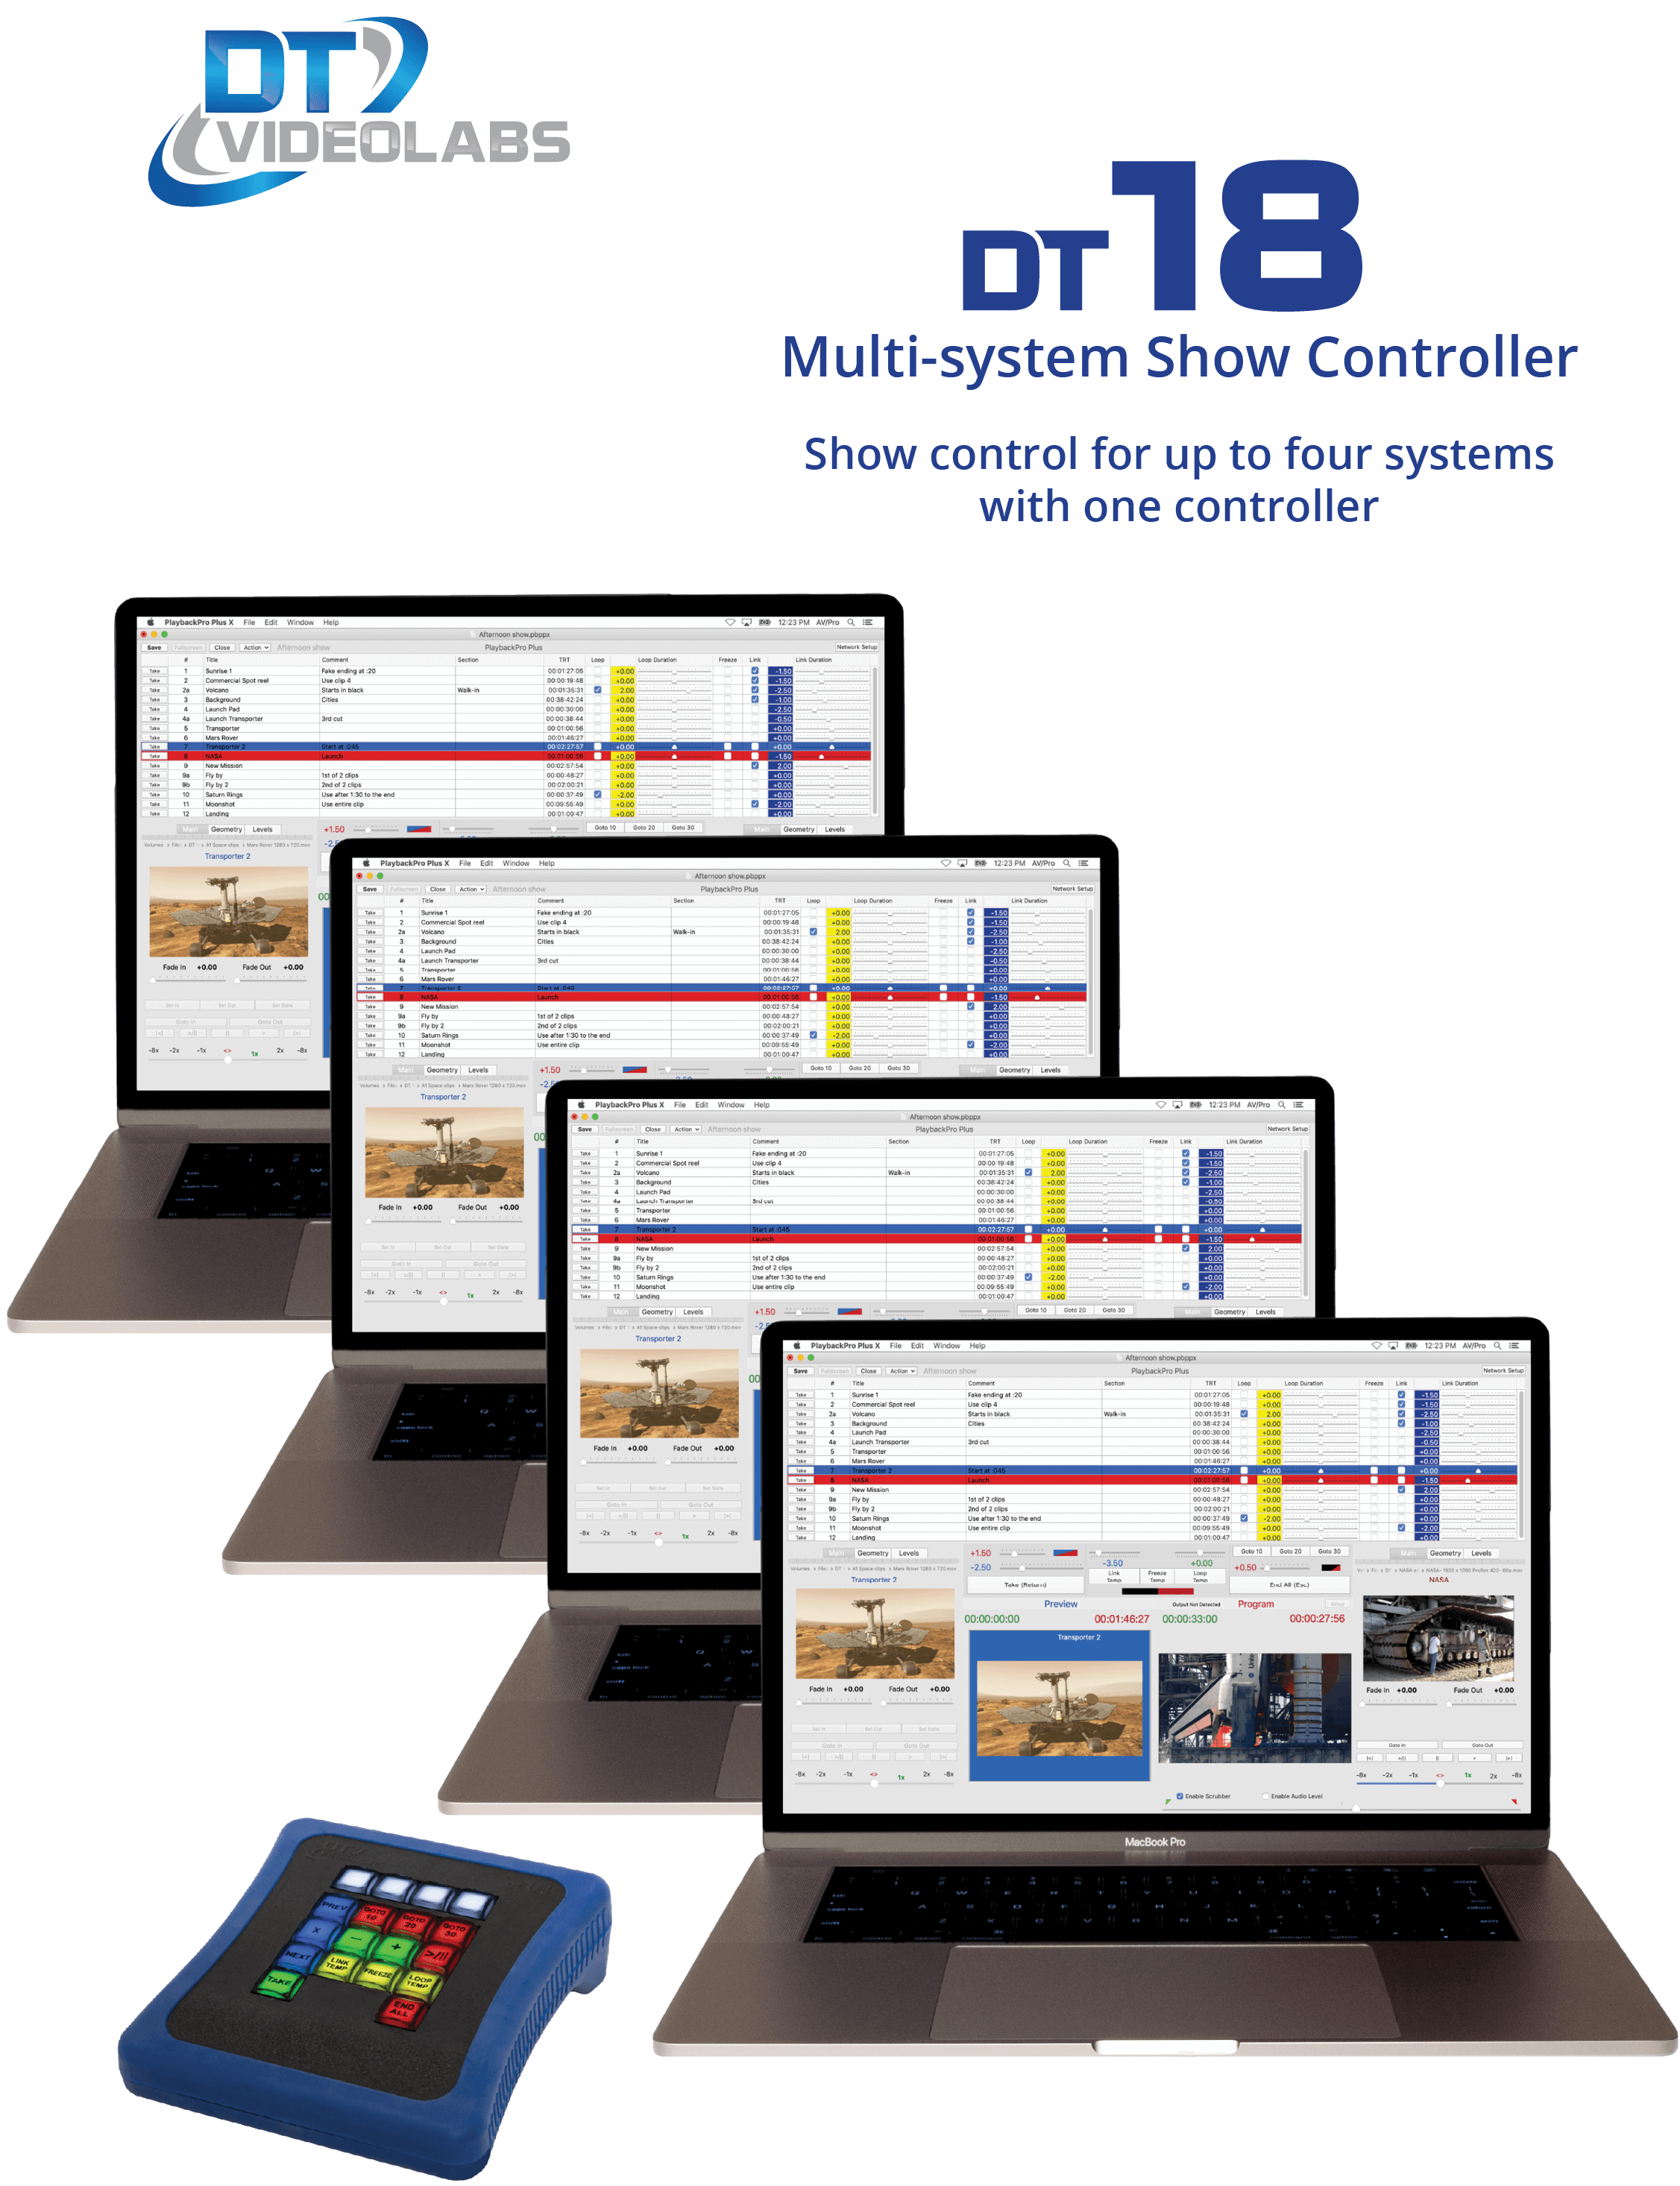
DT18 Overview
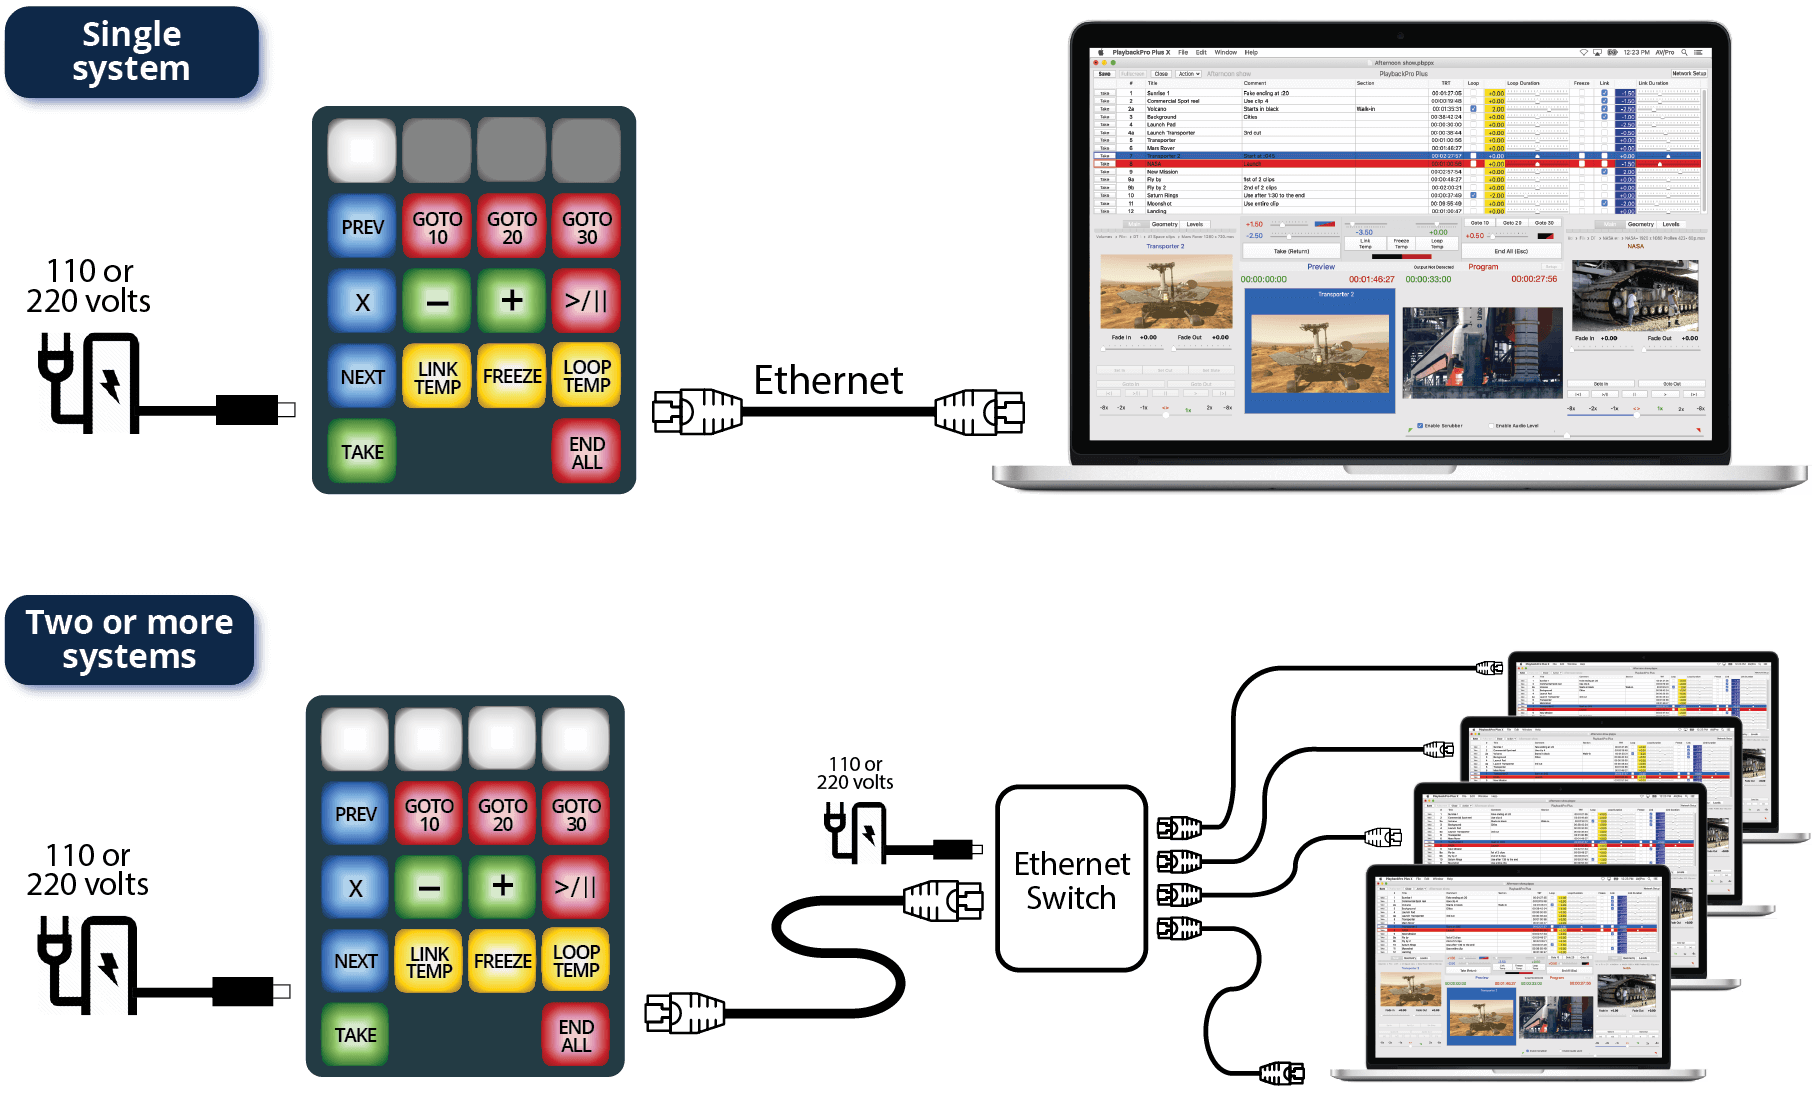
The DT18 can control up to 4 playback systems connected over an ethernet switch. It has two sets of buttons, channel and control:
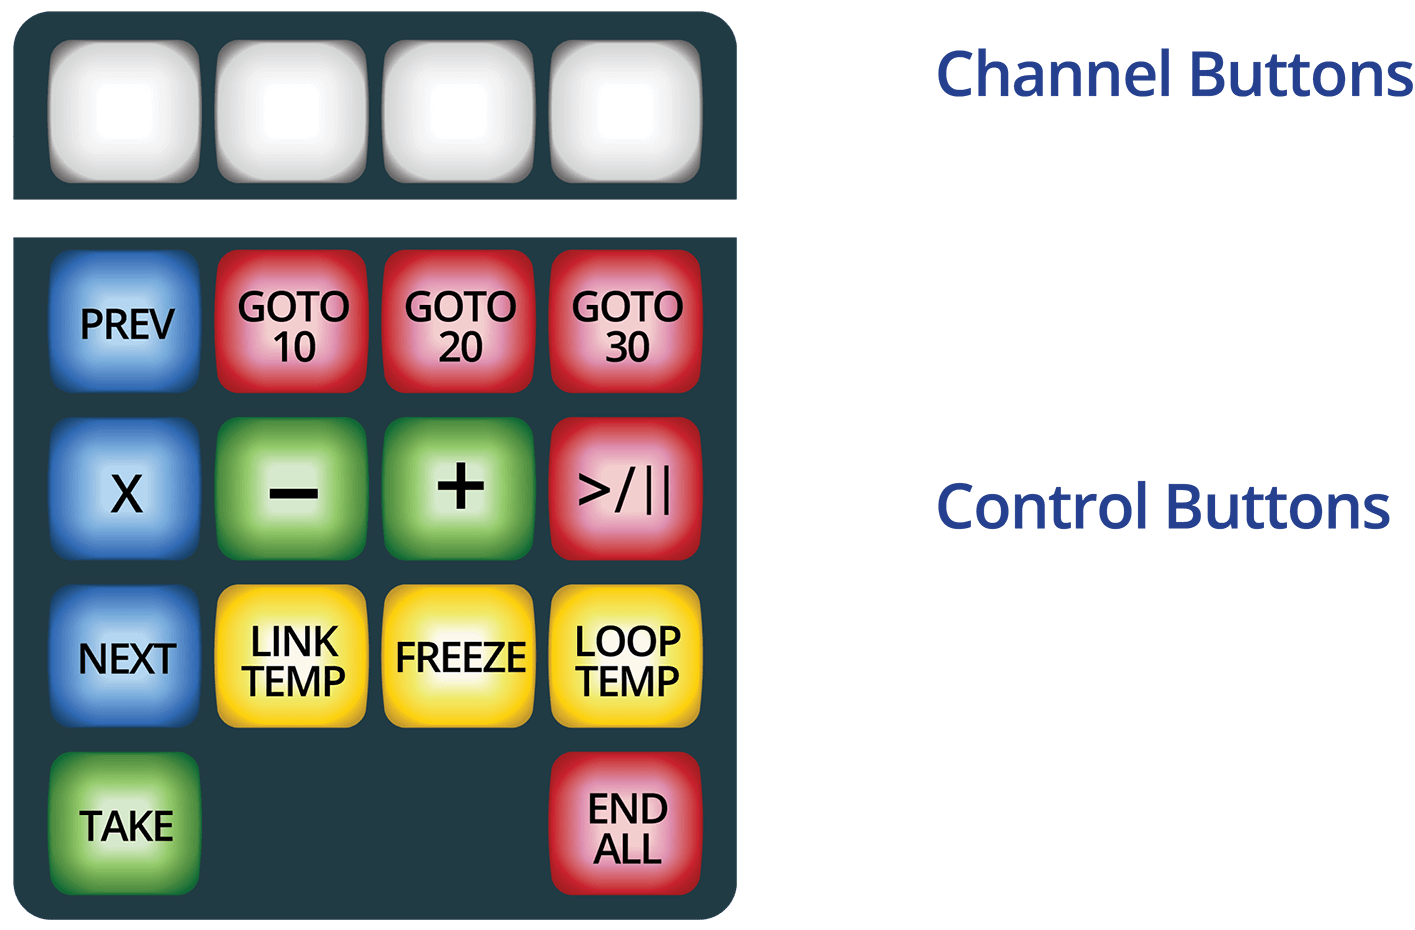
Channel Buttons: Each button represents a communications link with a single playback system. They can be toggled to engage or disengage control to specific playback systems. The channel buttons are assigned from left to right, the lowest IP address to the highest.
Control Buttons: The control buttons affect playback systems that have a corresponding channel button that is engaged. Some controls of the playback system are changed by pressing a combination of control buttons.
Configuration

PreFlight

Each version of macOS has specific settings which have a great impact on playback performance. Before you begin, please visit www.dtvideolabs.com/preflight.This page also includes a link to a printable PDF if needed.
The DT18 requires PlaybackPro Plus 3.8.0+ (32-bit) or X (64-bit).
Download latest PlaybackProPlus, 32-bit IA(InternetActivated) or USB
Download latest PlaybackProPlusX, 64-bit IA(InternetActivated) or USB
If you are unsure which version (IA or USB) you are using, the filename of the app on your system now will indicate IA (Internet Activated) or USB (USB dongle).

Connecting Your Systems
Establishing a connection involves five steps:
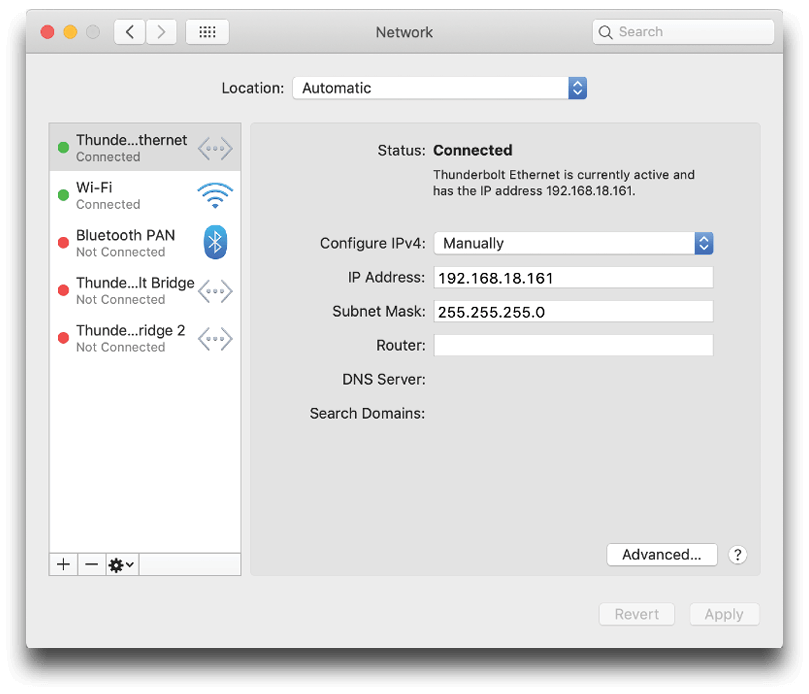
(1) Configure macOS networking
Set the system IP
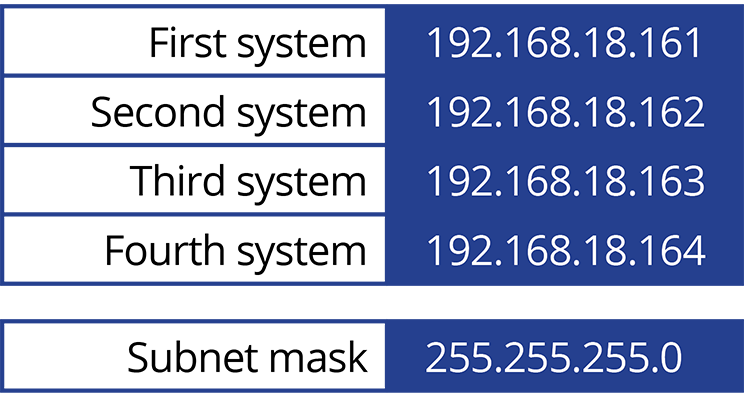
Each playback system requires a unique IP address. Open System Preferences > Network and configure using the manual IPs as shown.The values shown are based on the DT18 factory default IP address of 192.168.18.160.
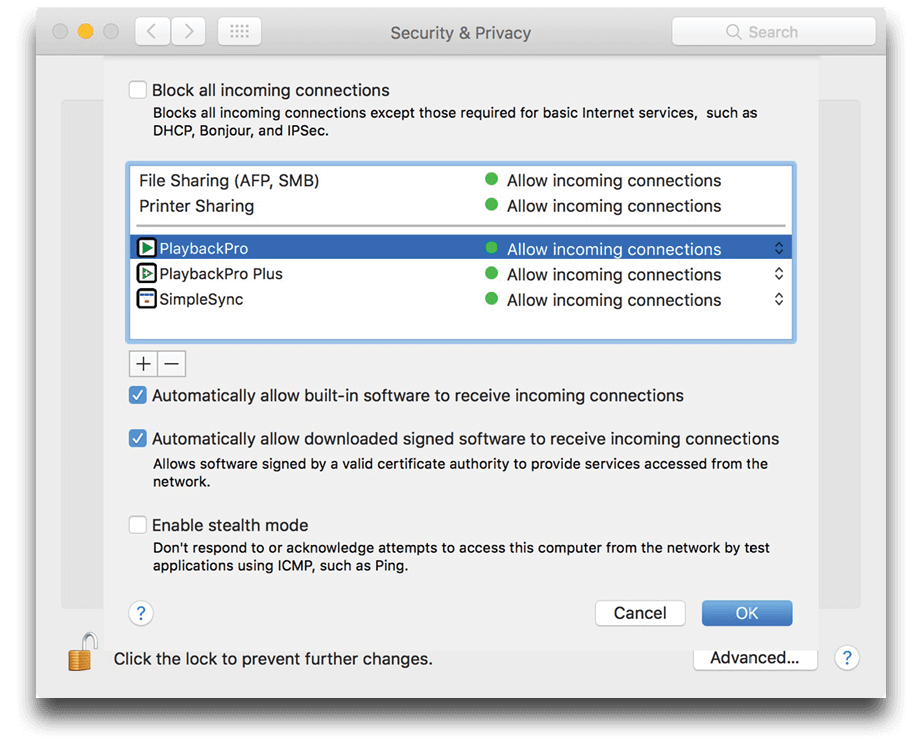
Configure the firewall
Confirm the macOS Firewall is not blocking PlaybackPro Plus network connections.
- Open System Preferences and then Security & Privacy
- Click on the Firewall tab and then the Firewall Options button
(2) Configure PlaybackPro Plus (default settings)
- Open PlaybackPro Plus and either open an existing show or start a new show
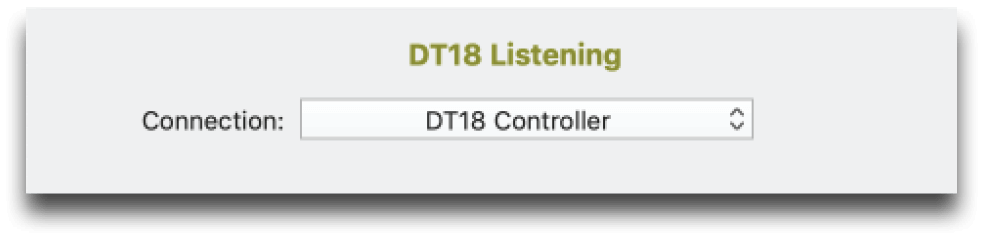
- Click the “Network Setup” button in the upper right corner of the PlaybackPro Plus interface
- Select “DT18 Controller” and PlaybackPro Plus will begin listening for communication from the DT18.
(3) Plug in and power up the DT18
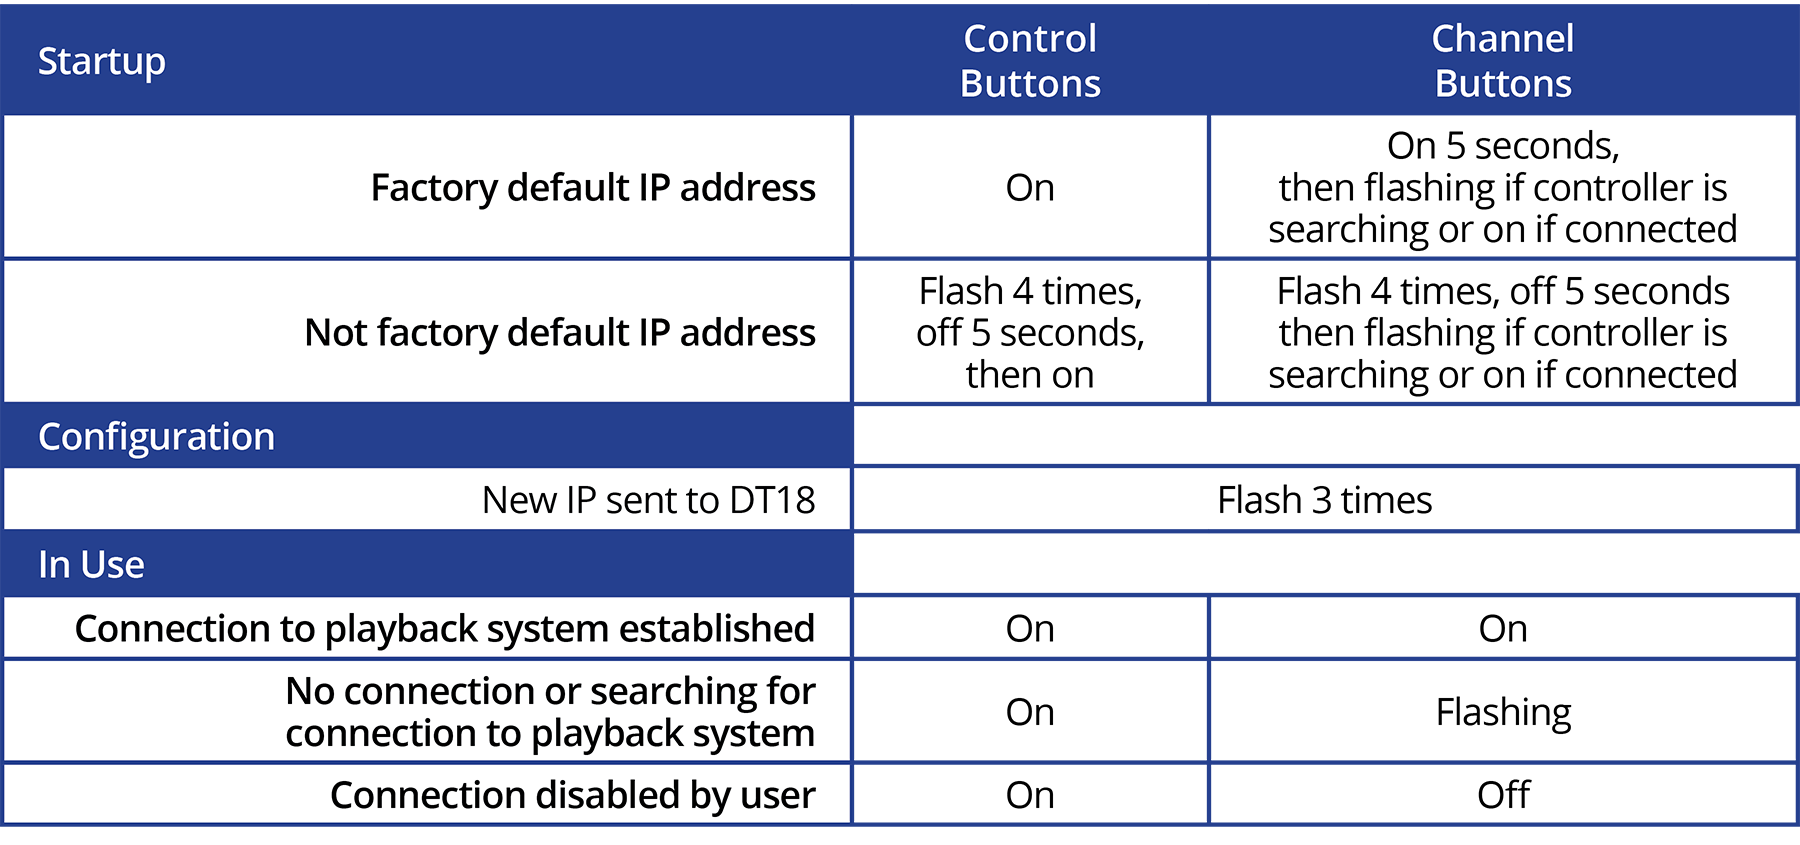
When the DT18 is powered up the buttons will turn on. Observing how the buttons flash will provide important Information about IP address status and system connection status.
(4) Reset the DT18 to factory default
We recommend starting with the factory default of 192.168.18.160 and then changing, if desired, as described in Section 3.2.1.
- Unplug the DT18 power supply
- Press and hold TAKE and END ALL buttons, while plugging in the power supply
- All buttons will flash 4 times, then turn off. Release TAKE and END ALL buttons. All buttons will illuminate within 5 seconds.
The DT18 IP address has now been reset to the factory default IP address 192.168.18.160.
(5) How to know everything is communicating
Three things will happen when a PlaybackPro Plus system is properly configured:
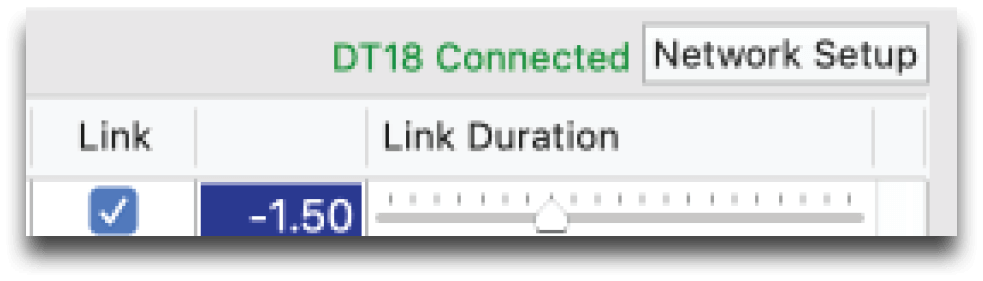
- In the Network Setup dialog box, the yellow “DT18 Listening” text will change to green “DT18 Connected”
- The associated Channel Button on the DT18 will change from flashing to on
- The playback system will receive commands from the DT18 controller

PlaybackPro Plus Advanced Settings
The “Network Setup” button is used to put the software into different listening modes. Options include TCP, UDP, DT Videolabs SimpleSync and the DT18.
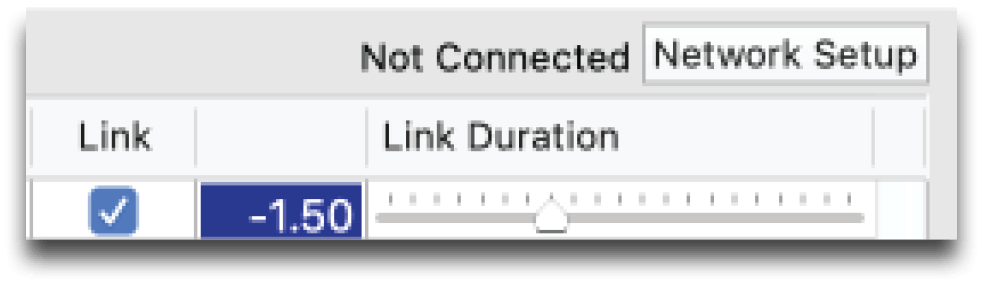
Select “DT18 Controller” from the Connection dropdown to put PlaybackPro Plus into the listening mode and display the Connection Settings. PlaybackPro Plus will now be listening for the DT18 controller.
With a successful connection, the text color will change to green and indicate “DT18 Connected” in the dialog box and the program interface.
Connection Settings
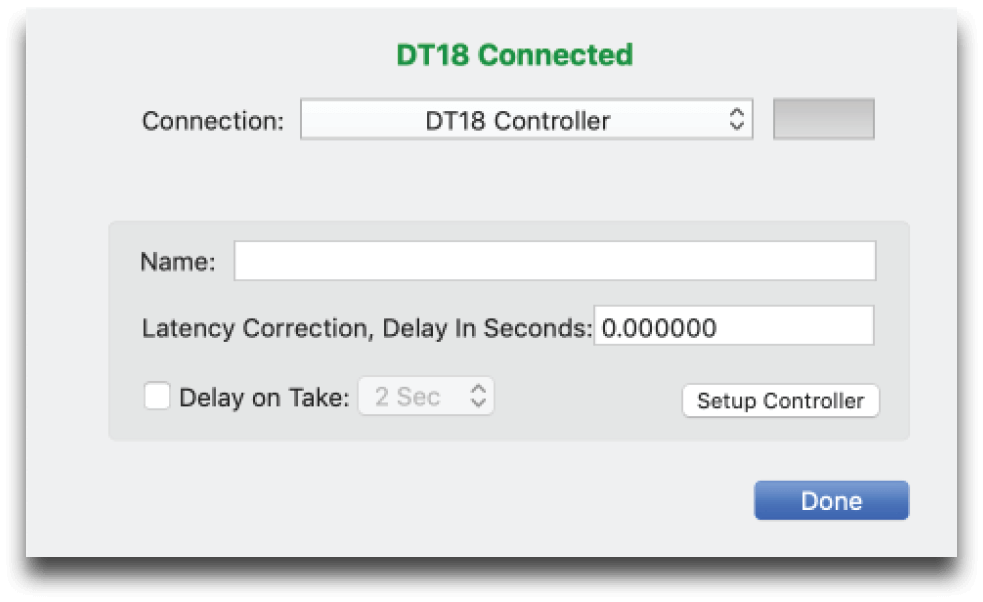
Connection settings are available after the DT18 is selected as a remote control device in PlaybackPro Plus. The settings are for the specific playback system and not for other connected systems or the controller. The only exception is the “Setup Controller” function which changes the IP address on the controller itself as described in Section 3.2.1.
Latency Correction
When using systems with varying performance it may be necessary to delay the execution of commands received from the DT18. Adding a delay on faster systems will allow more uniform command execution. The delay may be entered in seconds and portions of seconds to tweak the accuracy of the delay.
Delay on Take
The “Delay on Take” function allows a specified delay after receiving the “Take” command from the DT18. This can be beneficial when using a primary / backup configuration to have the backup system begin playback slightly after the primary system.
Setup Controller
When the DT18 controller is connected to a system, the “Setup Controller” button will appear will appear in the Nework Setup dialog box. This button is used to change the IP address of the DT18 controller as described in Section 3.2.1.

Managing Playback Connections
Each of the 4 channel buttons corresponds to a playback system at a specific IP address. The channel buttons will be assigned from left to right, the lowest IP address to the highest.
The channel buttons have three modes - engaged, disengaged and searching.
Engaged: The corresponding playback system will indicate “DT18 Connected” and the DT18 channel button is on. Commands will be sent from the controller and accepted by the playback system.
Disengaged: The corresponding playback system will continue to indicate “DT18 Connected”, however, commands will not be sent from the controller to the playback system and the channel button will be off.
Searching: The button will flash while it is searching for a playback system.
To engage a DT18 network connection
Press a disconnected (off) Channel Button once
- The button will turn on and begin flashing as it searches for a connection
- The button will stop flashing when a connection is established
- The corresponding playback system will show “DT18 Connected”
To disengage a DT18 network connection
Press a connected (on) Channel Button once
- The channel button will turn off
- The corresponding playback system will continue to show “DT18 Connected” but no commands will be received from the DT18
Operation

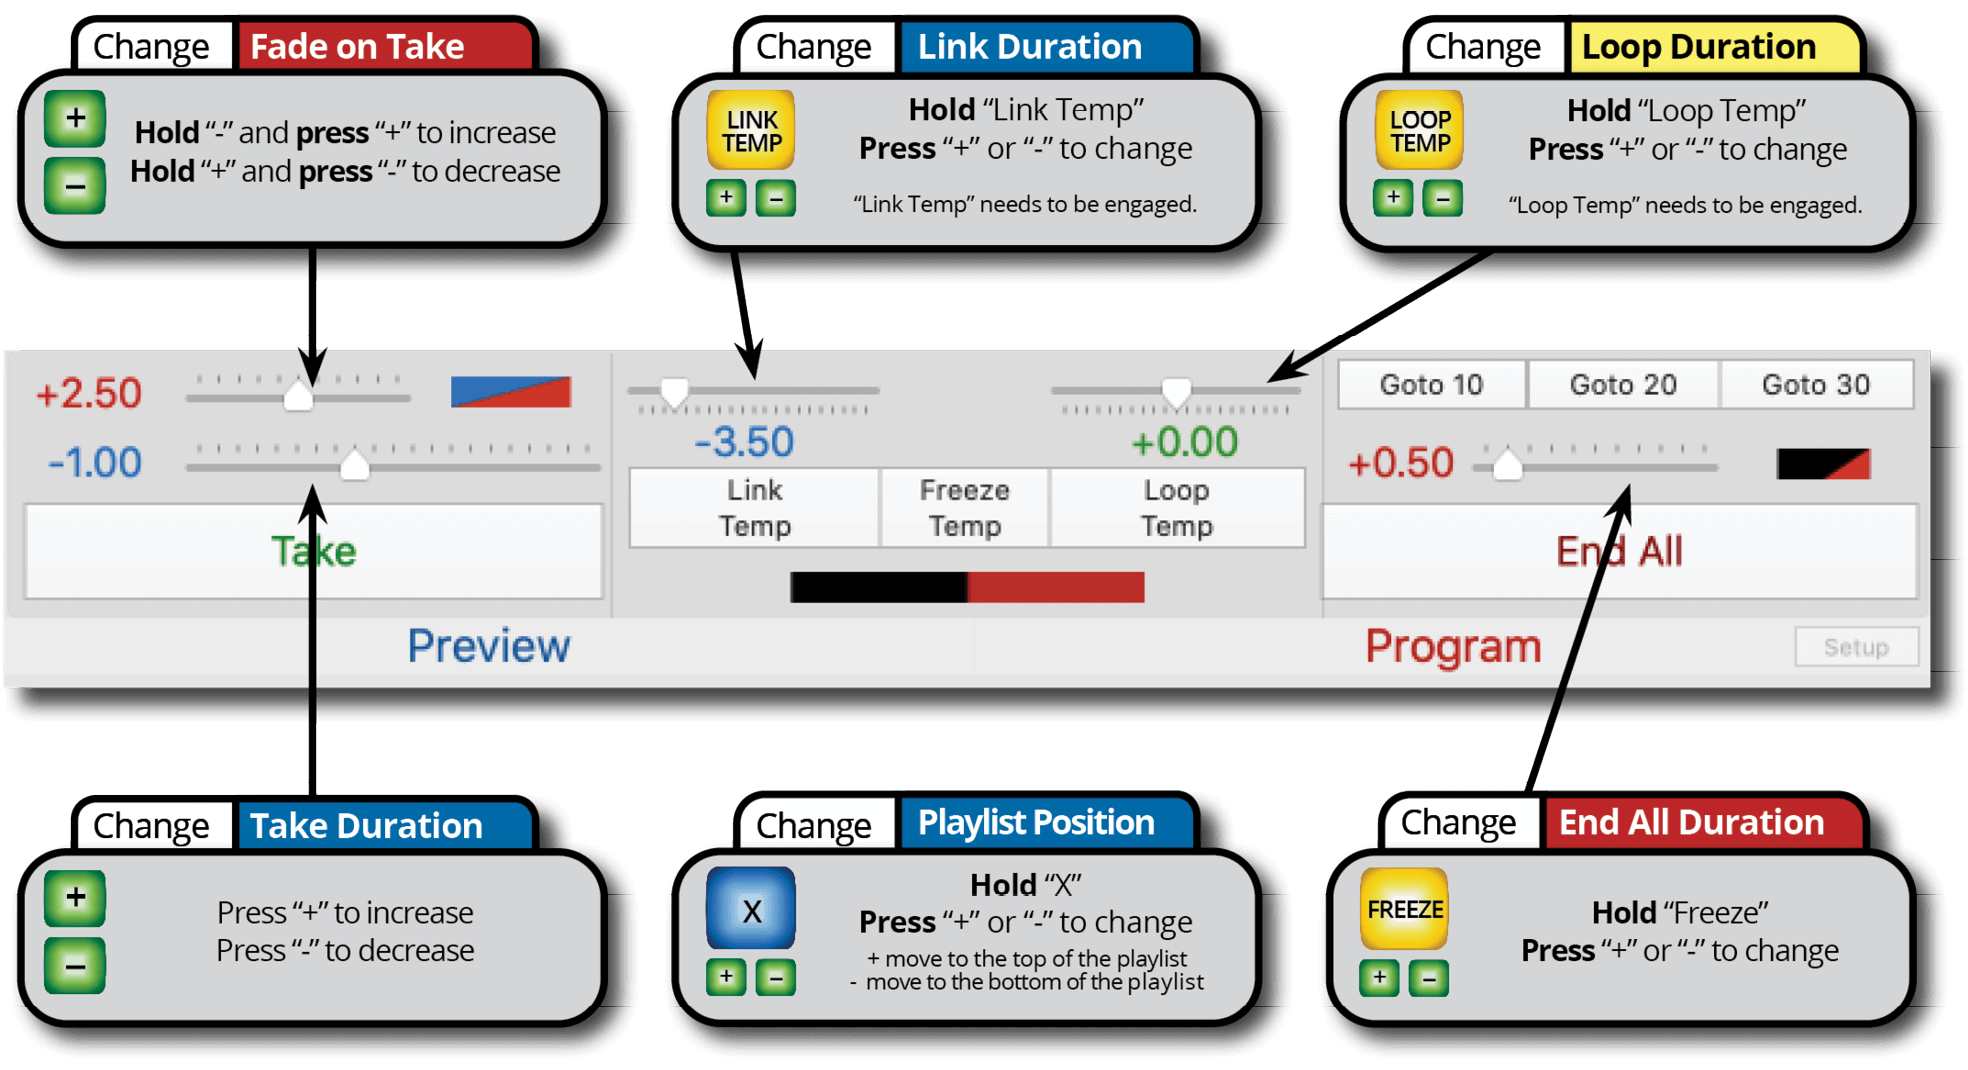
Playback Control Functions
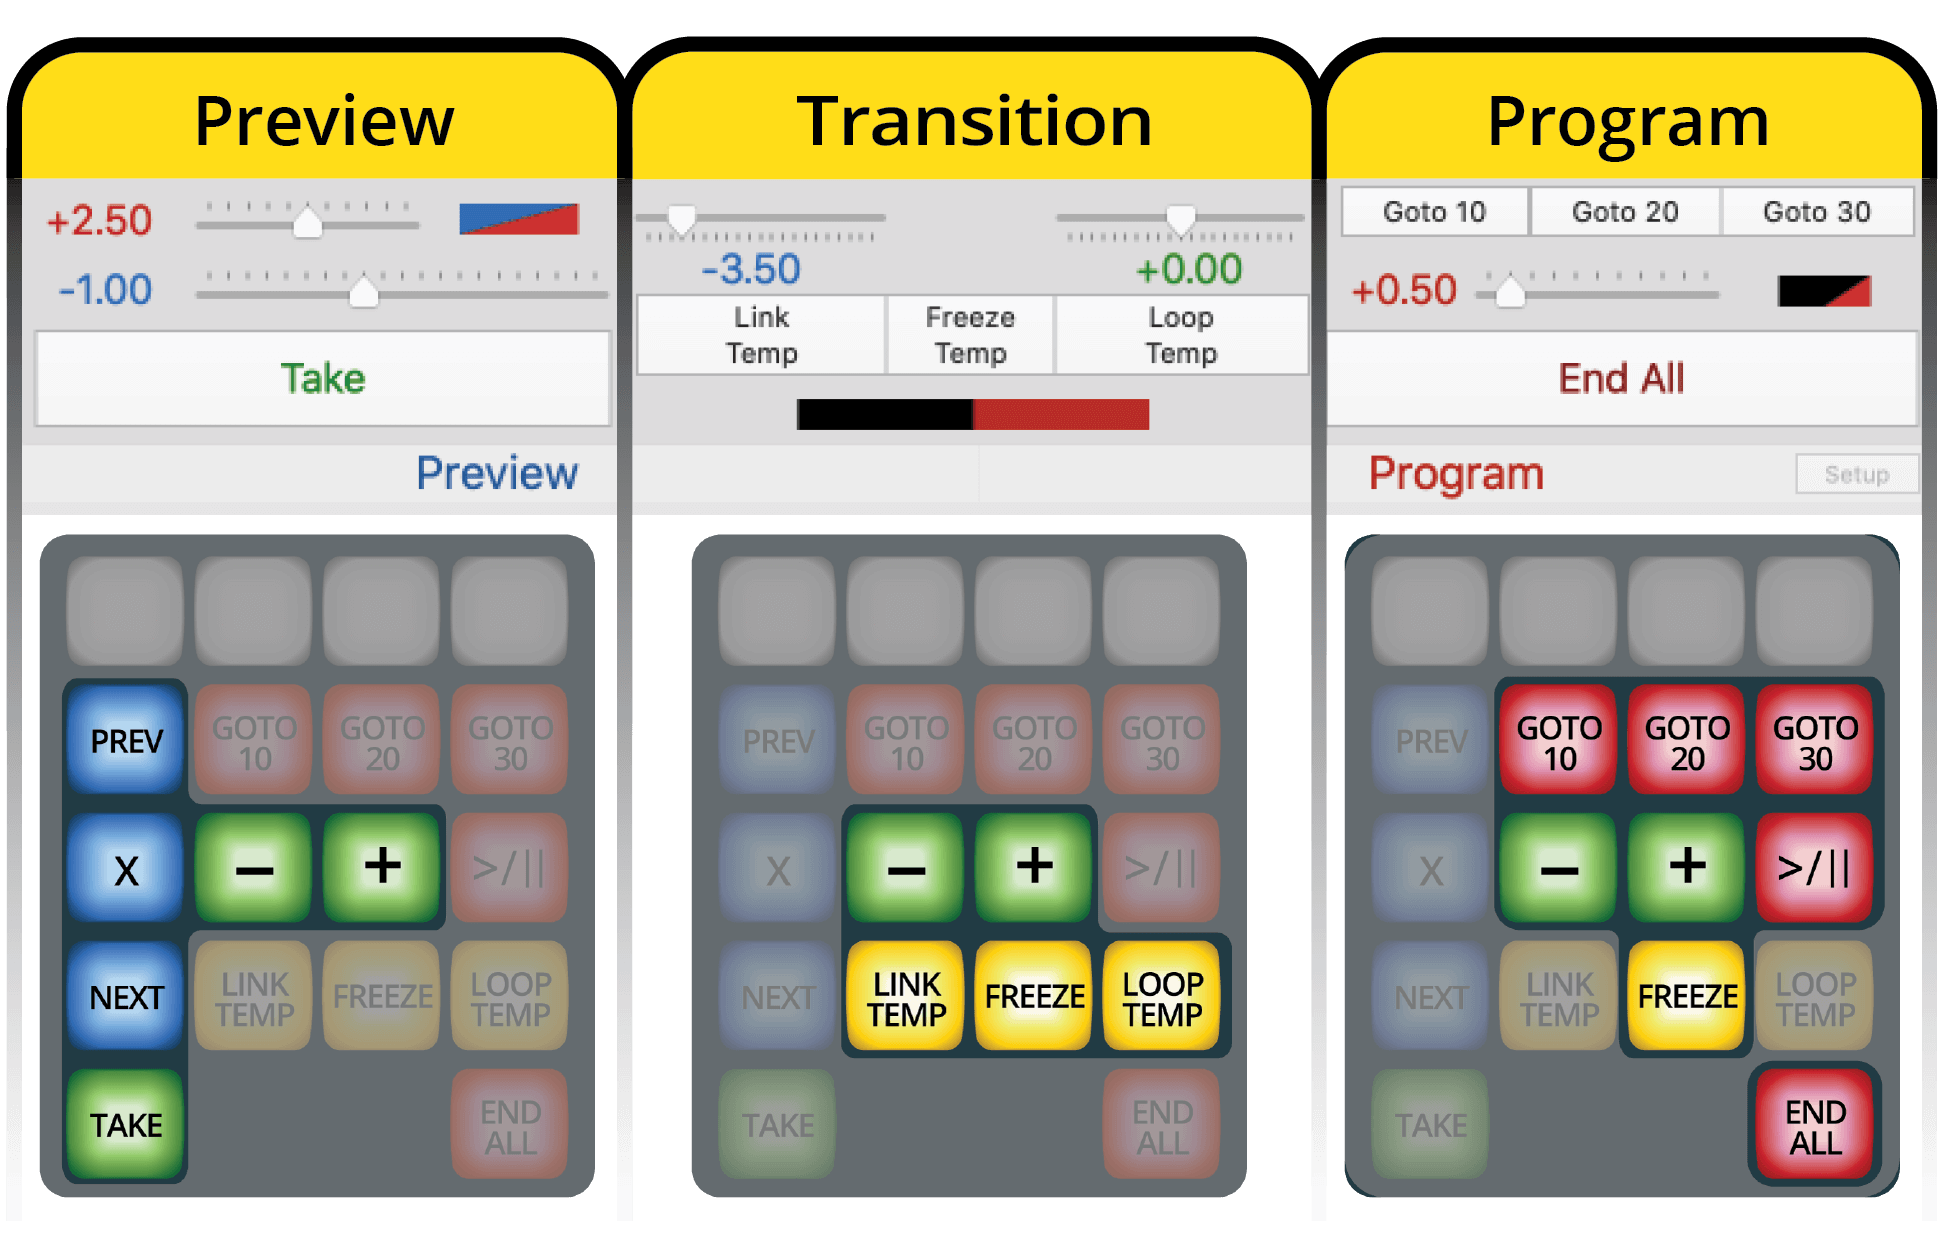
Preview

Moves the blue selection bar in the Playlist up to the previous clip

Clears the selection in the Playlist

Moves the blue selection bar in the Playlist down to the next clip

Transitions a clip from Preview to Program and starts playback


Increases Take Duration

Decreases Take Duration


Increase Fade On Take Duration
Decrease Fade On Take Duration
Go to beginning of playlist and load clip into Preview
Go to end of playlist and load clip into Preview
Transitions

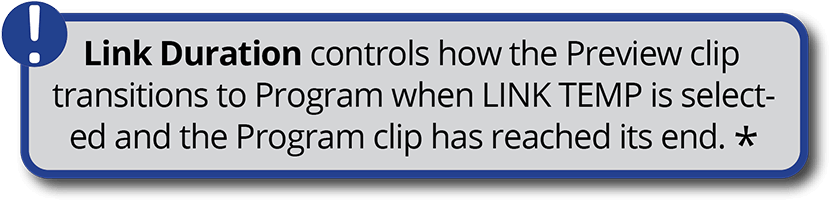
The next clip in the Playlist will be selected and played at the end of the Program clip
Increase Fade On Take Duration
Decrease Fade On Take Duration

The Program clip will stop and hold on the last frame of the Program clipuntil the FREEZE button is pressed again, TAKE is used to start another clip or END ALL is pressed

A Program clip will play again when it reaches the end

Increase Loop Duration
Decrease Loop Duration
Program

Moves the Program playhead to 10 seconds from the end of the clip

Moves the Program playhead to 20 seconds from the end of the clip

Moves the Program playhead to 30 seconds from the end of the clip
Toggles Pause and Play of the Program clip

Ends playback of Program clip

Increase Fade On Take Duration
Decrease Fade On Take Duration


Playback Control Key Combinations

Controller Settings
Customizing DT18 IP Settings
The DT18 IP address can be changed to any value within the accepted range of 0-255 . 0-255 . 0-255 . 0-250.
Changing the IP requires four steps:
(1) Configure macOS networking
If you need to change the controller IP address you must first connect your Mac to the DT18 using the steps outlined in the “Connecting your systems” section of this User Guide. Acceptable IP number ranges for the DT18 are 0-255 . 0-255 . 0-255 . 0-250.
(2) Change the IP address of the DT18 Controller
Select “Network Setup” and then “Setup Controller” on any of the connected playback systems. Enter the IP address you wish to use for the controller and click “Update”. PlaybackPro Plus will then send the new IP address to the controller. All buttons on the controller will flash 3 times to show the IP address change has occurred.

(3) Change the IP address of the DT18 Controller
The IP address of each playback system will need to be changed to the next sequential addresses. For example, if the DT18 IP address is changed to 192.168.1.200, the PlaybackPro Plus system’s IP addresses will need to be:
192.168.1.201
192.168.1.202
192.168.1.203
192.168.1.204
The Channel Buttons will stop flashing as each connected system IP address is updated.
(4) Confirm everything is communicating
The IP address of each playback system will need to be changed to the next sequential addresses. For example, if the DT18 IP address is changed to 196.168.0.200, the PlaybackPro system’s IP addresses will need to be:
- The PlaybackPro Plus Network Setup dialog box will show “DT18 Connected”
- The channel buttons for any attached system will not be flashing. They will be on or off depending on whether the channel button is engaged.
Reset Controller to Factory IP Address
The factory default IP address of the controller is 192.168.18.160. We recommend this setting so the controller and playback systems are always operating in their default modes. Resetting the default IP requires three steps.
- Unplug the DT18 power supply
- Press and hold TAKE and END ALL buttons, while plugging in the power supply
- All buttons will flash 4 times, then turn off. Release TAKE and END ALL buttons. All buttons will illuminate within 5 seconds.

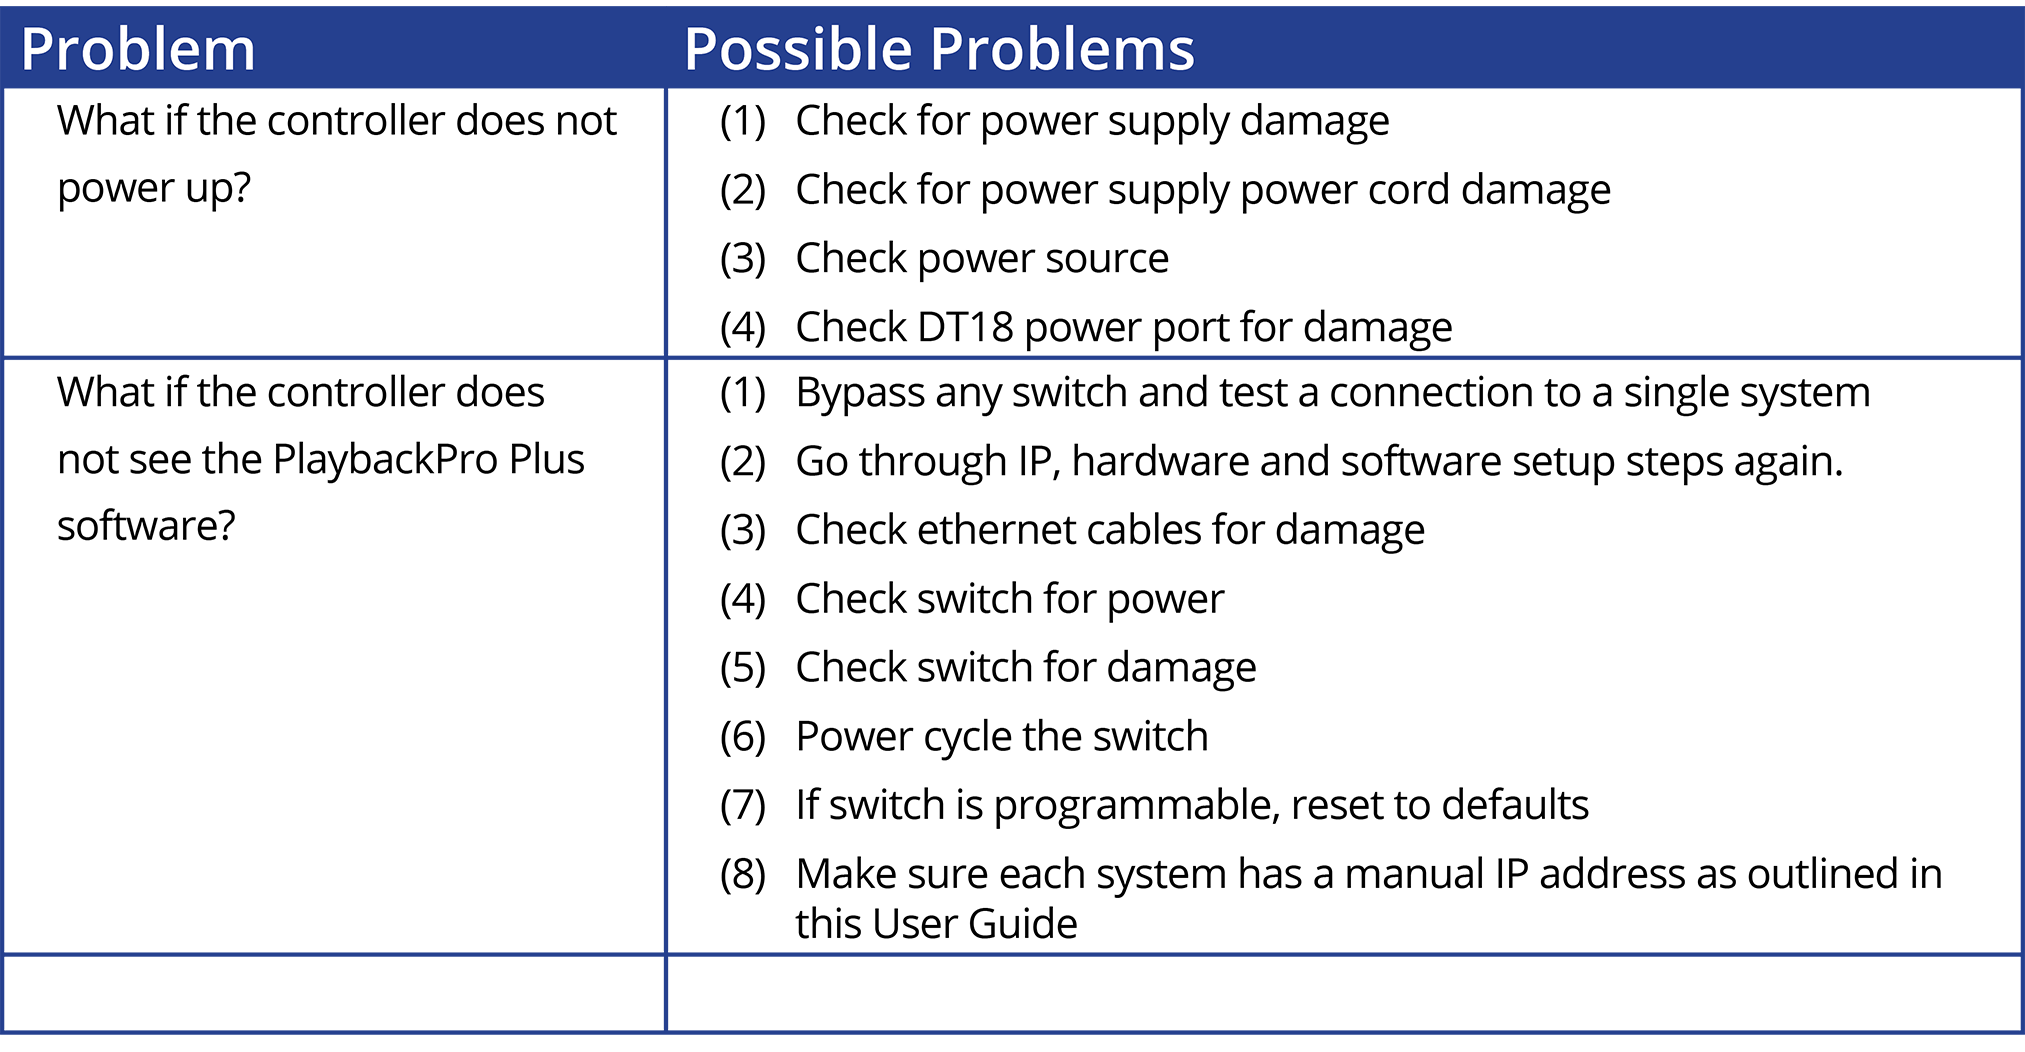
Troubleshooting
For help with troubleshooting please contact DT Videolabs at email technical@dtvideolabs.com. or (602) 687-8507.
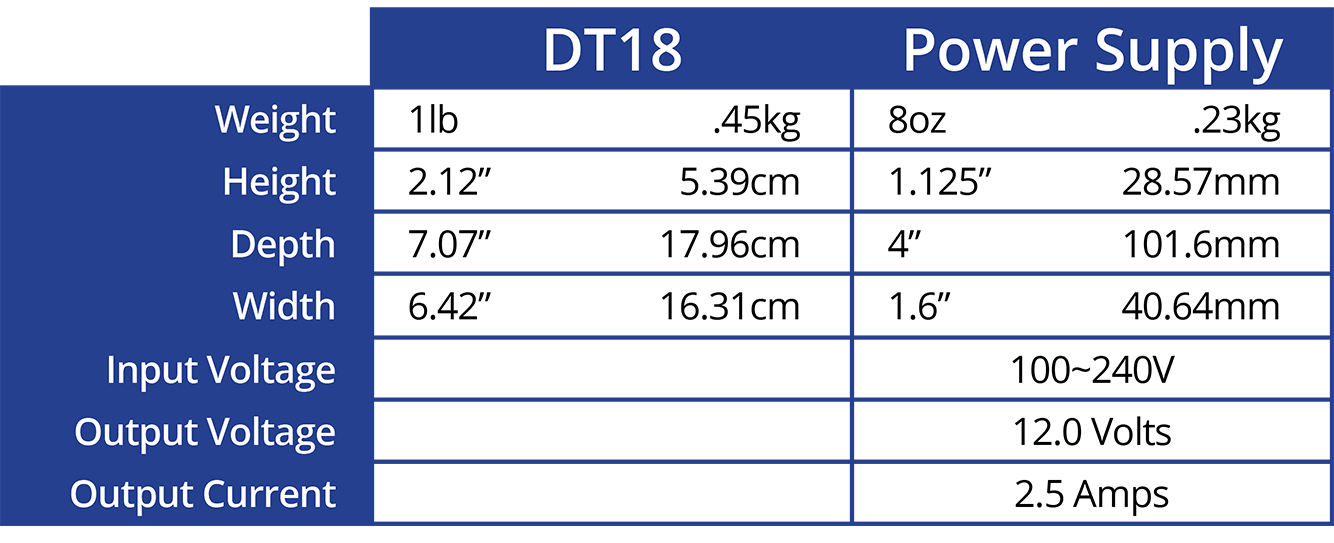
Technical Specifications